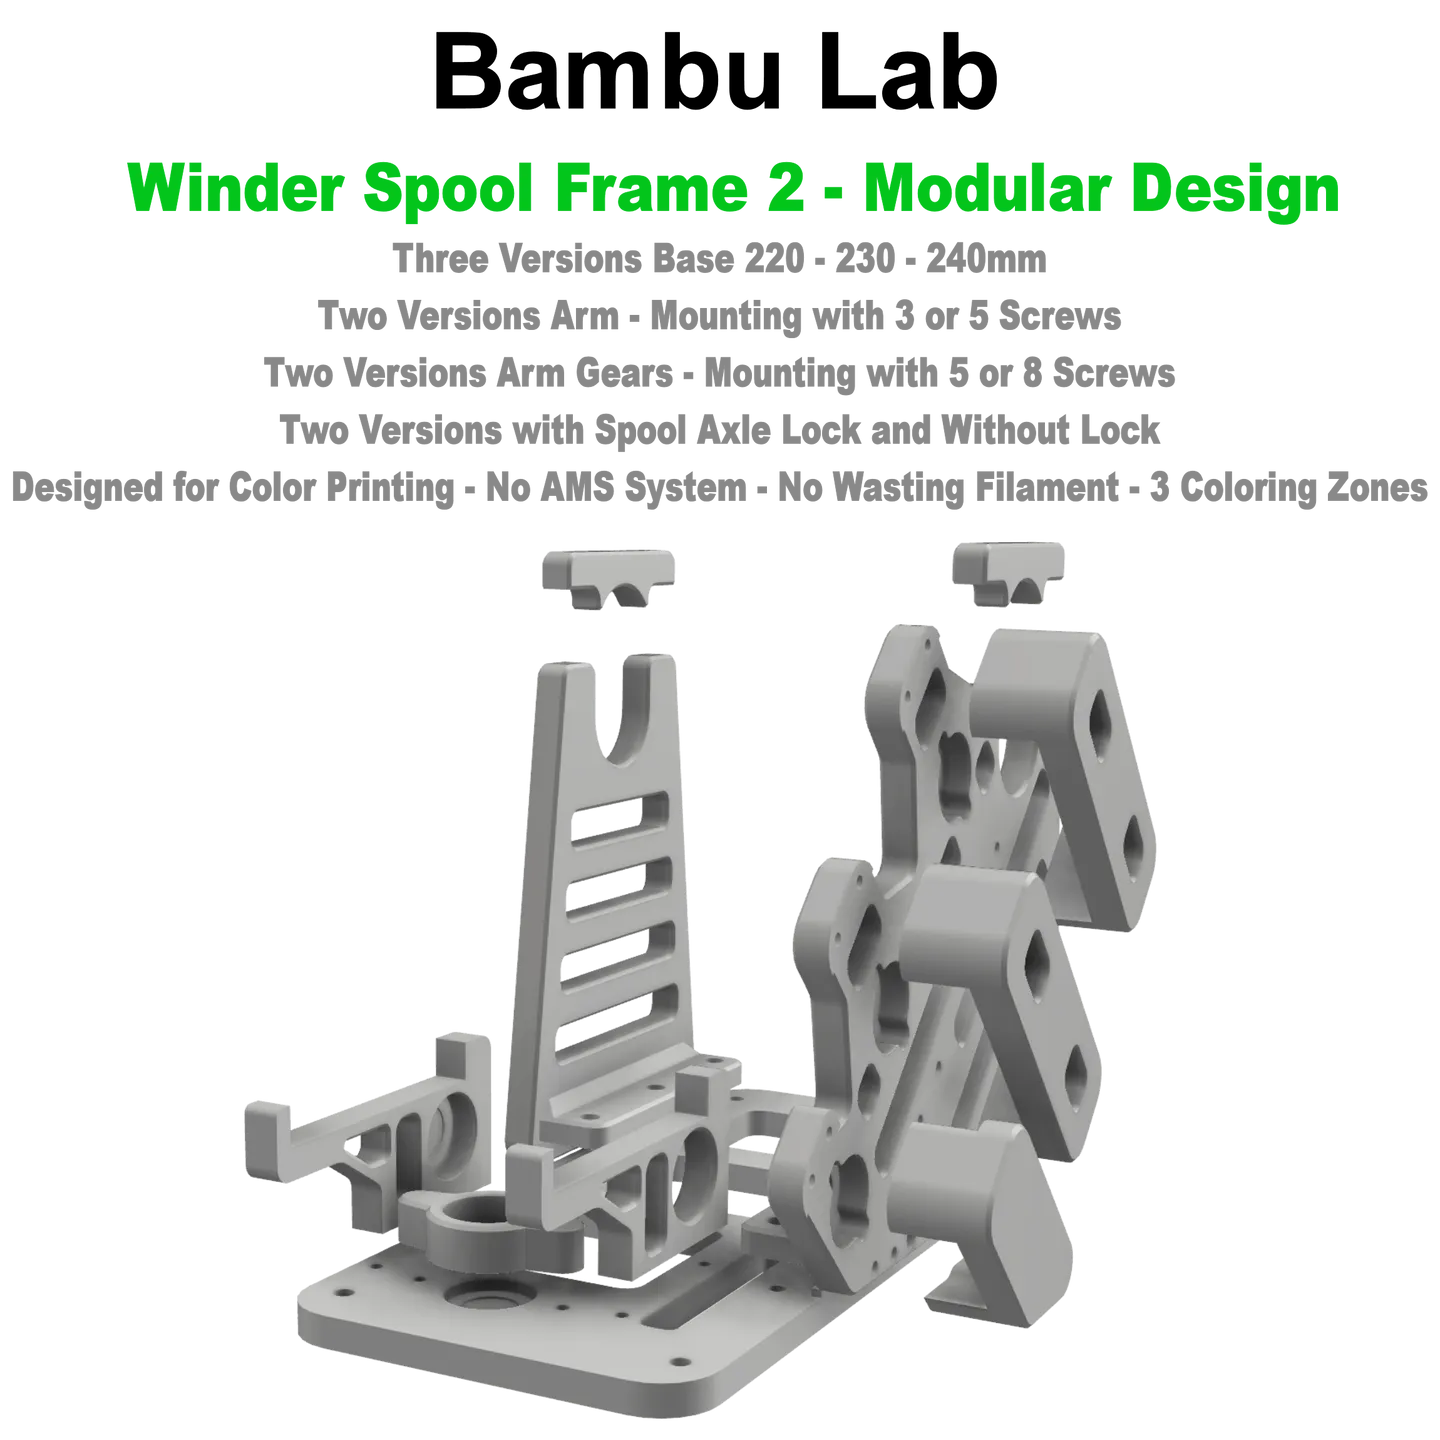
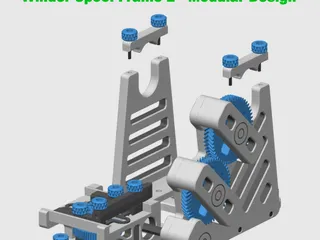
Bambu Lab - Winder Spool Frame 2 - Modular Design


Opis
PDF
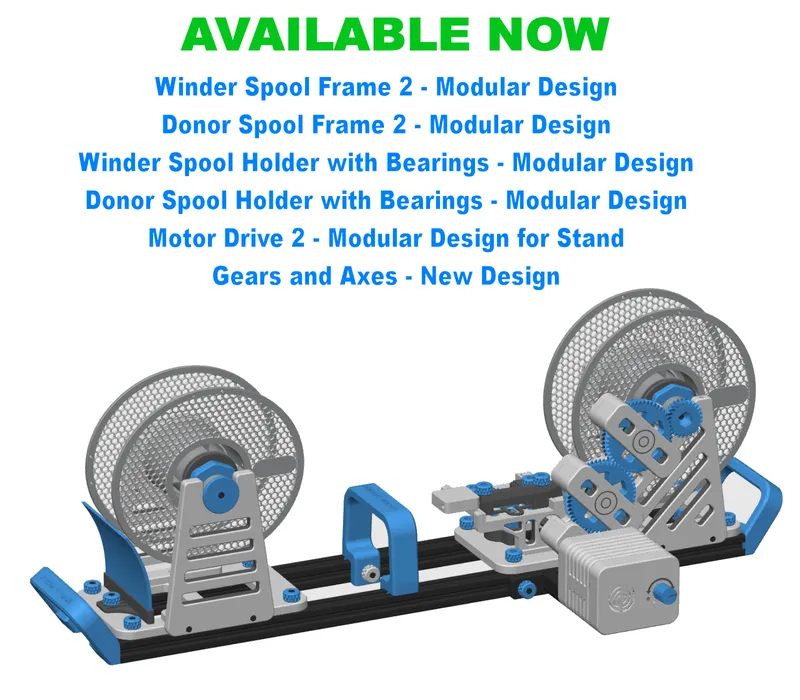


This is a Remix “Winder Spool Frame 2 - Modular Design” for an amazing project "Filament Spool Switcher & Winder" Design by @MiklosKiszely_486882
BEFORE STARTING THE PROJECT, YOU SHOULD CALIBRATE THE PRINTER AND FILAMENT AND PRINT THE "SIZE TEST.STL" FILE TO CHECK THE ACCURACY OF THE DIMENSION. DO NOT START IMPLEMENTING THE PROJECT WITHOUT PRINTING A TEST FILE AND MAKING MEASUREMENTS. BE SURE TO READ THE ENTIRE DESCRIPTION BELOW AND SEE THE PHOTO GALLERY !!!
IF YOUR PRINTER AND FILAMENT ARE NOT PROPERLY CALIBRATED, DON'T BLAME ME THAT SOMETHING WILL NOT FIT EACH OTHER. USE THE TIPS BELOW TO MAKE THIS PROJECT GO SMOOTHLY
IMPORTANT NOTE :
- THE ORIGINAL SPOOL AXLE IS NOT COMPATIBLE WITH THIS DESIGN BECAUSE THE FRAME IS THICK. PLEASE USE MY OTHER DESIGN "Winder Spool Holder with Bearings"
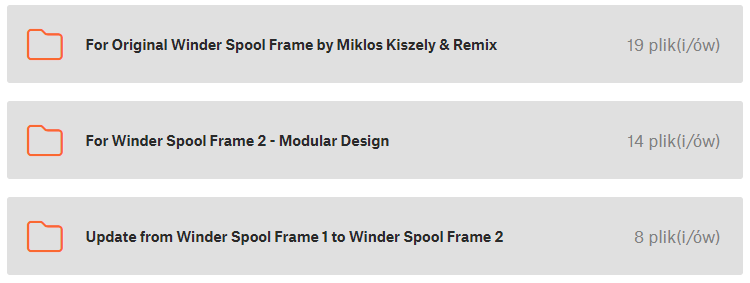
https://www.printables.com/pl/model/740644-winder-spool-holder-with-bearings-for-bambu-lab-fi - IN EVERY OTHER RELATED PROJECT THERE ARE APPROPRIATE CATALOGS CONTAINING THE COMPONENT VERSION FOR WINDER SPOOL FRAME 2 - MODULAR DESIGN AND THE UPDATE FROM WINDER FRAME 1 TO WINDER FRAME 2 - MODULAR DESIGN. YOU DON'T HAVE TO PRINT EVERYTHING FROM THE BEGINNING IF YOU WANT TO USE A NEW VERSION OF THE DESIGN
- TO FULLY COMPLETE THE PROJECT, DOWNLOAD THE REMAINING ITEMS FROM THE LINK BELOW
https://www.printables.com/pl/@Damian27/collections/1304611
Hello Everyone
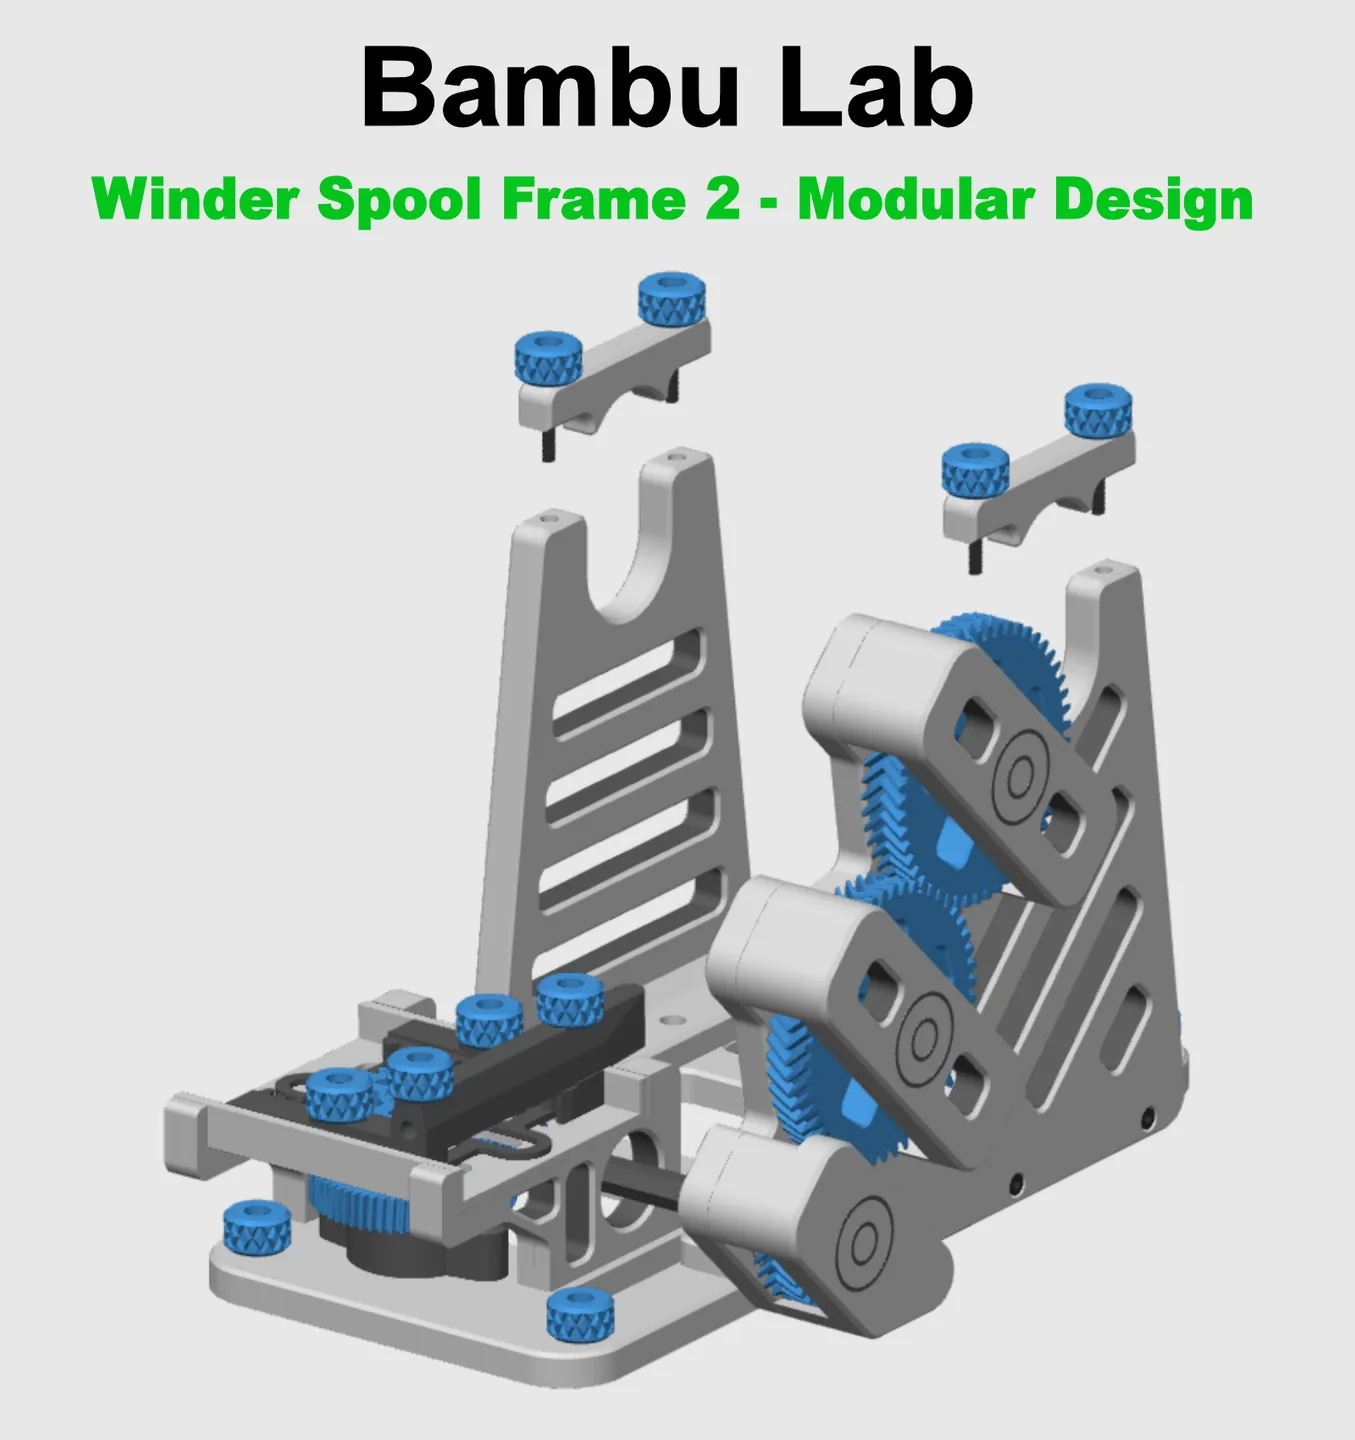
It's been almost 8 months since I started using all my remixes for the “Filament Spool Switcher & Winder” project. During this period, I rewindet almost 300 spools of filament. Due to such intensive use, I found another problem, namely excessive friction on the spool axes. I noticed that with such intensive use, the winder frame on the side of the gears was worn off and melted by friction. I decided to design a Winder & Donor Spool Holder from scratch and added bearings. Thanks to this modification, friction on the spool axis no longer occurs and the motor does not lose torque during rewinding. Due to the damage to the Winder Spool Frame, I had to reprint the frame, but I didn't do it. I decided to design “Winder & Donor Spool Frame 2 - Modular Design” from scratch, which consists of modules. Each element of the framework of both projects will be printed individually. If something is damaged, you can print one element and not the entire structure. Additionally, I made many modifications and the entire structure after assembly is several times stiffer and stronger because each element is printed horizontally and the printing process itself is easier and without the risk that the entire project will end up in the trash because something went wrong during printing. In this case, you will lose at most one element of the structure.
Take into account that I designed “Winder Spool Frame 2 - Modular Design” for myself according to my requirements and needs. This does not mean that you have to agree with it and you have every right to do so. Even though I would like to, I cannot please everyone. Take it into consideration. I'm writing this only because even before I published the project and already shared photos of the project, I received private messages like: why the construction of a module whose assembly will take more time than printing one ready-made element ? or why did I use so many mounting points? or will the assembly be done with nuts or hot threads? e.t.c When I answered these questions, many times these people later complained to me that the project was bad and different from what they expected and should be consistent with their idea, not mine. Remember that no one is forcing you to complete this project. You can always choose the one that suits you or you can design it according to your own vision. Our 3D Printing community should support each other and not hate each other before the project has even been published. Happy printing and have fun with the project
When you complete the project, please share a photo and a comment. Thank you and have a nice day.
BEFORE IMPLEMENTING THE PROJECT AND FINAL ASSEMBLY, PLEASE COMPLETE THE FOLLOWING STEPS :
- Print the "Test Size.stl" file to check the correct calibration of the printer and filament.
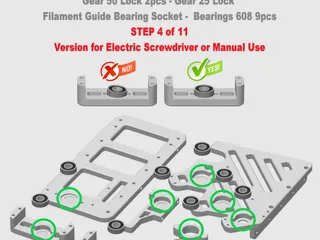
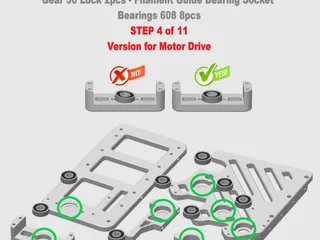
Make measurements of the purchased bearings and the bearing seat in the printed "Test Size.stl" file. The dimensions should be similar to those shown in the photo. If your bearing is the correct size but the bearing seat is not, grind it to match the size. I performed the test by deliberately reducing the bearing seat to a diameter of 21.8 mm and installed the bearing without any problems. So I assume that this is the maximum error tolerance. It is better for the bearing seat to be too small than too large because only the central part of the bearing has to rotate - By clicking on the photo you can enlarge it
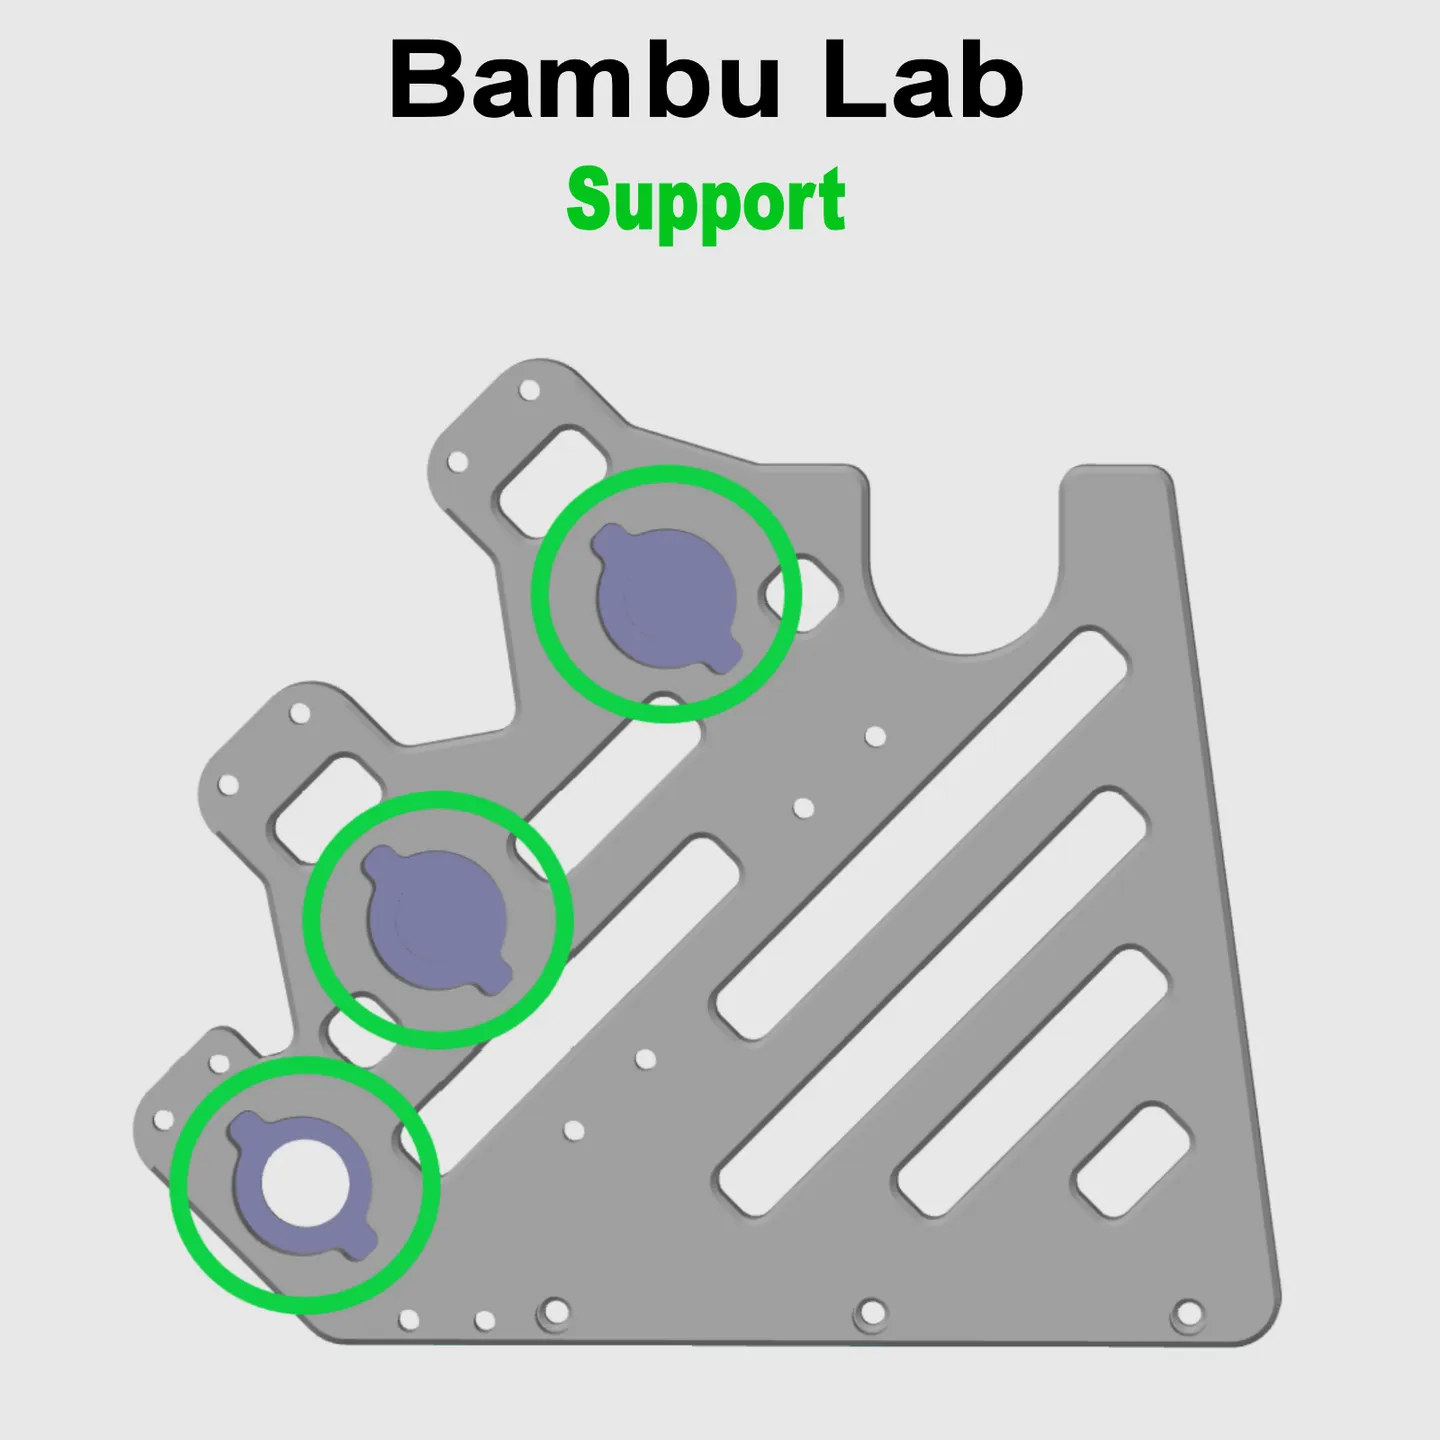
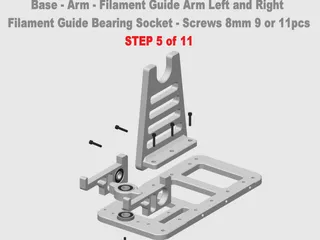
- Bearings must be mounted flush in their seats and must not protrude beyond the structures. If the bearing protrudes from any element, proper installation will not be possible. You can use the bearing installation tool included in the project files which will allow you to properly align the bearing. All structure elements are printed horizontally, so do not worry that any of the elements will be damaged during the installation of the bearings - By clicking on the photo you can enlarge it

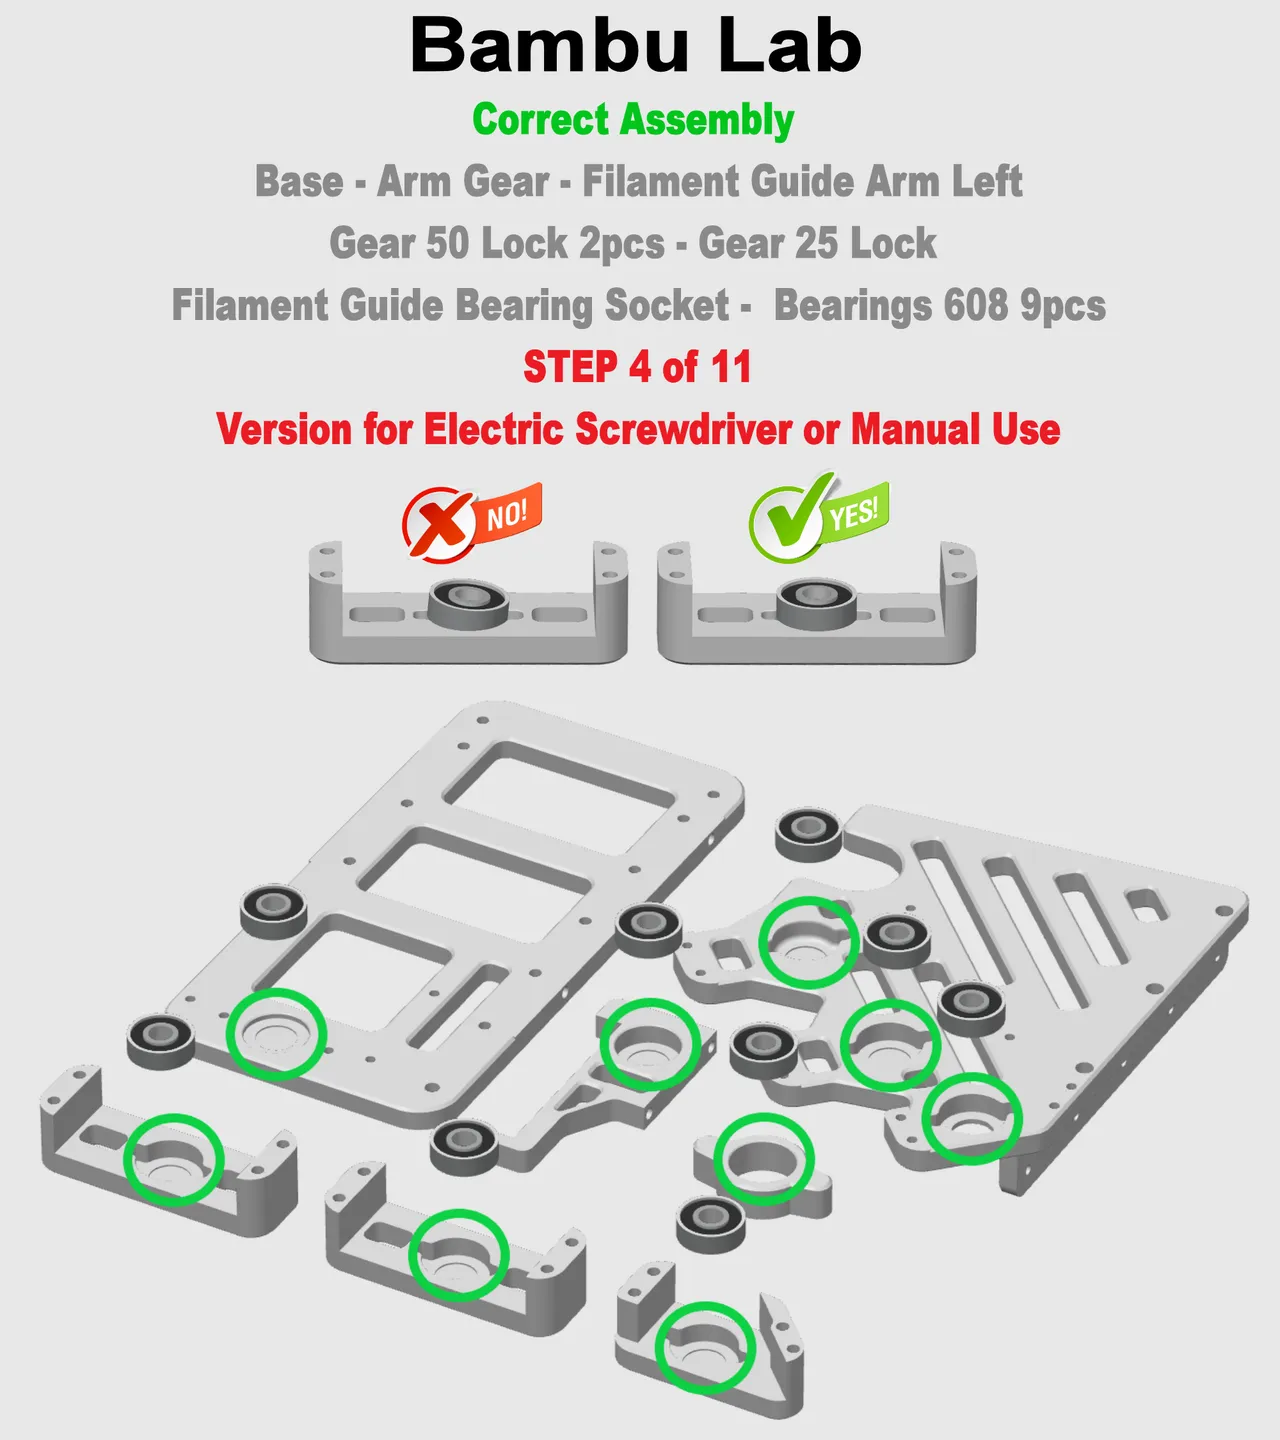
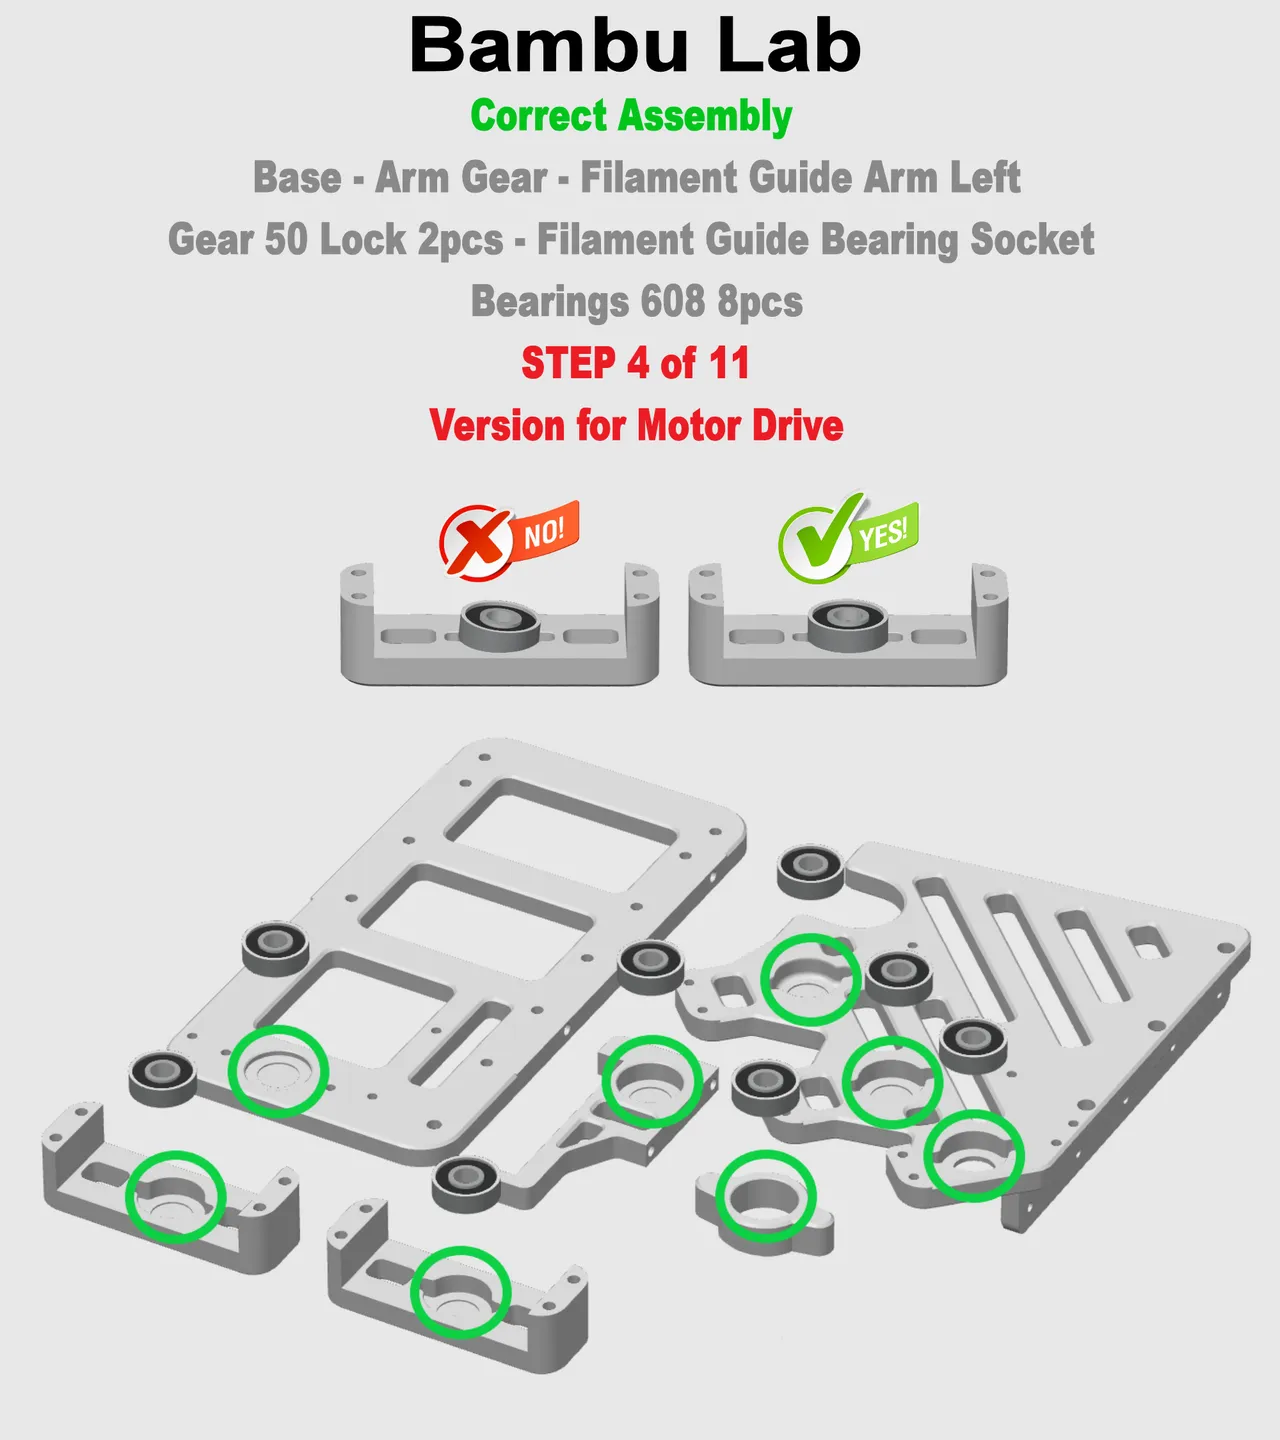
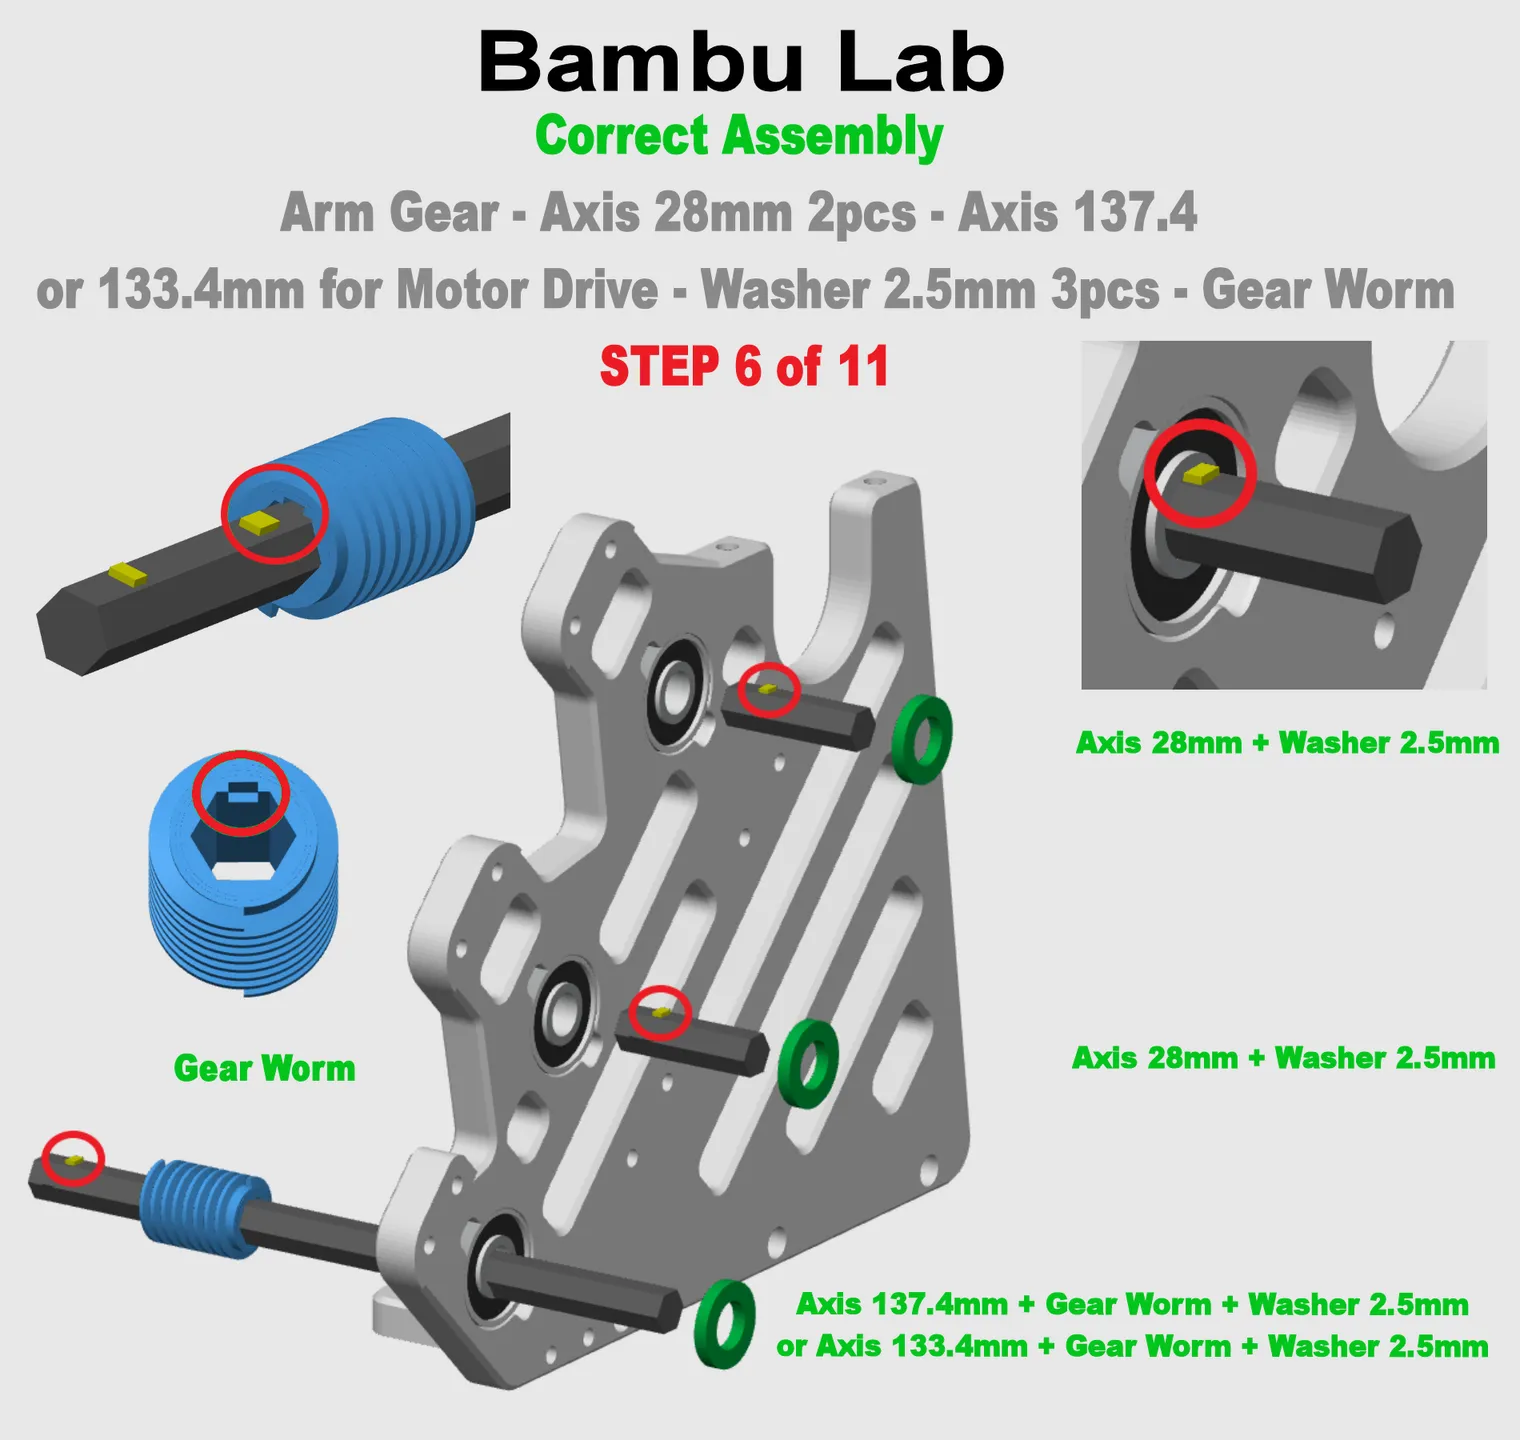
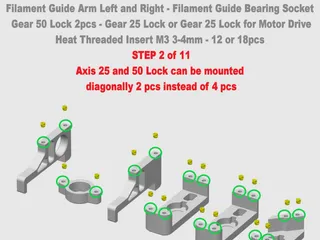
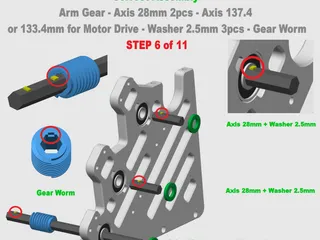
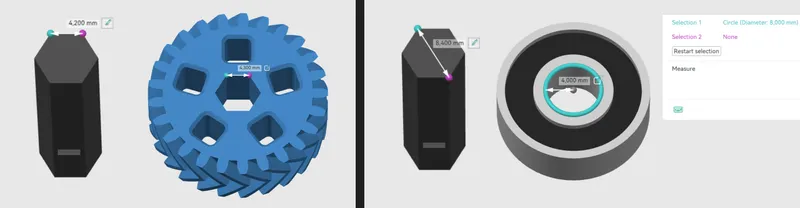
- Each of the 6 sides of the hexagonal axes is 4.2 mm long and each of the 6 sides of the hexagonal gear socket is 4.3 mm long. Therefore, the axles should fit the gears without any problems because they have a dimensional reserve. However, hexagonal axes have a diagonal of 8.4 mm and the bearings have an internal diameter of 8 mm, so they should fit quite tightly with the bearings. This is intentional and not a design flaw. Thanks to this, the gears will work in their axis during operation. If the axle is loose in the bearing, the gears will wobble sideways. I tested with a smaller axle size but it didn't work.
Before you start the final assembly, install and disassemble each axle on both sides to the bearing. Repeat the same step with the gears, installing them on the axles and dismantling them. Repeat this operation in both cases about 3-4 times. This will make the final assembly much easier because the parts will be matched to each other. If you skip this step, it may damage the lock on the axles, which will result in incorrect assembly because the axle will move during assembly and rub against the frame - By clicking on the photo you can enlarge it
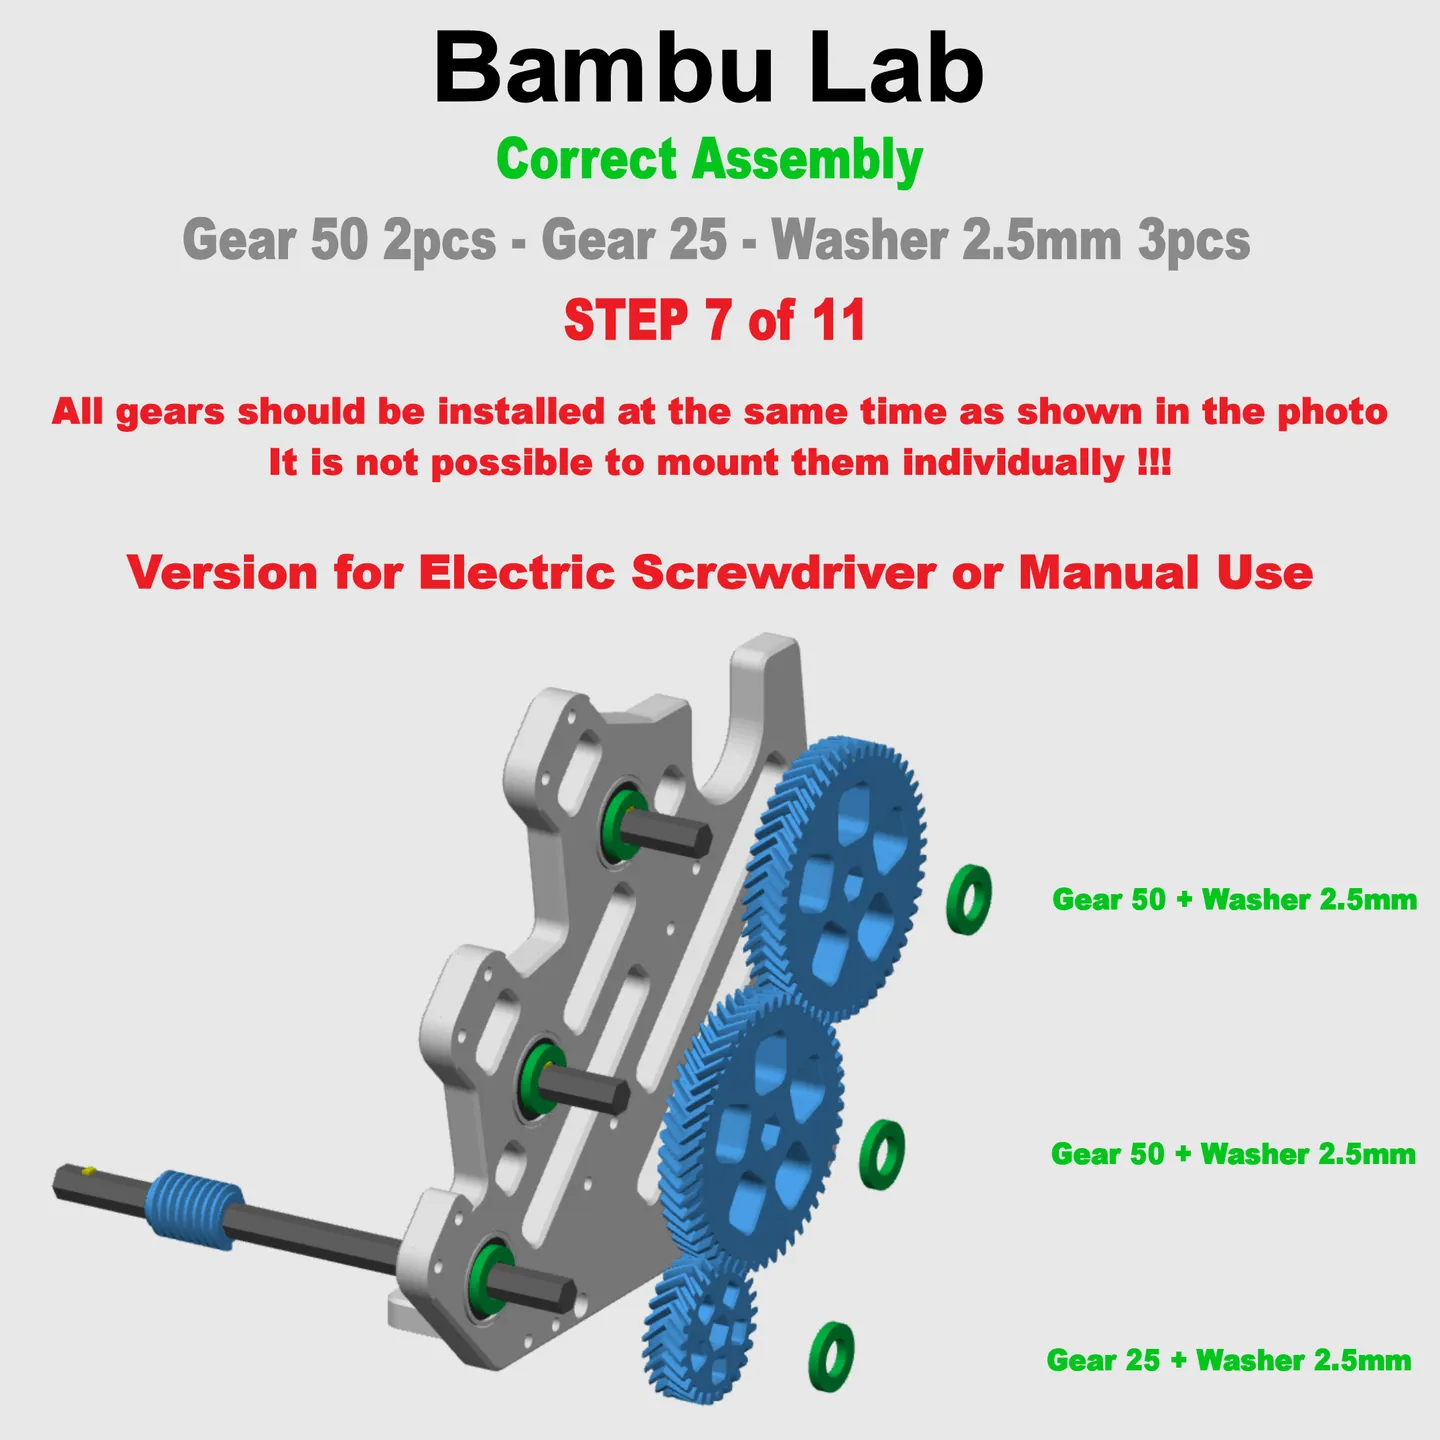
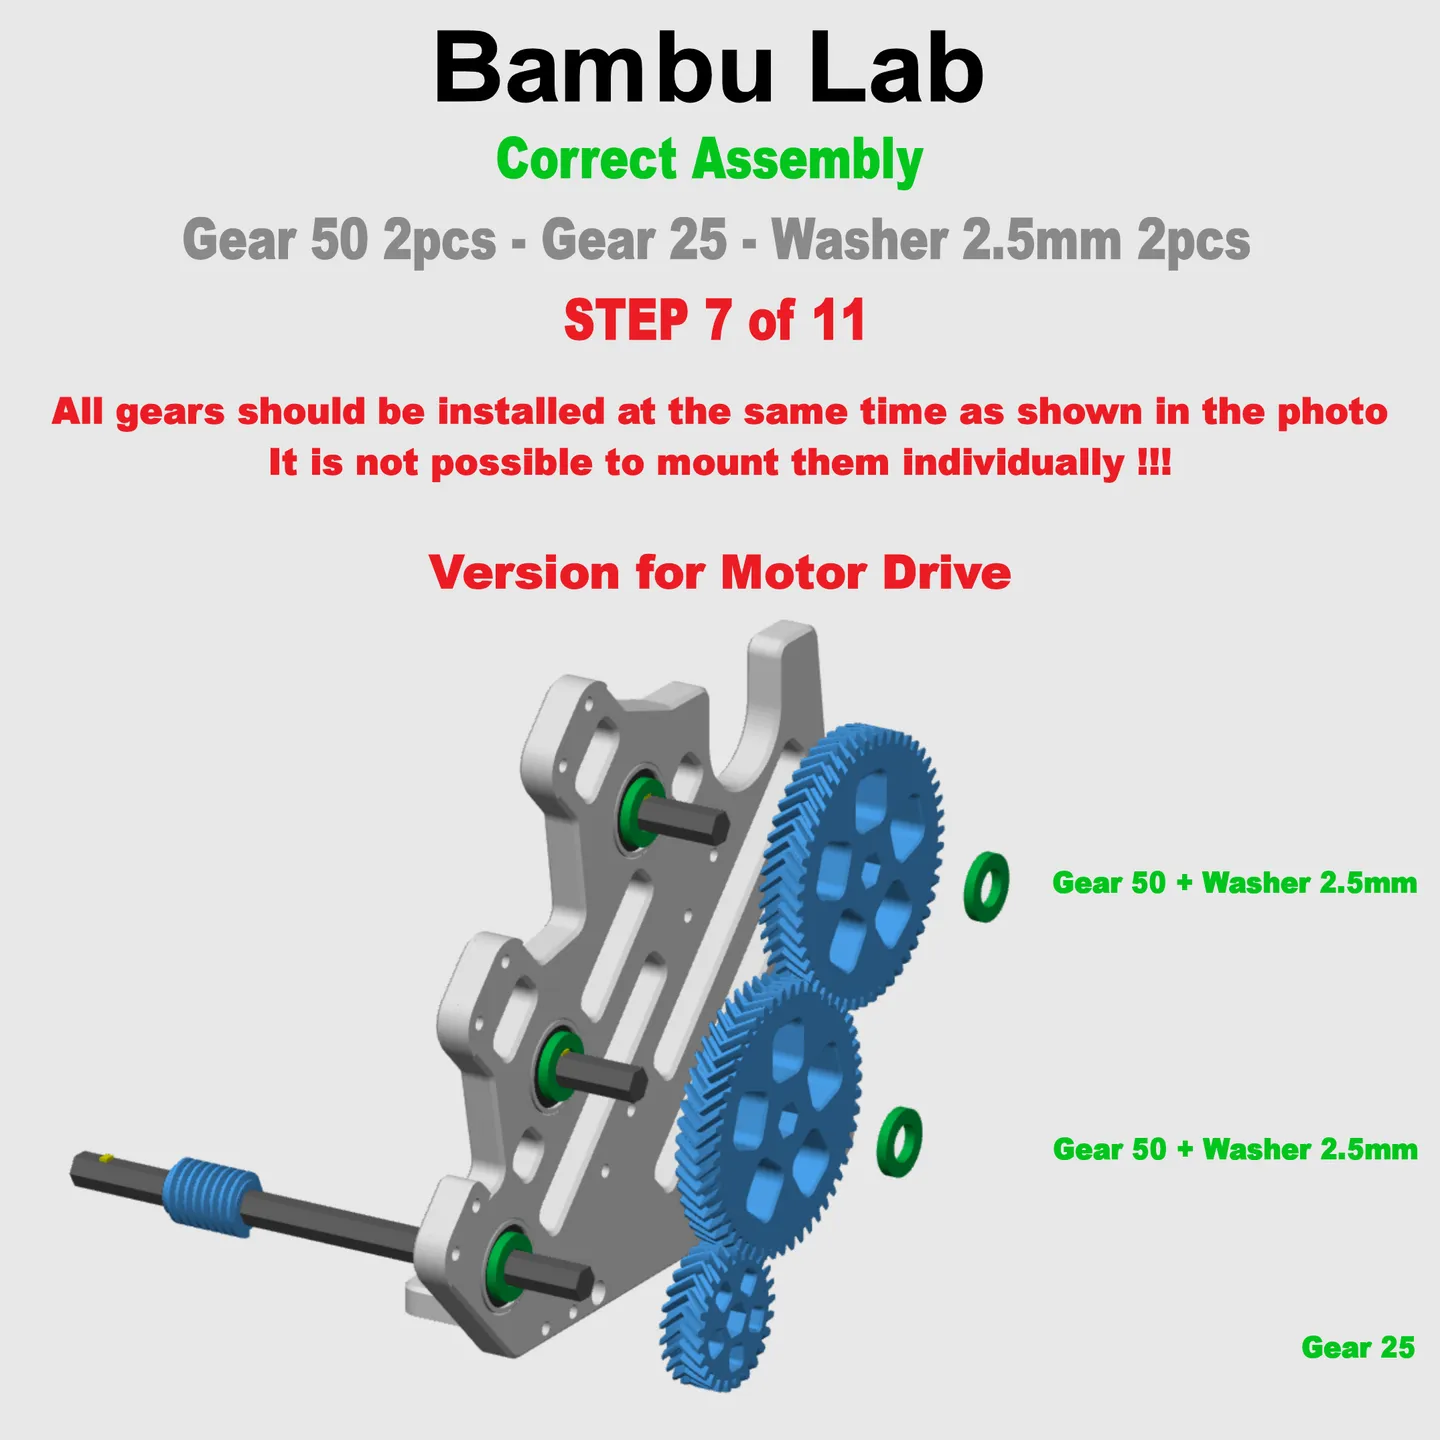
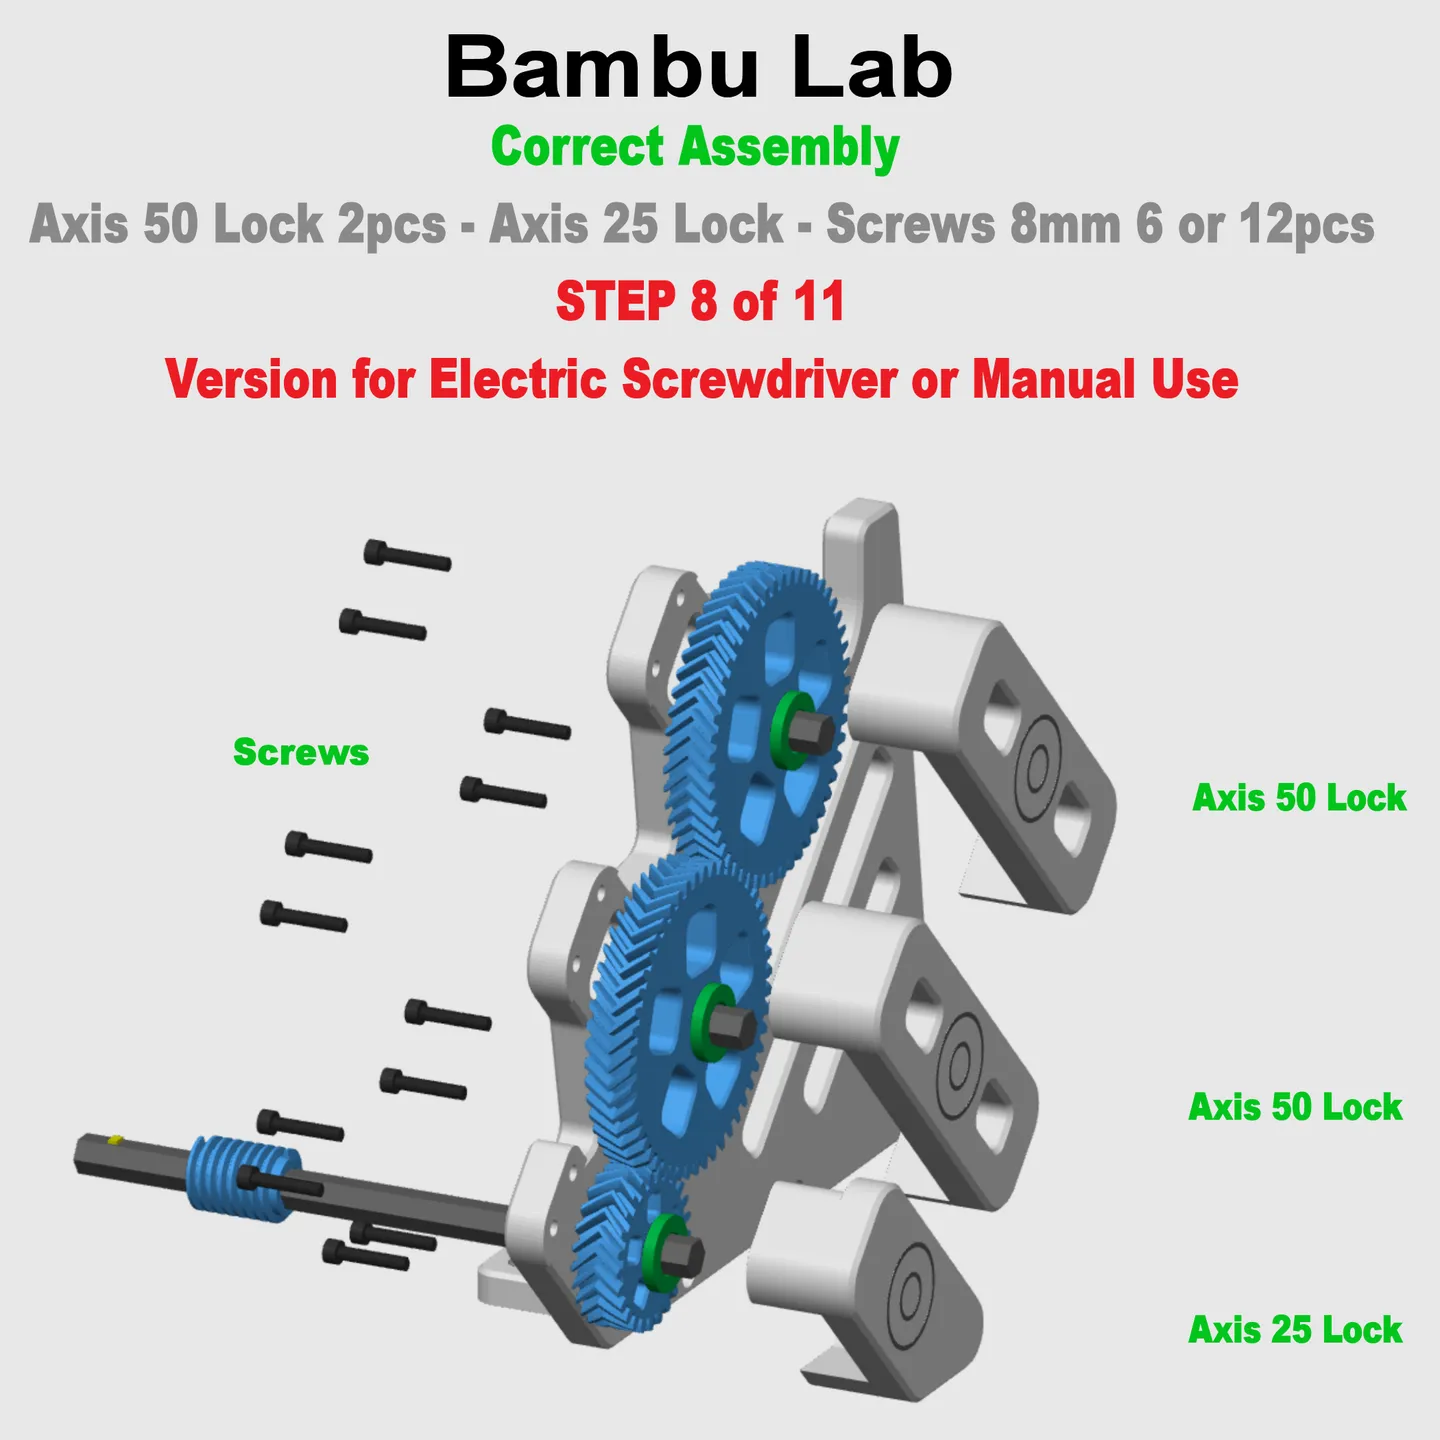
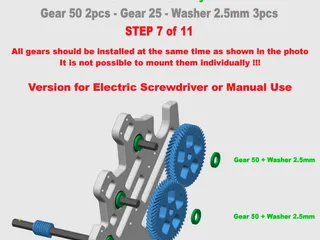
- The Gear 25 Lock.stl and Gear 50 Lock.stl files contain graphics. If you don't color it, it won't be printed

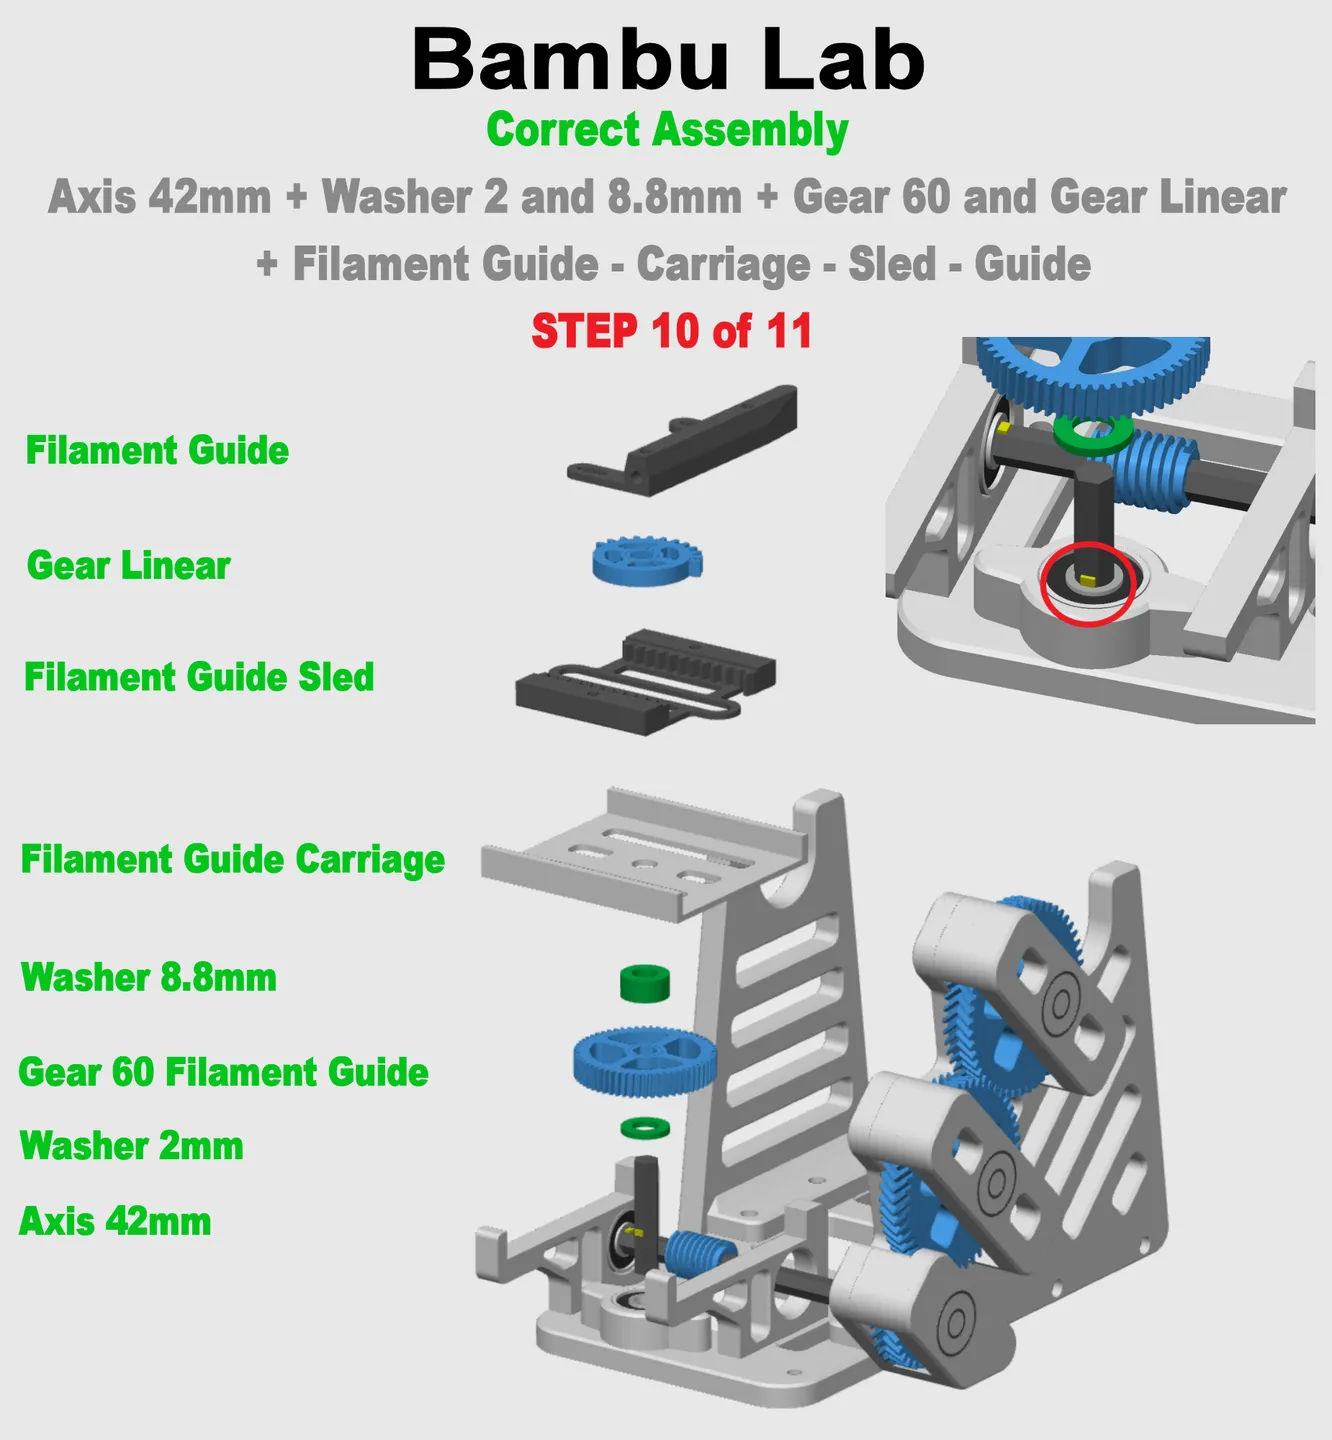
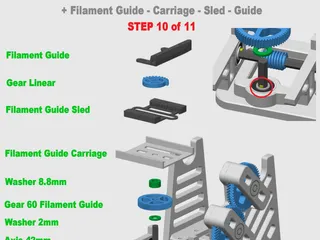
- Starting position for “Gear Linear For Filament Carriage and Filament Guide Sled” - By clicking on the photo you can enlarge it

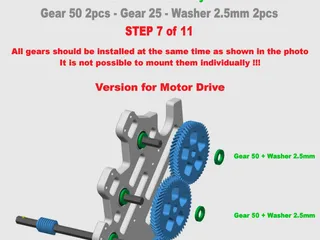
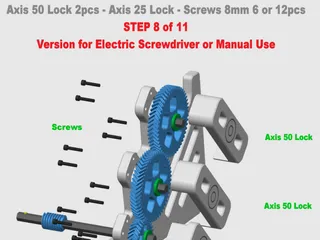
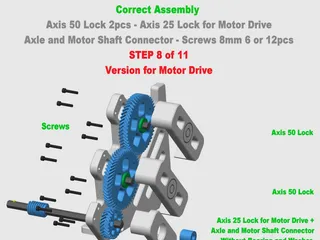
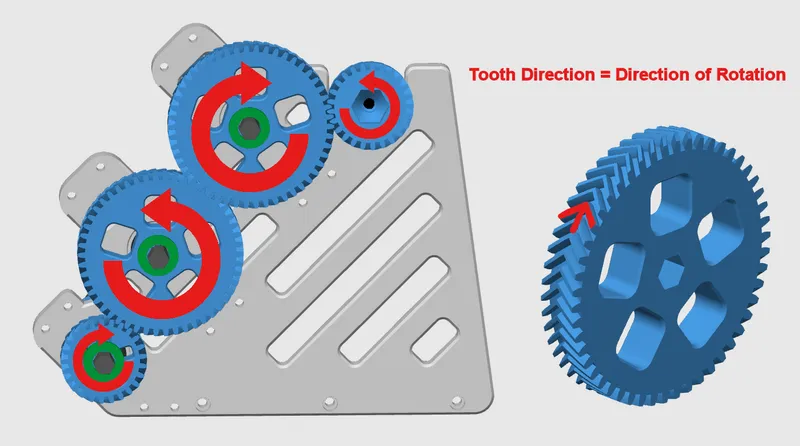
- The mechanism in this design can only rotate in one direction !!! The direction of the teeth on gears indicates their correct direction of movement. If you are rewinding the filament by hand or with a cordless screwdriver, use counterclockwise rotation. If you use the "Motor Drive 2 - Modular Design for Stand" design, the motor rotation should be to the right. If your motor rotates in the wrong direction, swap the poles from positive to negative and from negative to positive - By clicking on the photo you can enlarge it
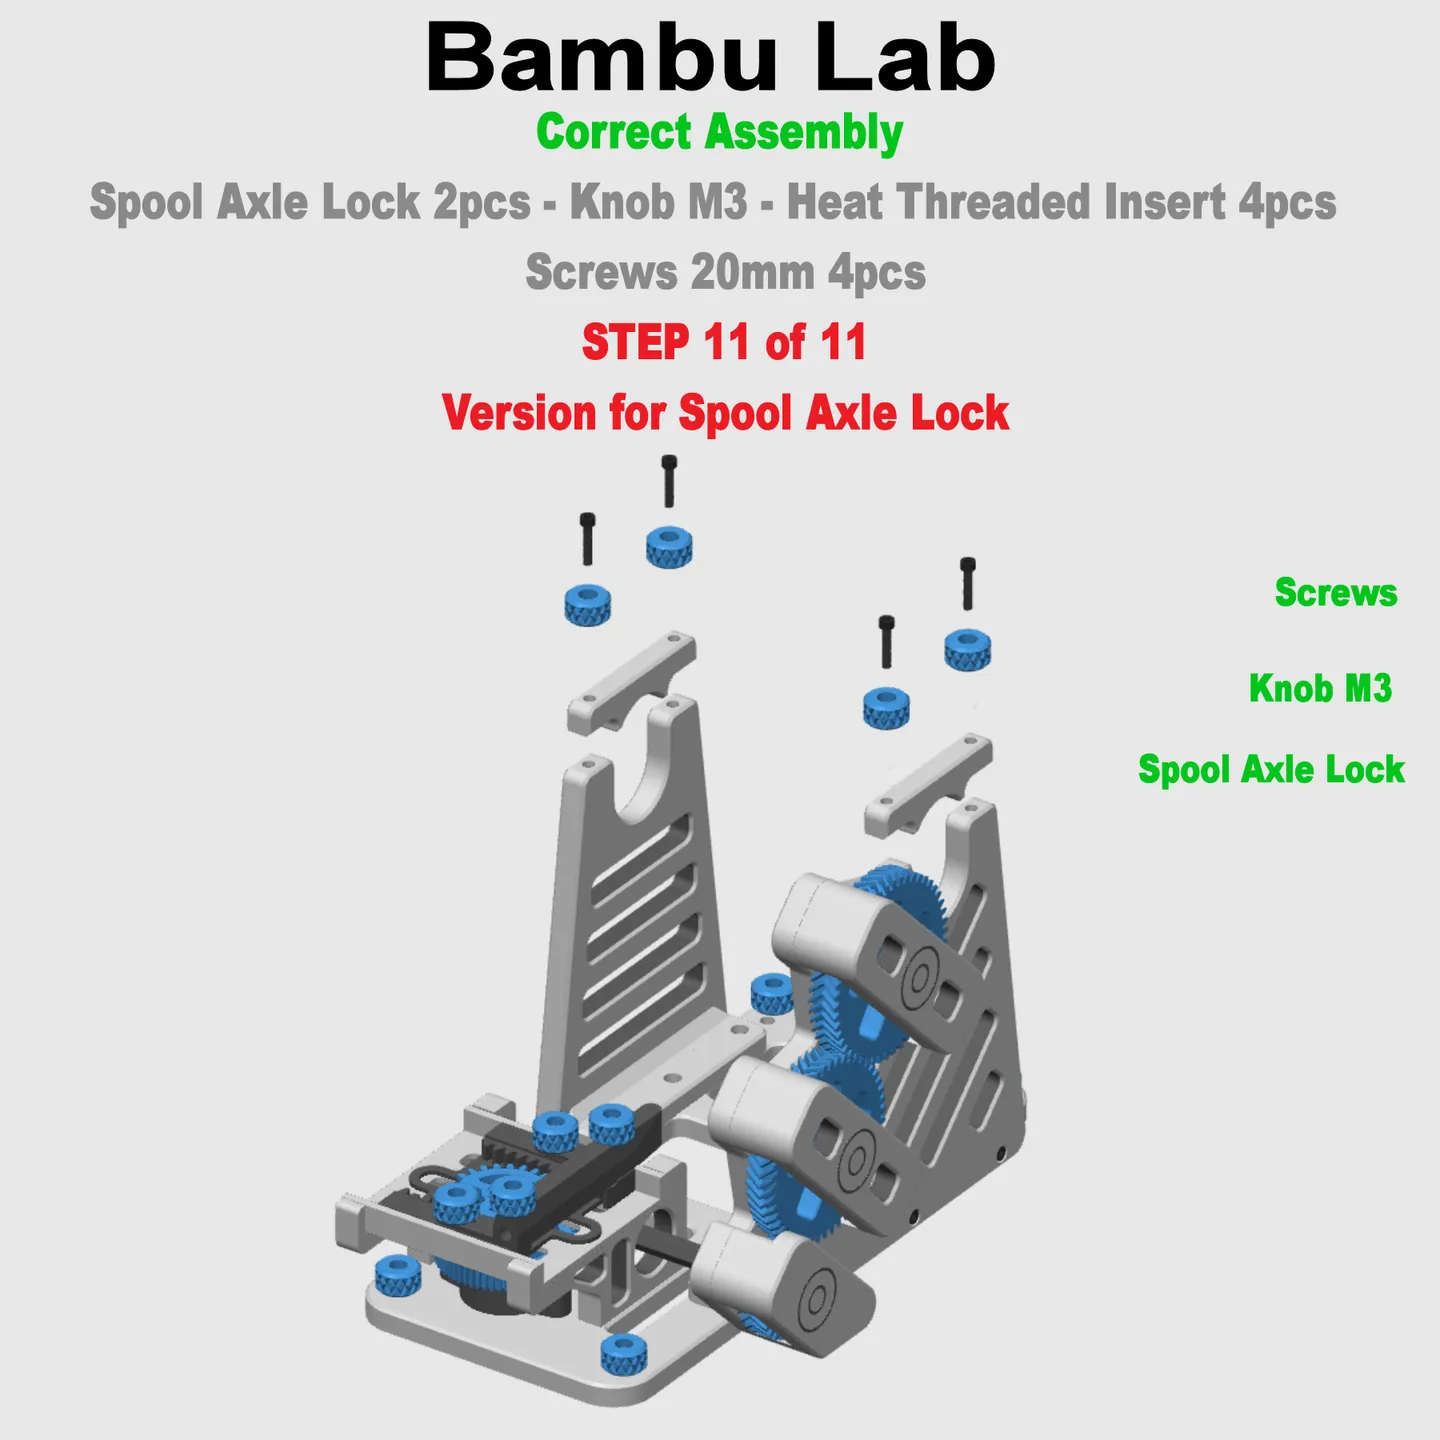
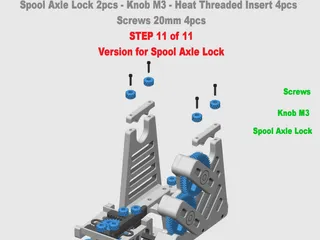
- If You use or will use the “Motor Drive 2 - Modular Design for Stand" project, you do not have to use the version with a Spool Axle Lock
- If you download files individually, they should be printed in the same position as they were imported into the slicer. You can always download a ready-made 3MF file that is compatible with Bambu Lab Studio or Orca Slicer
What Should I Buy ? :
If you will also be printing "Donor Spool Frame 2 - Modular Design" buy both items in 50 pieces
- Bearing 608 2RS 8 x 22 x 7mm - 8-9pcs (9pcs for Manual Rewind and Electric Screwdriver and 8pcs for Motor Drive 2 - Modular Design)
- Screws M3 8mm - Cylindrical Head - min.20pcs - max.31pcs - https://a.aliexpress.com/_EQBSTPJ
- Screws M3 20mm - Cylindrical Head - 4pcs - Only for Versions with Spool Axle Lock https://a.aliexpress.com/_EQBSTPJ
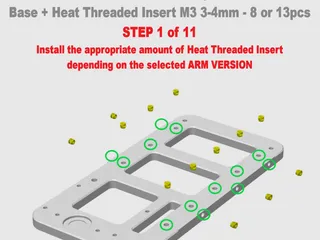
- Heat Threaded Insert M3 3-4mm OD 4.5mm - min.20pcs - max.43pcs - https://a.aliexpress.com/_EyZii5B
Should I Print? :
Winder Spool Frame 2 - Modular Design - With Holes for Spool Axle Lock :
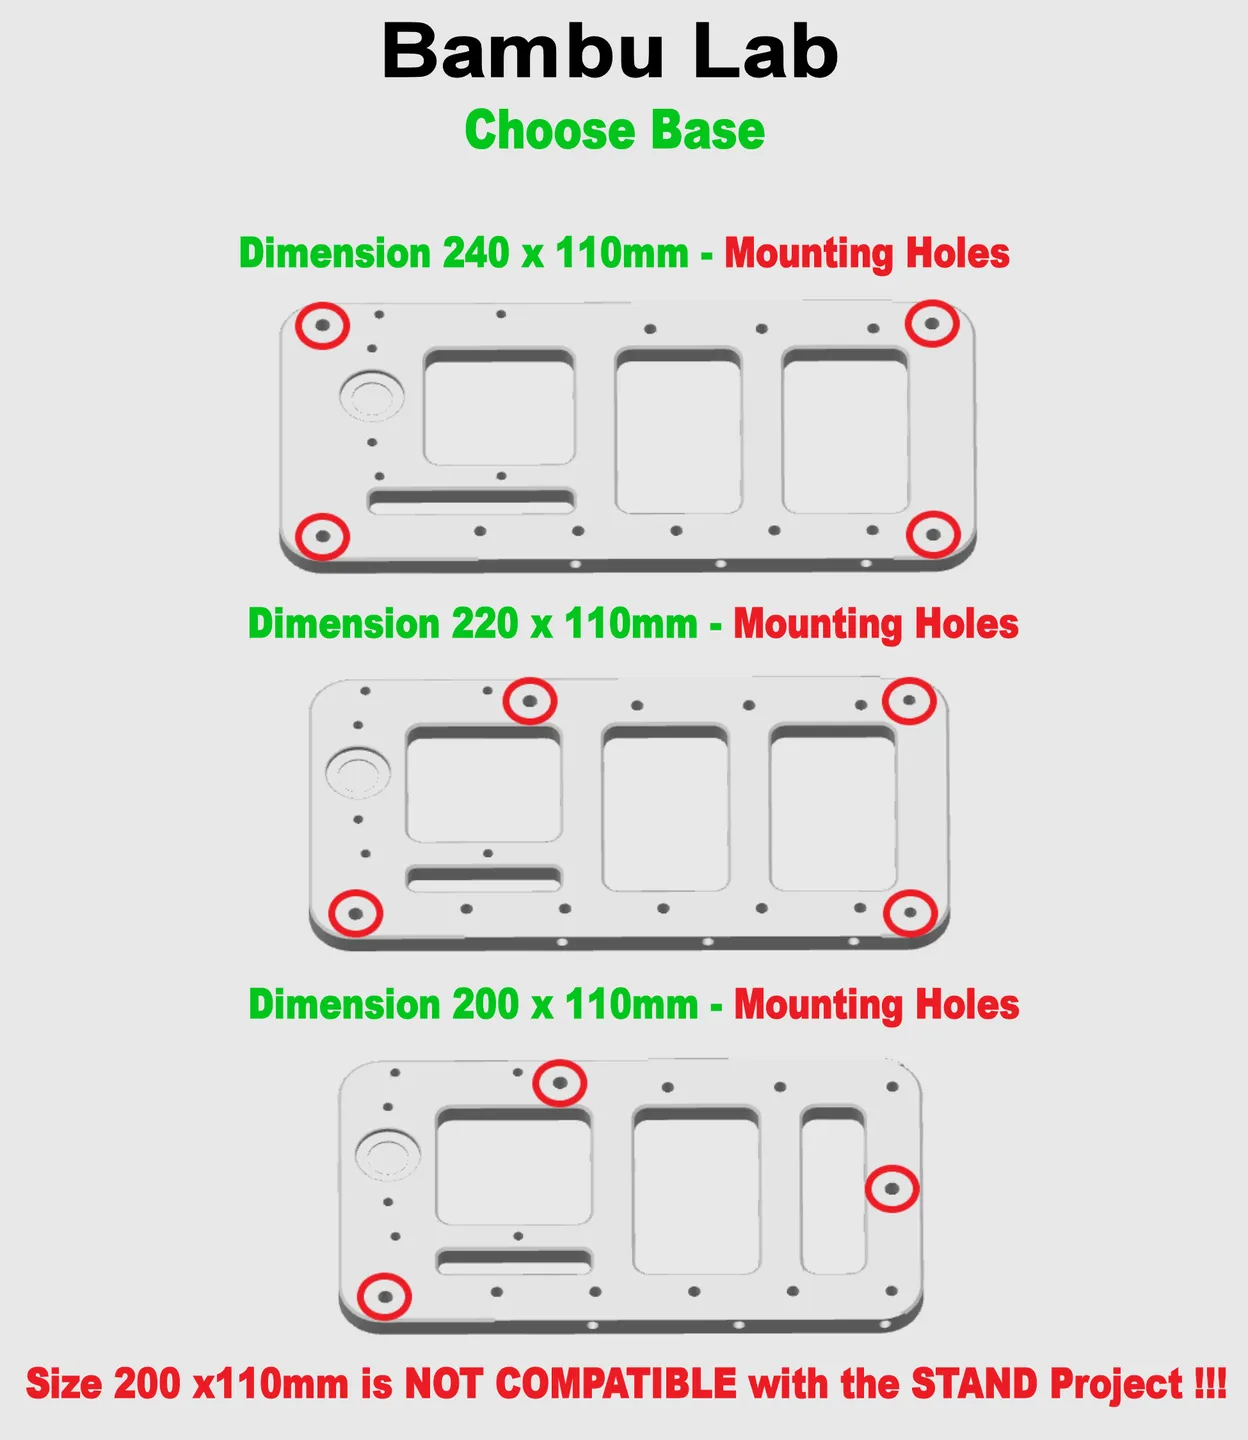
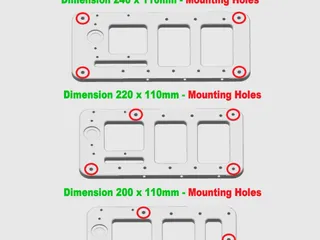
- Choose The Right Base :
Winder Spool Frame 2 - Base 200mm.stl - 1pc
Winder Spool Frame 2 - Base 220mm.stl - 1pc
Winder Spool Frame 2 - Base 240mm.stl - 1pc
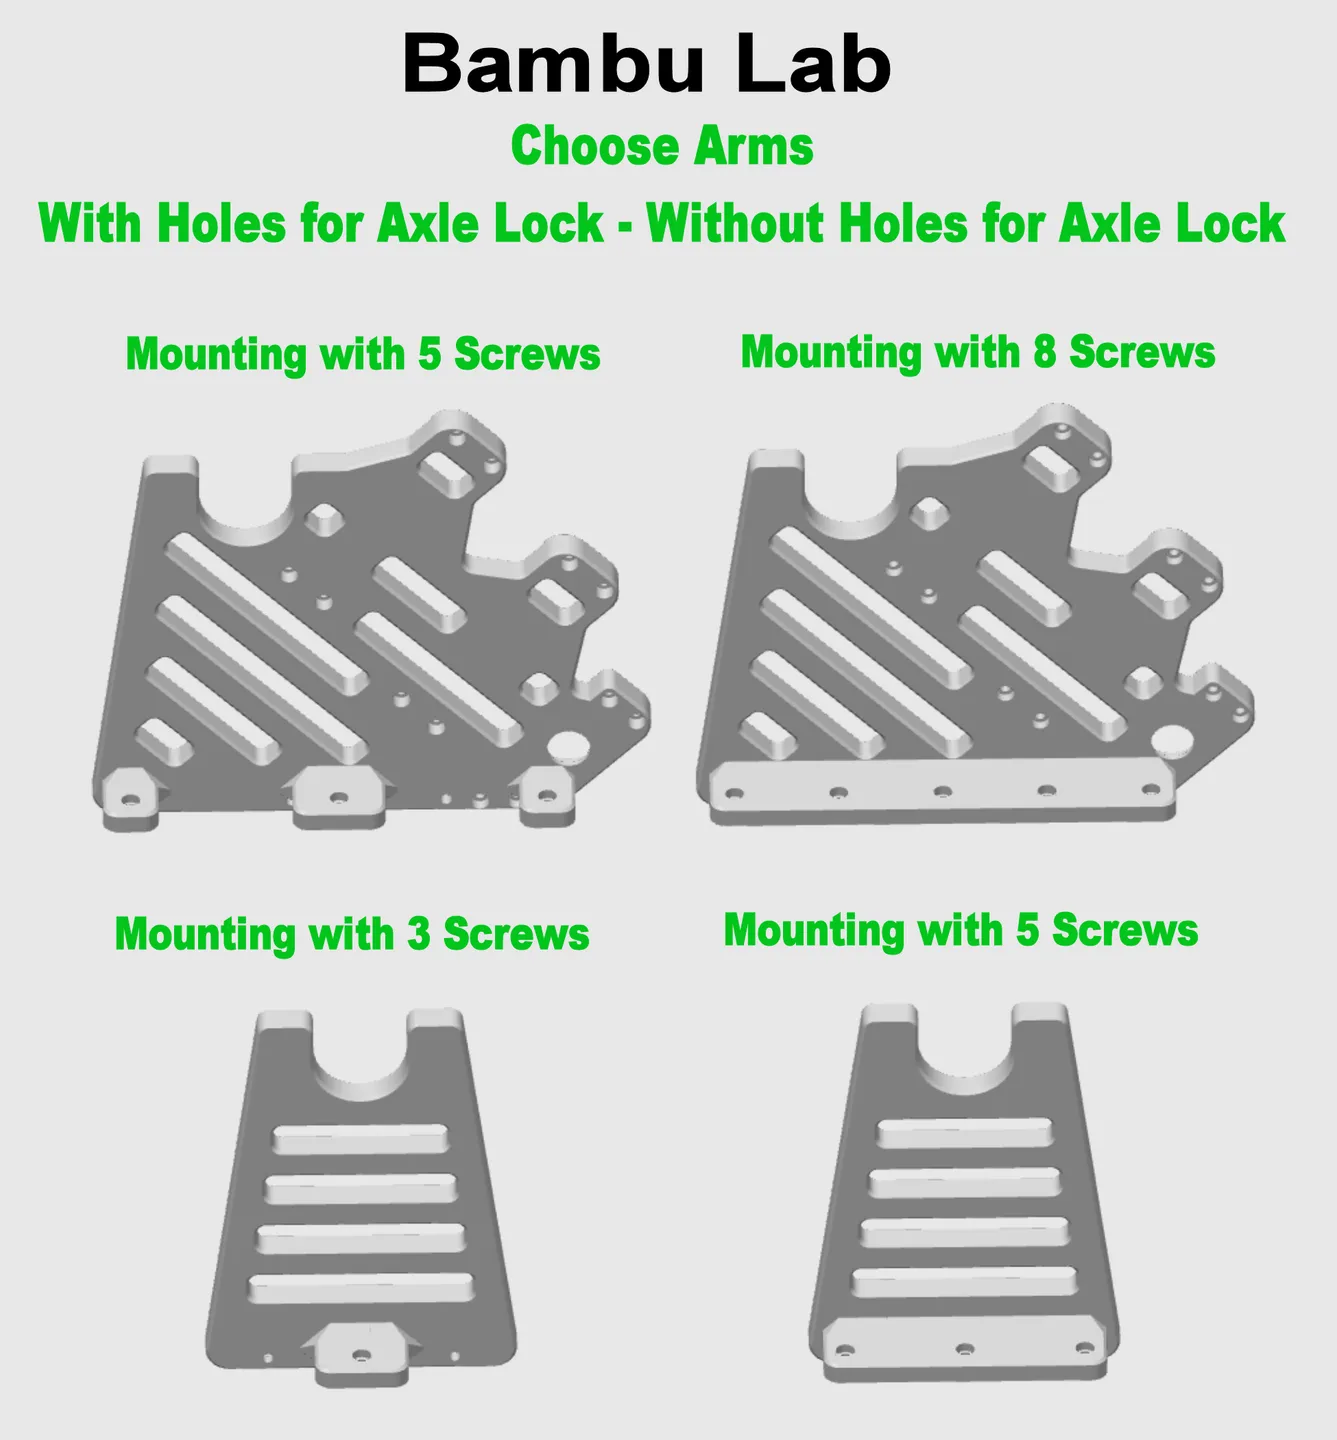
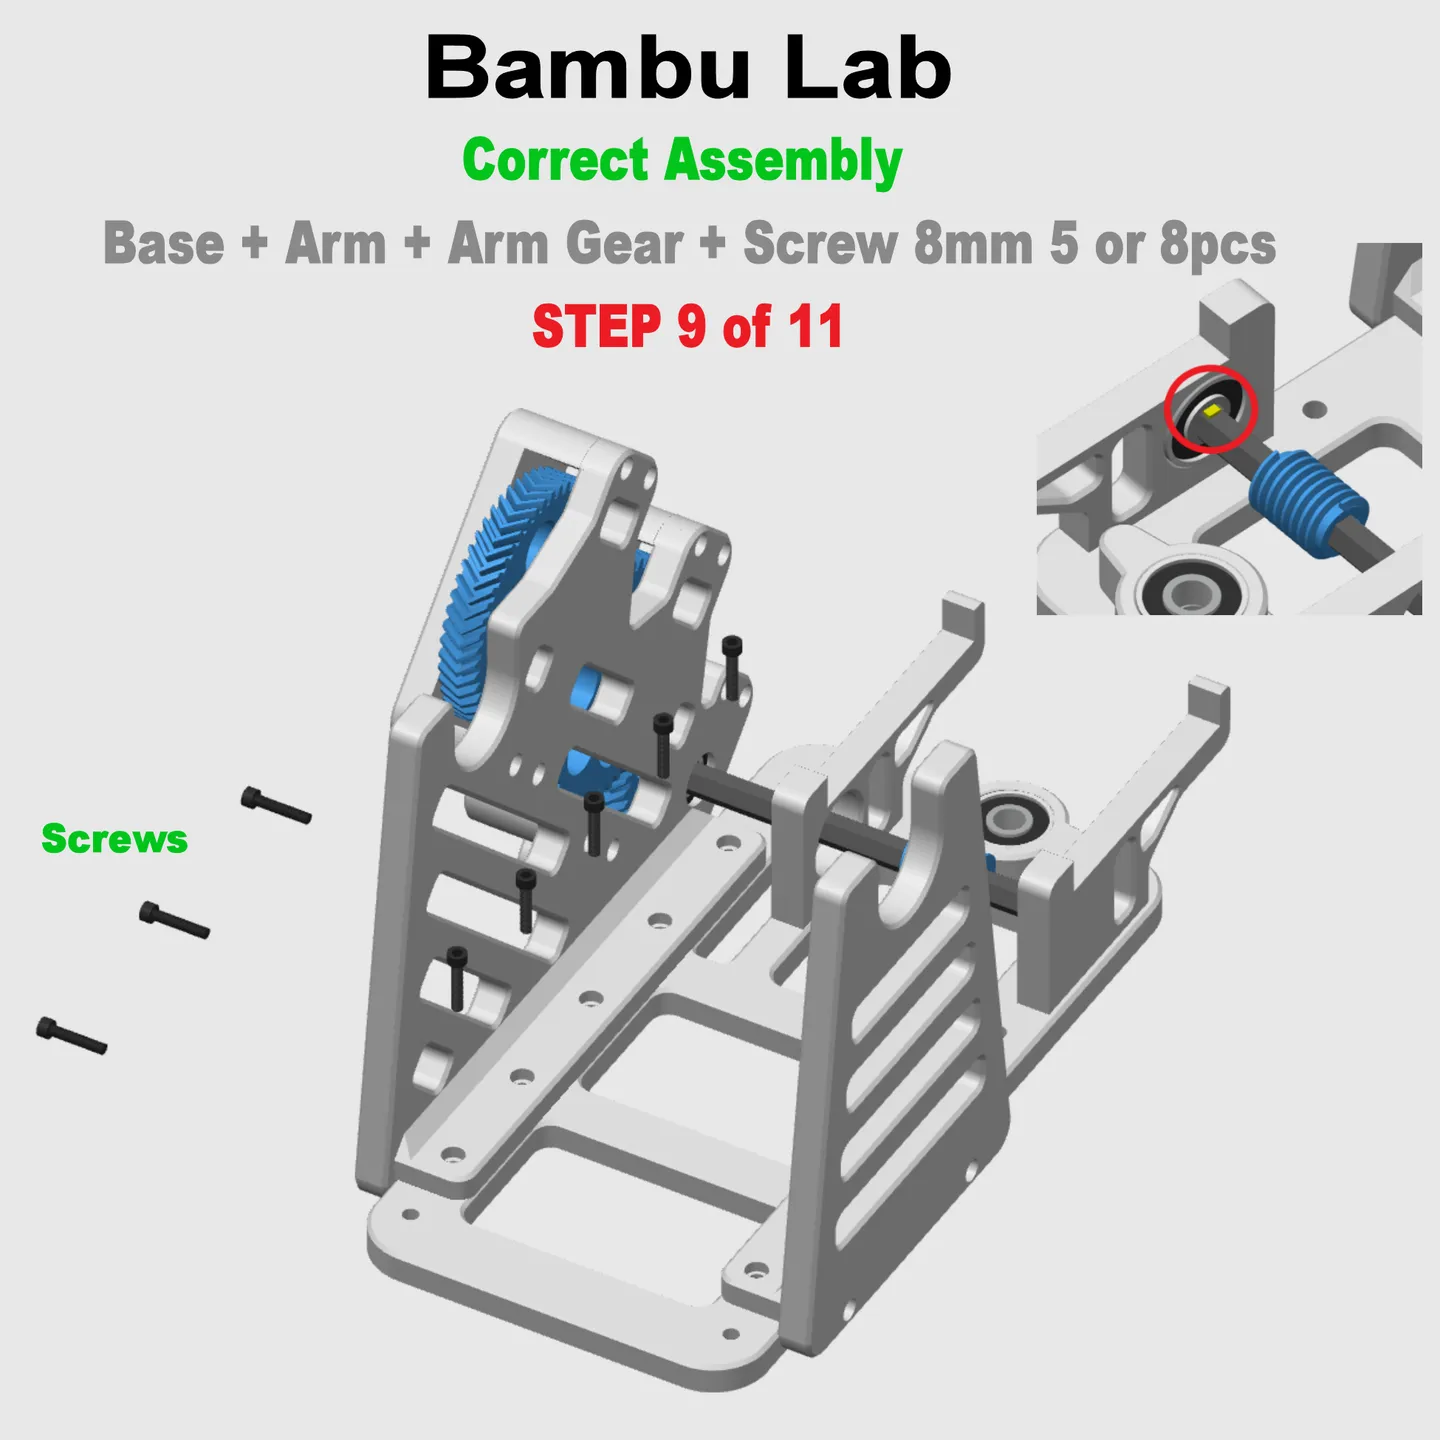
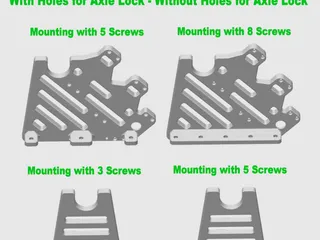
- Choose The Right Arm :
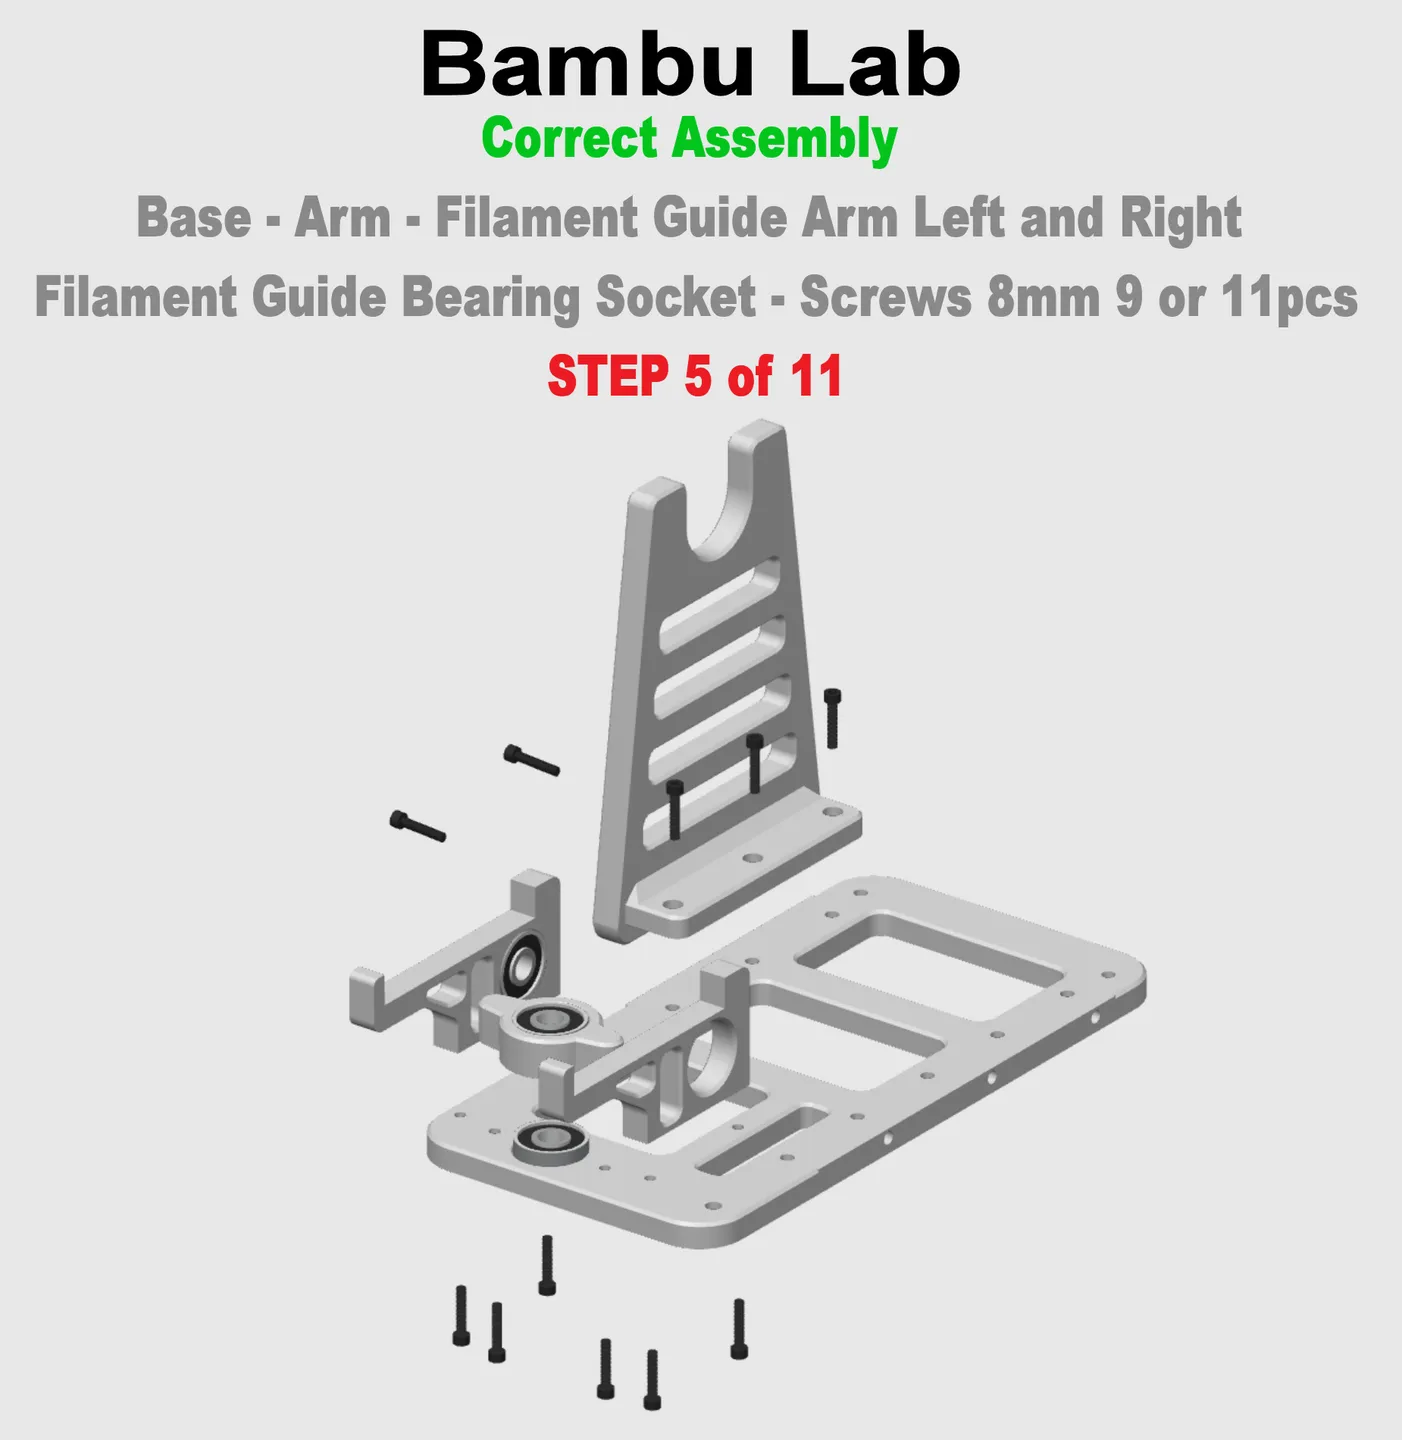
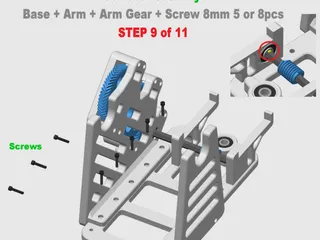
Winder Spool Frame 2 - Arm 3 Screws - With Holes for Spool Axle Lock.stl - 1pcs
Winder Spool Frame 2 - Arm 5 Screws - With Holes for Spool Axle Lock.stl - 1pcs
- Choose The Right Arm Gear :
Winder Spool Frame 2 - Arm Gear 5 Screws - With Holes for Spool Axle Lock.stl - 1pcs
Winder Spool Frame 2 - Arm Gear 8 Screws - With Holes for Spool Axle Lock.stl - 1pcs
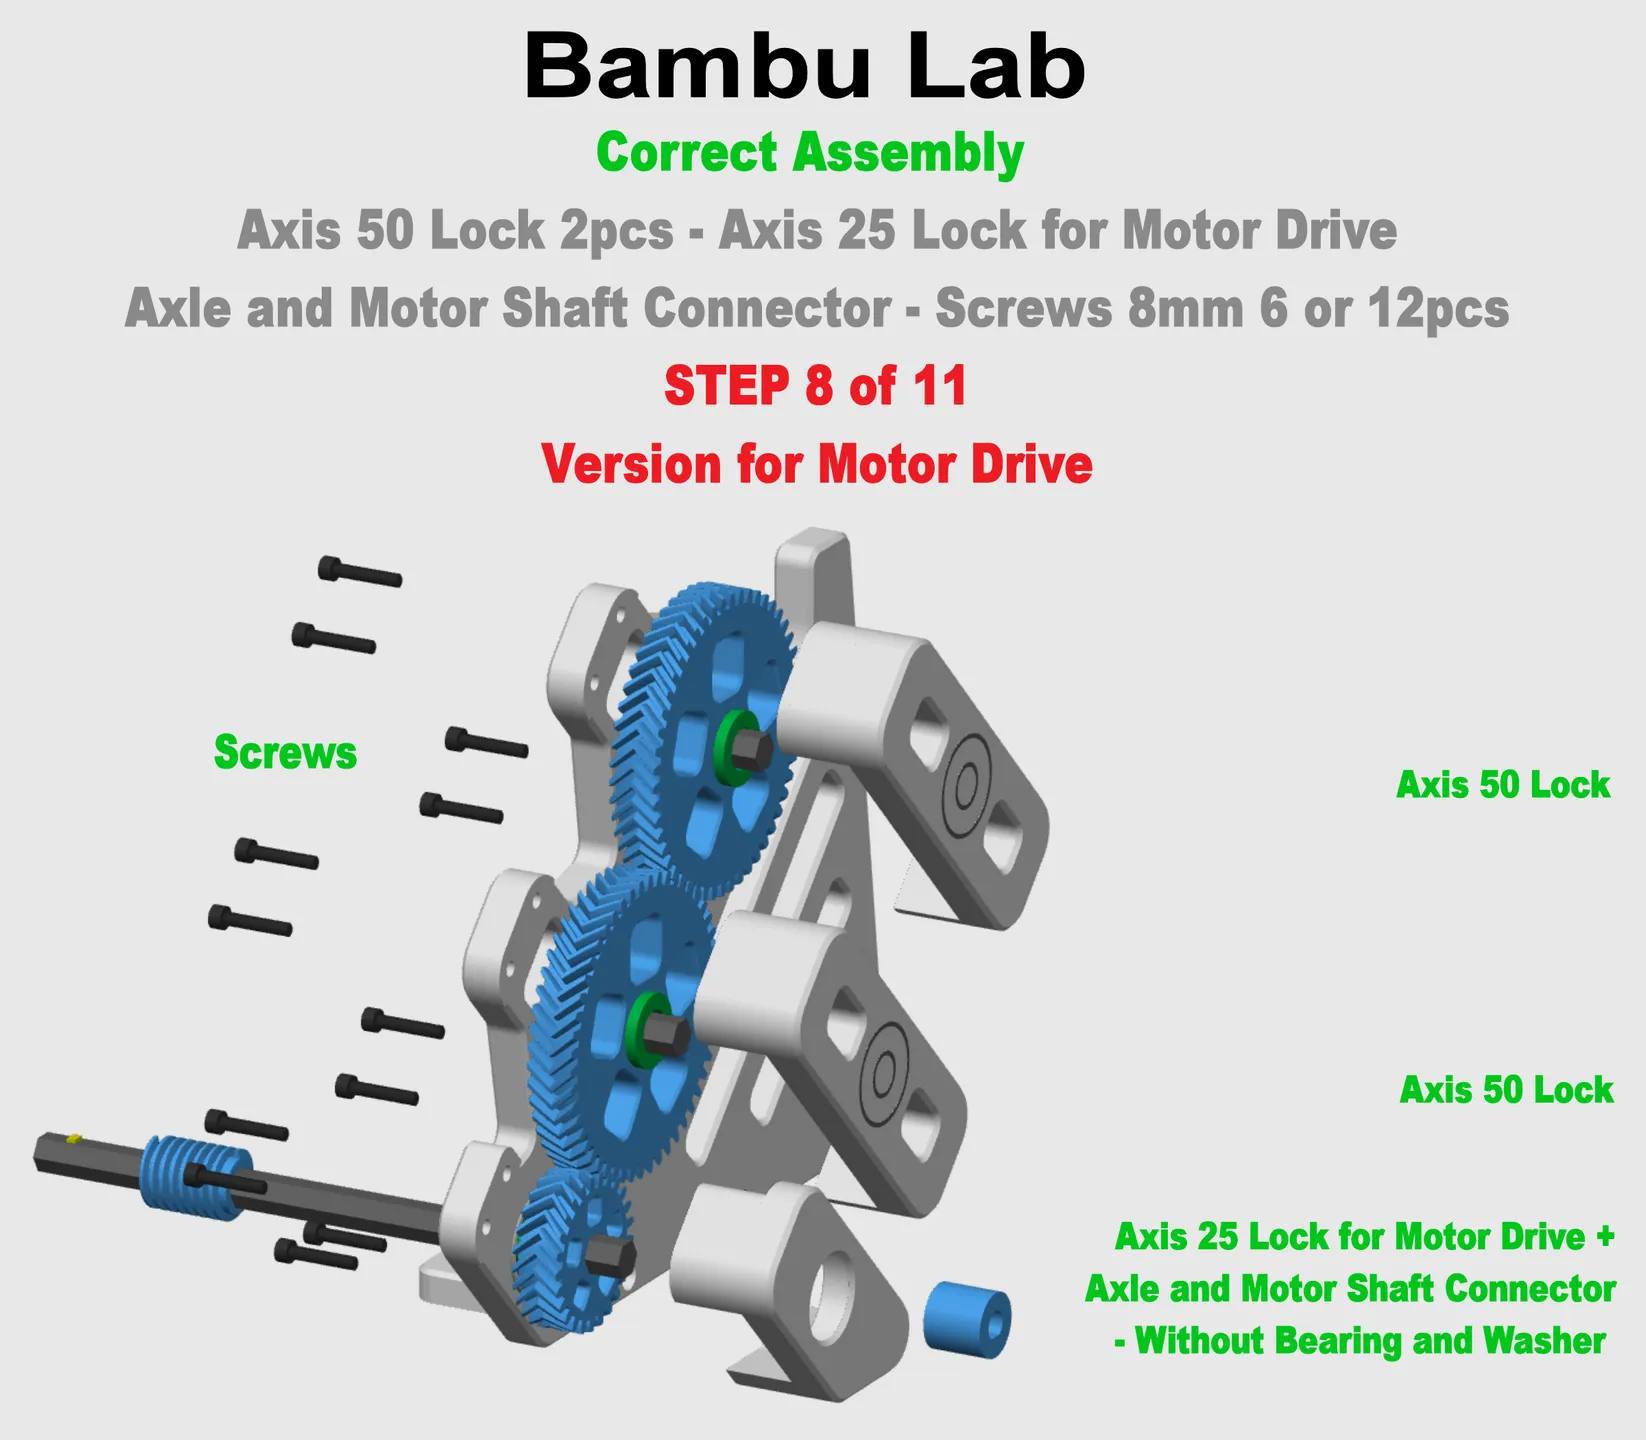
- Winder Spool Frame 2 - Gear 50 Lock.stl - 2pcs
- Winder Spool Frame 2 - Gear 25 Lock.stl or Gear 25 Lock for Motor Drive.stl - 1pc
- Winder Spool Frame 2 - Filament Guide Arm - Left.stl - 1pc
- Winder Spool Frame 2 - Filament Guide Arm - Right.stl - 1pc
- Winder Spool Frame 2 - Filament Guide - Bearing Socket.stl - 1pc
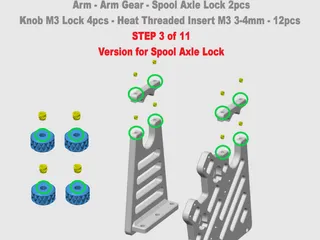
- Winder Spool Frame 2 - Spool Axle Lock.stl - 2pcs
- Winder Spool Frame 2 - Knob M3 - Heat Threaded Insert.stl - 4pcs
- Winder Spool Frame 2 - Bearing Installation Tool.stl - 1pc - Only if you need it - In my case, I installed the bearings using two fingers
Winder Spool Frame 2 - Modular Design - Without Holes for Spool Axle Lock :
- Choose The Right Base :
Winder Spool Frame 2 - Base 200mm.stl - 1pc
Winder Spool Frame 2 - Base 220mm.stl - 1pc
Winder Spool Frame 2 - Base 240mm.stl - 1pc
- Choose The Right Arm :
Winder Spool Frame 2 - Arm 3 Screws.stl - 1pcs
Winder Spool Frame 2 - Arm 5 Screws.stl - 1pcs
- Choose The Right Arm Gear :
Winder Spool Frame 2 - Arm Gear 5 Screws.stl - 1pcs
Winder Spool Frame 2 - Arm Gear 8 Screws.stl - 1pcs
- Winder Spool Frame 2 - Gear 50 Lock.stl - 2pcs
- Winder Spool Frame 2 - Gear 25 Lock.stl or Gear 25 Lock for Motor Drive.stl - 1pc
- Winder Spool Frame 2 - Filament Guide Arm - Left.stl - 1pc
- Winder Spool Frame 2 - Filament Guide Arm - Right.stl - 1pc
- Winder Spool Frame 2 - Filament Guide - Bearing Socket.stl - 1pc
- Winder Spool Frame 2 - Bearing Installation Tool.stl - 1pc - Only if you need it - In my case, I installed the bearings using two fingers
How To Print ? :
- Material : Each Rigid Filament - I printed with PLA Premium (I do not recommend PETG - It is too flexible)
- Layer Height : 0.2mm
- Infill : 20-25%
- Wall Loops : 4
- Bottom Layers : 4
- Top Layers : 4
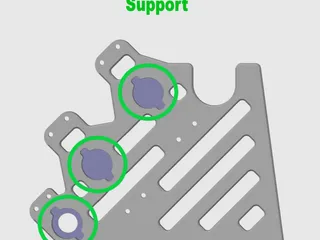
- Support : Yes - Normal Manual - For Bearings Only - Shown in Photo Gallery
- Brim : No
- Brim Auto : No (Be sure to disable Brim Auto. When printing in color Gear 25-50 Lock.stl with Brim Auto on, it may cause a problem on the first layer)
I receive a lot of messages asking what to print for a complete project. It is complicated for many people. I had a problem with that myself. So I decided to prepare a short instruction.
If you take advantage of all my improvements :
All Projects :
https://www.printables.com/pl/@Damian27/collections/1304611
1. Bambu Lab - Winder Spool Frame 2 - Modular Design
https://www.printables.com/pl/model/769319-bambu-lab-winder-spool-frame-2-modular-design
2. Bambu Lab - Donor Spool Frame 2 - Modular Design
https://www.printables.com/pl/model/766774-bambu-lab-donor-spool-frame-2-modular-design-for-s
3. Bambu Lab - Upgraded All Gears and Axes
https://www.printables.com/pl/model/478967-bambu-lab-filament-spool-winder-upgraded-all-gears
4. Bambu Lab - Upgraded Filament Guide, Filament Guide Sled, Filament Guide Carriage and Knob
https://www.printables.com/pl/model/478923-bambu-lab-filament-spool-winder-upgraded-filament-
5. Bambu Lab - Winder Spool Holder with Bearings - Modular Design
https://www.printables.com/pl/model/740644-winder-spool-holder-with-bearings-for-bambu-lab-fi
6. Bambu Lab - Donor Spool Holder with Bearings - Modular Design
https://www.printables.com/pl/model/750033-donor-spool-holder-with-bearings-for-bambu-lab-fil
7. Universal Spool Centering Cone for Bambu Lab Filament Spool Switcher & Winder https://www.printables.com/pl/model/752030-universal-spool-centering-cone-for-bambu-lab-filam
8. Spool Brake for Bambu Lab Filament Spool Switcher & Winder
https://www.printables.com/pl/model/748642-spool-brake-for-bambu-lab-filament-spool-switcher-
9. Handle for Manual Rewind and Adapter for Electric Screwdriver
https://www.printables.com/pl/model/805532-handle-for-manual-rewind-and-hexagonal-adapter-for
10. Stand for Bambu Lab Filament Spool Switcher & Winder
https://www.printables.com/pl/model/479022-stand-for-bambu-lab-filament-spool-switcher-winder
11. Motor Drive 2 - Modular Design for Stand - Auto-Stop Function for Bambu Lab Filament Spool Switcher & Winder
https://www.printables.com/pl/model/485389-motor-drive-for-stand-auto-stop-function-for-bambu
Tagi
Pochodzenie modelu
Autor zremiksował ten model.


Różnice między remixem a oryginałem
Nowa wersja


