Sovol Planetary Tool Head and MGN12 X Axis Conversion for the Sovol SV01 Pro

Description
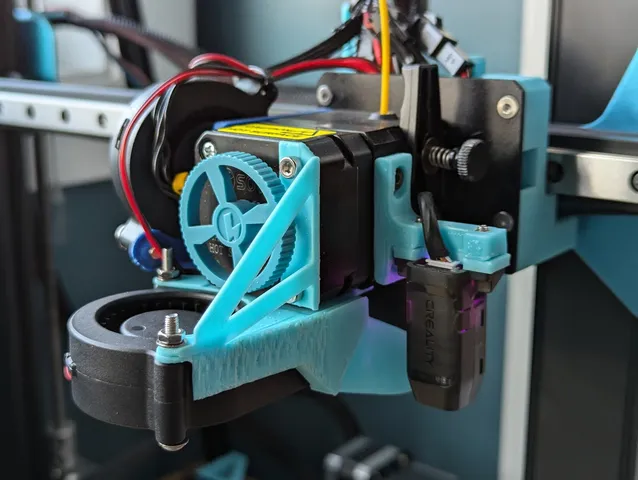
PDFI decided to upgrade my SV01 Pro and picked the SV06 Plus tool head for its modern planetary extruder, high flow “Volcano” style block and reasonable price.
However, since that tool head does not mount on a V-wheel carriage I had to design my own solution; opted for linear rails to also benefit from higher speed capabilities and better wear resistance.
(The SV07 or SV07 Plus had not been announced at that time, and for reasons known only to Sovol the SV06 Plus tool head is currently available for purchase while the SV07's still isn't.)
Bill of Materials
- A Sovol Planetary Extruder Tool Head
- A “Klipperized” Sovol SV01 Pro (see https://github.com/gbkwiatt/klipper for a fork which keeps the stock touchscreen functional)
- A good quality MGN12 linear rail, 400 mm long
- A good quality MGN12H block, installed on the rail
- 2~3 MGN12 on 2020 extrusion installation guides (e.g. Printables # 462709)
- 6 M3x8 socket head cap screws (SHCS)
- 6 slide-in M3 T-nuts
- 3 M3x6x5 threaded brass inserts
- 7 M3x6 flat head hex socket countersunk screws (FHCS)
- A cabling solution:
- I removed the breakout PCB, re-used SV01 Pro's original wiring and re-crimped. I reused the SV01 Pro's CR-Touch probe, used a two pin Molex Micro-Fit for the heater cartridge and JST-SM for everything else. Finish with a cable tie on the purpose-built post to secure the harness.
- I do not know whether the SV06 Plus or SV07 Plus ribbon cable could work or not - I did include a clip for it on the carriage.
- The SV06 and SV07 non-Plus cables are most likely too short on the SV01 Pro.
- Dedicated CAN bus or USB tool head boards are options I have not explored nor plan to at the moment.
- Printed parts from this page:
- Tool Head Linear Rail Carriage
- X axis pulley cover and limit switch offset mounting block
- If you're re-using the CR-Touch probe: Printables # 489843
- Optional: X extrusion drilling guide Printables # 370266 (Biqu H2V2 Linear Rail for the SV01 Pro) comment 1374648
- Recommended: soldering supplies, shrink wrap and extra wire. (I had to salvage and solder some extra lengths of wiring for my harness but I believe this was due to user error.)
- Recommended: polyimide tape (e.g. Kapton) to help manage cables between the metal plate and the tool head carriage.
Tools
- A drill or drill press
- Clamps or a vise to secure the extrusion while drilling
- Assorted hex drivers
- Soldering iron for the brass inserts
- Cable crimping tools
- Flush wire cutters
Installation
Gantry Preparation
- Loosen knob, unscrew and remove the X axis belt tensioner.
- Unhook the X axis belt from the tool head.
- Remove the X axis belt.
- Unscrew and remove the X stepper motor pulley cover.
- Unscrew the X limit switch PCB from the pulley cover and screw it onto the printed replacement part using the original self tapping screws.
- Reinstall the X stepper motor pulley cover.
- Remove the SV01 Pro Titan-clone tool head :
- Disconnect the extruder stepper motor.
- Disconnect the CR-Touch probe.
- Roll out the tool head.
- If you're re-using the SV01 Pro wiring: cut (and label!) the other cables :
- Heater cartridge
- Extruder thermistor
- Part cooling fan
- Extruder fan
Carriage Preparation
Install the three threaded brass inserts into the tool head carriage.
Extrusion Modification
Modify the X axis gantry extrusion (instructions adapted from Printables # 370266) :
Only drill deep enough to take away the covered part of the 2020 extrusion. Use appropriate drill sizes based on the holes or screw heads on the other side.
- Fully remove the top extrusion by removing the 4x mounting screws on top.
- For holes 1 to 3, measure from the top edge with the following dimension:
17.5mm
77mm
97mm
- For hole 4 to 6, measure from the bottom edge with the following dimension:
48.5mm
29mm
3mm
(All holes are vertically centered on the extrusion face.)
- Re-install the X axis gantry extrusion, rotated 180° along its length, leaving the open surface of the gantry outside so you can slide the rail in.
- Re-install the top extrusion.
Linear Rail Installation
- Clean your rail and lubricate your block.
- Install the M3x8 socket head cap screws onto the rail, loosely screw on the T-nuts.
- Slide the rail onto the extrusion.
- Temporarily slide the belt tensionner onto the extrusion to butt the rail against it.
- Secure the linear rail onto the gantry by using the printed installation guides to screw it into place.
- Screw the tool head carriage onto the MGN12H block using 4 M3x6 flat head hex socket countersunk screws.
Tool Head Installation
- Screw the carriage onto the block using 4 M3x6 flat head countersunk screws.
- If you're crimping wires: remove the breakout PCB.
- If you're re-using the CR-Touch: remove the inductive probe and replace the probe mount with your printed part.
- Crimp connectors as required.
- Manage cables so they won't get stuck between the extruder metal plate and the printed carriage edges.
- Attach the metal plate to the carriage using 3 M3x6 flat head countersunk screws.
- Install and tension the belt
Klipper Configuration
See https://github.com/louisrousseau/sovol-sv01-pro-klipper-custom-configs for more details.
Other modifications on this printer
Cooling
- Sovol SV06 Plus / SV07 series 5020 Blower Fan Upgrade
- Deprecated - 5015 front-mounted part cooling fan duct
- Deprecated - 5015 extruder fan duct
- Curtain Fan Ducts
Y Axis
Z Axis
Assorted Bits
- 4040 Extrusion Tip Diagonal USB Cable Clip
- Sovol SV01 Pro Maintenance Stands
- Raspberry Pi 4 snap fit case (Thingiverse # 3723561) - printed the “hex” pattern parts which happen to fit an M5 screws; installed under the Y axis extrusion using drop-in T-nuts and printed spacers (cut those from the Y rail conversion using PrusaSlicer) to clear the carriage
- Klipper Expander bracket - installed inside the front case to control and power fans
- ADXL345 (X axis) SV06 Stepper Motor Support
- ADXL345 Y axis support:
Tags
Model origin
The author marked this model as their own original creation.