Parametric e-liquid box
Description
PDFDisclaimer: This is my first parametric model, it seems to work quite well but you may need some Fusion 360 knowledge to fix a few steps along the way.
I like to have several flavours to vape, especially when I am not home so I wanted to design a box that can be easily modified to fit the number of bottles I have and this is the result.
Published as STL are the files for a one stage box to fit 4 bottles and the files for a 2 stages box with 3 bottles each - Case, Lid and Holder(s) in each .zip.
How to parameter the file?
Download the .f3d file and open it in Fusion 360.
Rough cut-down of the steps:
- Step 1: Base sketch for the layout of the model
- Steps 2 to 6: Design of the Holder
- Steps 7 and 8: Iteration of the Holder
- Steps 9 to 11: Design of the Case
- Steps 12 to 16: Design of the Lid
- Steps 17 to 26: Design of parametric thread on the Case and Lid
- Steps 27 to 30: Aesthetic (fillet and knurling on the Lid)
Note: Step 30 is voluntarily kept after the history marker as it can be time-consuming to calculate, especially while modifying the parameters.
The list of parameters will be available under “Modify > Change Parameters” - all of them are commented to help you customize your box.
The most important parameters can be found under the “Favorites” section:
- The Diameter of your bottles
- The Height of your bottles
- The Number of bottles per stage
- The Number of stages to fit in the box
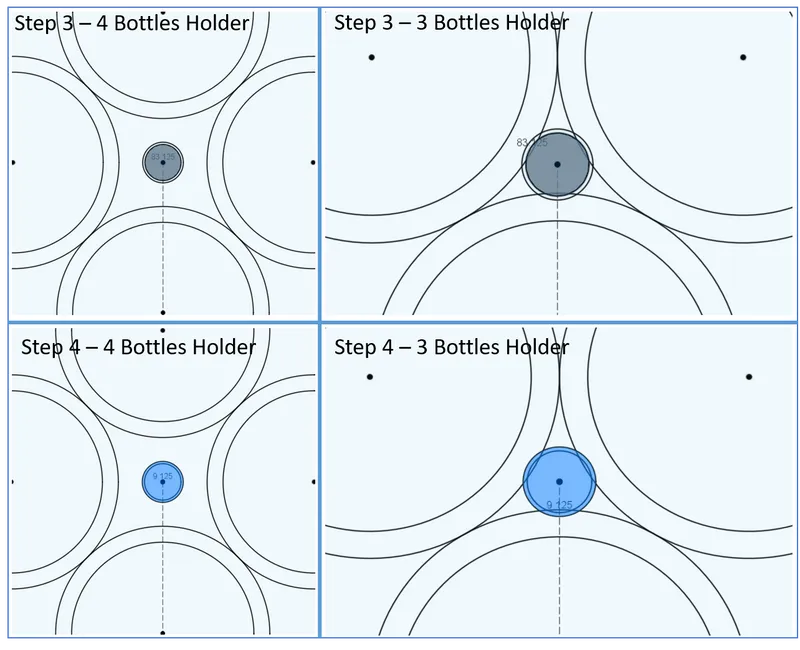
After changing the Number of Bottles parameters, make sure that the sketch's profiles are still correctly selected for the Extrusions at steps 2 to 4 - see examples below:
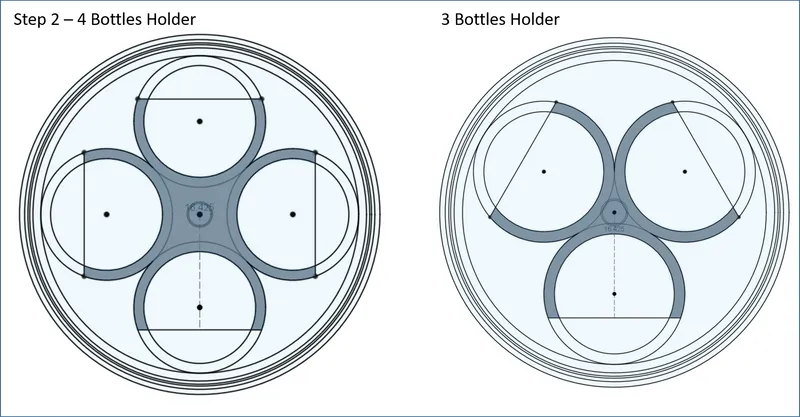
In order to make the case as compact as possible, a formula is used to calculate the external diameter of the box. This formula is based on the geometry of the bottles inside and so, the number of bottles per holder. At the moment, the formula only works with 3 or 4 bottles per holder.
If you wish to select a different number, replace the formula in the parameters “Center_to_BottleCenter” by the value of the driven parameters “Centers_Driven” (as driven parameters cannot be used outside of sketches).
The “Holder_Position” determine roughly where the holder will sit on the bottle. As the model is based on the iteration of the Holder, this “Holder_Position” is more or less a dead-space at the bottom of the Case and have an important influence on the height of the box. I would recommend keeping it as low as possible.
Finally, the Case and Lid are threaded together. In order for the thread to be parametric, I have used coils to create it (following this tutorial), rather than the thread function. All the “Thread_[…]” parameters are used for this parametric thread and should be treated carefully.
Don't forget to add the last step (for the knurling) once you have finished customizing your model!
Printing Tips:
The most difficult part to print will definitely be the thread at the top of the Holder.
Printing at low speed should be enough to avoid the wobbliness of the spindle and the subsequent failed print.
(I'm open to suggestions in the comments if you have an idea other than threads to connect each holders together.)
TL;DR:
- Key Parameters in favourites
- Double-check the sketch selections for step 2 to 4
- Keep “Center_to_BottleCenter” ≥ “Centers_Driven”
- Keep “Holder_Position” low
- “Thread_[…]” are sensitive
- Print the Holder(s) slow
Tags
Model origin
The author marked this model as their own original creation.


