HueForge TD Lightbox Step Test add-ons

Description
PDFThis is a set of new lids and matching swatches for the v3 lightbox TD step test. You'll still need the lightbox bottom by Ajax that this models remix; the v3/v2 swatches fit, but are not “compatible” (you'll see why).
In a nutshell, this add-on has:
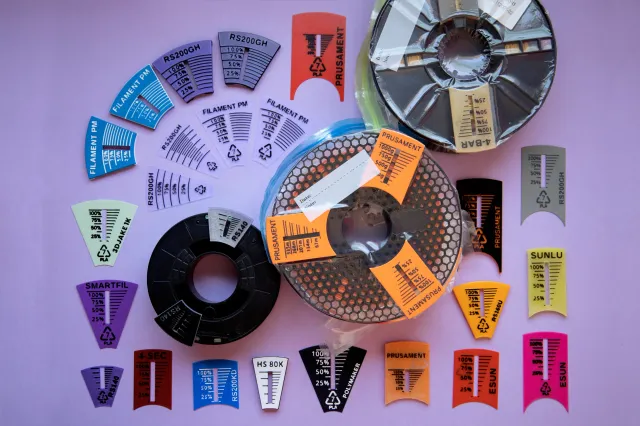
- New lids and swatches for 0.1 and 0.25mm layer height, plus some 0.2mm lh variants, with (and without) some accessibility/usability features.
- Bigger, more printable and readable, Hershey fonts.
- "Snake-like" alternating direction of panels per row. Now each swatch panel is contiguous to both the one immediately lower and the one immediately higher.
- A "weird trick" option for small panel guide, that can be used when HueForging, too, to make things literally pop out ;).
If it's needed, I'll post a v2 version with the smaller lid (and no detent), but I thought that the number of users who had v2 and will be interested in this add-on is very small, since Ajax (and Steve) did a very intensive work getting out iterations very quickly.
Why and what's this
If you look at the current HF libraries, most of the medium and long TD filaments, if not all, have their TDs as multiples of 0.5, so I thought a layer height of 0.2 was somewhat odd, as didn't land in a x.5; 0.25 is faster and more in the right spot. Steve stated that an approximation of 0.5mm for the TD is enough, so we have double that precision (as 0.25 is half of 0.5).
The lowest TDs are regularly 0.3, which can also be obtained only by approximation with 0.2, so I added the more precise 0.1mm layer height swatches. These are more to have a swatch that shows some (very fine) difference between panels than for practical TD purposes, as something with such a small TD will be a “single-layer-covers-all” matte ultra-pigmented filament.
The snake-like alternating rows make for easier comparison (all panels are next to those next in heights), but required the new lids; the v3 swatches/samples are compatible in size only, but the disposition of the panels is different (all rows are read left-to-right).
I was also missing some kind of reference in the swatch; that's why I added variants with the last panels missing in a flat area, so a tiny label of about 11x13 mm max can be fit. That's enough to write down a number for reference in an outside list.
So, swatches come in pairs. Those are:
- with 10 and 16 rows per column
- with and without top embossed lines
- with and without label area (which translates to a lower height)
Those variants are for all 3 layer heights (0.10, 0.20 and 0.25mm). The top lines are to be printed in black or a contrasting color, so the color under test aligns nicely with the guide lines in the lid.
Also, almost all the swatches (all but the shorter ones, 2mm and under) have on their long sides the height and layer height. Those numbers are usually not very readable (save for filaments like Fillamentum and Spectrum Wizards, “toothpaste” coextrusion, etc.), but can be painted over with a fine-point Sharpie, or you can use the trick of putting a paper on it and scratching with a pencil, like they did in old detective movies.
The lids with 16 rows per column, though, necessarily have a small font size, that may be not printed right. So that's when we resort to the “one weird trick” mentioned above: encapsulating an insert. There are PDFs in 10x15cm and a DINA4 with all the inserts in the “Other files” section, plus the source SVG if you want to play around.
Keep reading to see how it's done!
Encapsulating prints
Overview and necessary materials
Encapsulating a 2D inkjet or laser print is much the same as embedding a nut or magnet into a print, and we can use the technique with some translucent filament to get a nice, well detailed panel for our lid without having to resort to an ultra-thin nozzle. (There are fully 3D printed variants, if you have a 0.2x one). In the "Other files" section you'll find the SVGs for the panels; there are positive and negative versions, so you can play with the background and/or foreground color, adding a colorful logo, etc.
Basically, the model has a hole in it, and we add a pause print M601 command, stop the print, glue on it the cut paper insert with glue stick, change to a translucent color, and keep printing, with another layer change to add the divisory lines in a visible color (like white or black).
You'll need a "good" paper, be it a high-end-ultra-gloss photo paper, or just a coated Navigator of 100gmsm, but not the usual, run-of-the-mill copy paper. Reason is that there needs to be some smooth layer of coating for the molten plastic to drag in; otherwise, we'd just be doing a huge bridge. The hole in the models is 0.2mm thick, which gives room for all but the ultra-thick quality papers (ranging usually from 0.15 to 0.2mm). There's not much problem if the paper barely fits and the nozzle presses the paper; paper is compressible, and at most you will find some bit of "flashing" easy to trim with a hobby knife; there are only two layers.
You'll also need a translucent filament, the more transparent the better; but it will be printed for only 2 layers, 0.4mm, so it doesn't matter if it isn't the most of the most. I've had good results with Spectrum Translucent, Fillamentum Crystal Clear, Geeetech and Sunlu transparent; if you can, avoid FilamentPM Natural, as it's the milkiest natural PLA I've ever seen (which works great for diffusers, btw).
Encapsulating step by step
- 2D print the insert. As stated, you'd better use a not too thick photo paper. Make sure that you print it at 100% scale, as the printing helpers and wizards like to "fit" things the way they shouldn't.
- Optionally, 3D print the cutting template in a translucent filament (so you'll be able to align it well). It's in the "Encapsulation Tools" folder, as this one is the same for all lids/reference layer heights. You can modify the height of the template, but if it's too thin you risk cutting the template too, and not just the paper.
- Take a hobby knife, a cutting mat, the cutting template and the printed insert, and cut the printed insert from the sheet. Cut the center hole also! If everything printed right, you'll notice that the template is just so slightly smaller than the printed insert; that is to account for the knife blade. And it's better to overcut than undercut; the 3D model will compensate by any misalignment by 3D printing lines on top. (The insert also has a bit of clearance to fit well in the 3D print).
- Prepare to print the lid. Print with the usual bottom and top thickness, but it's important to print at 0.2 layer height; the hole is 0.2mm tall and has 0.4mm above it, exactly. (I've added the "pieces" to make your own variants, using negative modifiers, if this doesn't suit you.) Set a print pause (M601 G-code) at 4.80mm (layer 24) and a color or extruder change at 5.20mm (layer 26). Remember that both pause and color change are triggered after the printer moves to the layer, but before it starts printing that layer. There is a PrusaSlicer example in the “Encapsulation Tools” folder.
- When the print pause triggers, get the insert and “present” it on the part in the bed; don't add glue yet. Just test if it fits correctly and there are no sharp edges or anything you should trim.
- Once everything's right, add glue stick to the back of the insert. Make sure that the borders are well glued, especially the corners; we don't want the nozzle dragging paper around. Make a thin coat, and remove any glue stick blobs and excesses.
- Now, place it carefully on the part. The glue stick will allow you to reposition the insert, if needed. Make sure it's well aligned, but you don't need a 0.001mm precision.
- Before resuming the print, change the filament to the translucent one. In the Prusa, that is via the “Tune→Change filament” menu. Maybe your printer will need to add an additional M600 color change G-code before or after the M601 of print pause.
- Keep printing until the next color change. Change the color to something visible for the lines, and not black (that would get confused with the lid base). The 3D printed lines will make for any displacement in the insert, and you may end with a nice “highlight” or “shadow” effect with them.
And you're done! Happy forging!
Tags
Model origin
The author remixed this model.