Remaining filament scales - no-MMU & parametric

Description
PDFUPDATED 2022-10-14: Many improvements, detailed at the end. TL;DR: New features, more spool models, improvements in printability, adapted to Recymbol 1.1.
We all know that spools spin faster at the end, and slower when they're the fullest - so a straight ruler and a ratio doesn't always work well to know if you'll have enough for your project. That's geometry - volume of the spool filament is not linear, but rather circle-area based which depends on radii squared (well, actually, more like a spiral of helices of circular sections packed in a not always regular "diamond" lattice...). This tool will help you make a more efficient use of your material, and since it is non-MMU multicolor enabled and lightweight, can also help you give a good use to those leftovers in your spools!
For instance, the smallest card-like version of the Alpaplastic RS200-series gauge is just about 2.5g of filament (less than 1m), Esun 2.74g (also <1m)! All the snap-on, leave-on-spool-and-forget versions are below 5m! Even better: the non-MMU color inserts can be spliced (text, each ruler, symbol), so you can use just the tiniest filament amount on each! Plus: snap-on versions double as a filament clip, hiding the pointy filament tip! And it has smoothed edges, so it's vacuum-bag storage friendly!
If you're new to OpenSCAD and/or design, don't worry: there is a bundled tutorial on how to use OpenSCAD customizer, which is an extremely user-friendly and easy-to-use tool, albeit the OpenSCAD look may be daunting with all that code; but it's all bark and no bite!
Also, a JSON file with a metric truckload of presets (or an Imperial vanload) is included at the "Other files" section. Download it into the same folder where you put the .scad app, and you're ready to go. You'll have the same files as I do; select the values at will in the Customizer controls at the right, render the models with F6, then export them with F7. It's really that simple.
There is also a detailed instructions booklet on how to use this customizer and what does each parameter mean exactly.
The pregenerated STLs
To make things simpler, pregenerated STLs are also bundled for some popular brands and spool models; note that a spool model can be used by several filament manufacturers! For instance, Alpaplastic (with 4 models listed below) is not a filament manufacturer, but a spool manufacturer whose spools are used by many filament brands, especially European: Fillamentum, ColorFabb, Spectrum, Extrudr, Smart Materials, Sakata 3D, some white brands... A similar thing happens with Hafner Spools (used by 3D Jake and Amazon Basics in Europe) and some Chinese manufacturers that I haven't been able to identify (as I've found the same spool models in Eryone as in other, much-less-known brands).
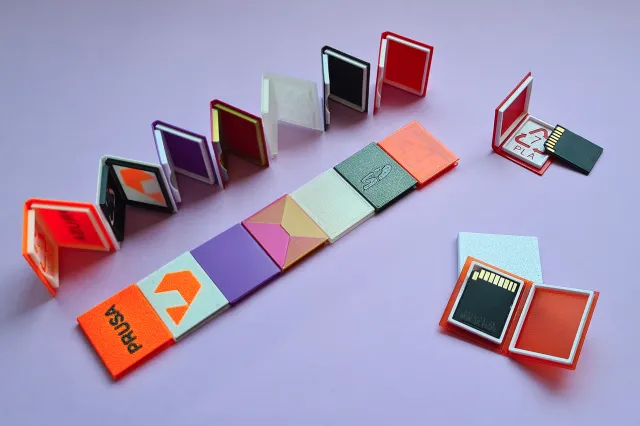
Each spool model has at least 4 gauge variants. These come in two formats, “card” and “snap-on”. The snap-on format… well, it's designed to snap right on a side of the spool, and many times can be kept while printing, if you use a central axle spool mount (like that on the Prusa). The card format is thin, like… say, a card; it's the tool in its simplest form, to keep near the printer and used like a ruler.
Each format can have a “Print-On-Print” or a raised/engraved variant. Print-On-Print is a technique that allows several colors in the same layer without extra hardware (no MMU, no Palette required), while the raised/engraved versions allow for a z-based color change. Furthermore, the snap-on “engraved” formats use a “stacking” technique where the cutouts have stepped borders. This changes ugly-looking bridges for a smooth 45-degree transition, and lets you choose at which height do you want the color change (usually at 0.6mm or higher).
The spool models with pregenerated STLs (and OpenSCAD presets) are:
- A model that I call 4-bar, which is used by Eryone and other Chinese brands, which has one spool side completely solid and the other with 4 bar-shaped long holes, forming a cross. (New in 2022-10-14 update.)
- Another model for which I lack proper reference and call 4+1 sectors (or 4 sectors plus 1 bar), 4-sec for short, also used by Eryone and other Chinese manufacturers. This one has 4 double sectors with smaller inner windows that run to the filament start, plus a bar that doesn’t run up to the filament start and serves-ish as inspection hole. (New in 2022-10-14 update.)
- Alpaplastic RS140U. This is a tiny, cute little spool that usually holds around 250g of filament. It's 140mm in nominal diameter. (New in 2022-10-14 update.)
- Alpaplastic RS160U. This spool usually holds 0.5 kg of filament. Be warned that the rim around the holes for filament end tends to “bulge” a bit, so use the snap-on format somewhere else, or make another version for a diameter about 0.5-1mm greater. (New in 2022-10-14 update.)
- Alpaplastic RS200 series. This comes in two flavours: the 750g RS200GH and the 1kg RS200KD, with minor differences. Since the 2022-10-14 update, there is another version for the RS200GH snap-on format that works also with the “nerved” subtype of RS200GH spools.
- Prusament. You know, that filament named after a guy named after a printer, I think it was... The 2022-10-14 update includes a whole range of new snap-on formats that can be left on the spool while printing (unlike the previous model). They have a drawback, though: There is only 4 places per side where it can be snapped on (actually 6, but in 2 of those you won't see anything). If you look carefully to the Prusament spool, you'll notice there are 4 lines of "voided hexagons", running from the center hole to the border, that are evenly spaced at 60 degrees from the solid plaques with the "Prusa Polymers" legend and the laser engraving, so these six elements make the inner radii of a big hexagon (feels a bit like a secret encoding, ain't it?). Align the gauge center slot with one of these lines, the outer guide with the border, and snap gently; maybe you'll need a little bit of wiggling, but don't use too much force (it's not required). The gauges can be also snapped over the plaques with "Prusa Polymers" and filament name (or blank, solid on the other side), but obviously there can be only used as filament clip. Check out the pictures for a better reference.
- 3DJake. European seller with white brand (and some of that "toothpaste" filament as of late). Apparently, both 3D Jake and Amazon Basics (Europe) use the same type of 0.5/1 kg spools, made by Hafner Spools (models SD200/52-43K for 500g, SD200/52-80K for 1kg).
- Esun. The folder has the STLs for the "classic" variant, transparent with two Allen screws. I've noticed that now they use a different spool for at least some of their products, which I've still to measure.
- Esun new. This is for their newer spool format, with one side completely solid and the other having two inspection “bars” or “pills”. (New in 2022-10-14 update.)
- Sunlu. (New in 2022-10-14 update.)
- Hafner Spools 52-80K. This is actually made to fit both 3D Jake and Amazon Basics (Europe) spools, and the dimensions diverge somehow significatively from those listed in their website. Some divergence may be explained by these being “soft” material spools, but not all of it. Maybe they've changed specs, maybe there's something else. (New in 2022-10-14 update.)
- Filament PM. This is a Czech manufacturer, well known to the older Prusa owners (as they provided the silver 1kg spool bundled with the Mk3 before Prusament times), that now also makes filaments for the “Made For Prusa” line of products. Fun fact: the “Made For Prusa” box depicts a RS200KD spool, yet the one used by Filament PM is very different (and IMHO much worse, as it's opaque and lacks any kind of inspection hole!) (New in 2022-10-14 update.)
- Smart Materials new. Smart Materials has changed recently the format of their spools from the good ol' RS200 series to another format, with two terrible, horrible bulges around the holes for the filament end, and a thicker rim. (New in 2022-10-14 update.)
The STLs use two techniques for non-MMU color changing: the well-known z-based color change, and the less-known print-on-print technique. The parametric OpenSCAD file may use an external free, open library to make the recycling symbol (called Recymbol); the instructions cover Recymbol and the z-based color change options in detail. Since the 2022-10-14 update, an (experimental) option has been added to use also the MMU and similar hardware. The main difference is just in the main object, the “Remaining filament scale” option in the “Object type” parameter; the POP technique calls for a bit of offset when removing the “negative image”, whilst MMU and similar do not. (Hat-tip to user Celta for the feedback and valuable info!)
The POP technique
As far as I know, this is due to Devin Montes from the Make Anything channel. You first print the insert, remove purge line and skirt, change filament and print the other part. This works best when the insert is at most two layers tall, and the negative part has some clearance in all three axes - all of which have been accounted for in the OpenSCAD generator. Print-on-print gives IMHO the best results, as it's flat and embedded, but requires two parts and you have to be careful with stringing. It also helps to let the second color "bake in" a bit, to let it go the filament in the nozzle and remove it to avoid leaving residues when doing the z-height calibration (if your printer does that, like the Prusa does); the color will be well primed again with the purge line and skirt. Also, look out after stringing in the first color, which happens often (there's a lot of movements) and can leave some “staining”.
How to use the gauges
For transparent spools, this is easy. Just align the gauge with the spool and see through the inspection slot where the filament is at. For opaque spools with no inspection slot, it's a bit (but just a bit) trickied. Take a ruler or something else that's straight and flat. Slide it along one of the inner sides of the spool until you touch the filament. Mark the point where the ruler meets the spool edge. Take the ruler and align the mark with the gauge edge, where the gauge meets the spool edge; you're "transporting" the distance, and the bottom edge of the straight ruler, aligned with the gauge inspection slot, will tell you how much filament you have left.
Note that, if we were to make "insertion" gauges (that would replace the ruler) we would have to make one for each value, like radius gauges (that's what they would be, actually). That's highly ineffective, and that's why that method has been discarded, and the outside gauge has been preferred.
The customizer
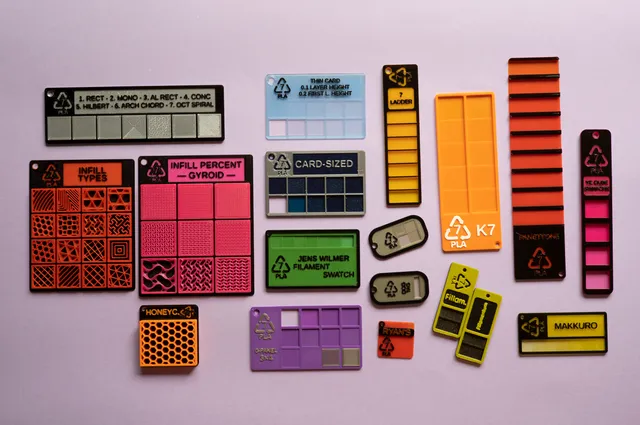
When I say that the gauge is "fully customizable", I really mean the "full" part. It's seldom said how much can "full" be at its fullest... So you can change the dimensions and shape of the gauge, define the scales and their intervals, units and values, the side text, font, coloring method…
I recommend, though, using percentage as units, because it's usually valid cross-filaments with different densities. Also, the file nomenclature may seem odd; or, rather, like a crypto wallet or a MD5 hash. Actually it packs all the relevant parameters, so you can reproduce a given design. But for your designs, you can use more friendly names and won't break absolutely anything.
Printing tips and tricks
With some sizes, you might need to enable the "Detect thin walls" option in your slicer. Note that the Print-on-print technique allows for different sets of options for each object, so you don't need it for the main gauge. This way, also, the POP technique is often better than the raised version (or, sometimes, engraved), as it may give a better letter definition —using different settings for each part.
Many brands use a "inner voiding" style, with holes between the mounting hole and the start of the filament (what I call the "core"); see, for instance, the Spectrum and Fillamentum spools above. These can be used to our advantage to make smaller gauges that can be permanently set, if we add both guides and maybe making the bottom/inner guide longer. With good measurements, the fit will be tight and the gauge will be kept in place when used with axle-mounted printers, like the Prusa MK3S (it obviously won't work with cradle mounts). The gauge has smooth edges, so it won't pierce a vacuum bag when stored with the filament.
With spools like Prusament, that do not have this "inner void", you can make a very long bottom/inner guide, at slightly below the height/thickness of the spool (some 60+ mm for Prusament) and no outer/top guide (or one with a very loose clearance), so it will slide to the bottom of the mounted spool when it's printing. You should make this gauge thick and with heavy infill, so it weighs more and gravity does a good job at keeping it at the bottom. It's not nearly as practical as the other cases, but it's yet feasible. Another solution for this, more resource-intensive, is to make straight guides that are wider than the spool mounting hole. You could then fit two per side, and so the spool wouldn't jump on the axle. That would require a lot of precision (check the option "external perimeters first"), possibly a bit of filing, and an overuse of filament. That's why I haven't checked it, but it's yet an option. (Note that, specifically in the case of Prusament, since the 2022-10-14 update a new gauge model is included which allows to have it mounted in an axle-bearing spoolholder, but only in specific places of the spool. The example value remains, though.)
With cradle-mounted spools, you can make a gauge to keep mounted with the spool just omitting the top/outermost guide. It will not snap on, but just like the trick above, it will roll with the spool. You may want to make a long bottom/inner guide, and it will be almost mandatory to check the "Invert text" in those rulers that have. Unless you're good at reading upside-down texts, that is...
You can make a set of thin, flat, card-like gauges to have always at hand, or another for storage - or both!
Note that the inserts will, more often than not, to have the "Detect thin walls" option enabled in your slicer; the gauge main bodies won't (and usually work better with it disabled).
A note on Alpaplastic snap-ons
I've noticed a bit of variation between (supposedly) different specimens of the same model of Alpaplastic spools, due to many reasons: moulding flash, slightly different model variations, time of the spool, oddities and just because.
To give you an idea, a single spool of Fillamentum Cobalt Blue happens to have four "nerves" inside each of the inner voids, which I've seen in no other spool. This actually doesn't affect the card versions of the guide, AFAIK, as the starting and end diameter of the filament coil are the same; it does affect, though, the snap-ons. They can get too loose to keep them mounted while printing, or fit too tightly (maybe even not at all, like that Cobalt Blue). Since the 2022-10-14 update, there is a v2 snap-on format for RS200GH that works with both the “nerved” and “unnerved” formats, so this should be preferable; though the inner guide is weaker (as it has less material), I've found it to be not a problem in about 2 months of testing (maybe more).
But the snap-on measurements are still accurate; the most extreme difference I've found is about 1mm (diameter), and it's well below the filament diameter of 1.75mm. Ruler lines have their thickness, too, so there is plenty of clearance for that. If you want to make a fit test, get the model and z-cut it in the slicer so it has about 2-4 layers of flat side and 2-4 more of guides. Check if that fits, and if it bends too much.
That said, by all the guides and spools I've checked (which are quite a few, ranging up to 3-4ish years old!), the problems are unlikely, and more likely to be encountered in white brand spools, which usually don't follow the strict quality procedures of more expensive brands. I wouldn't be surprised if those were factory-second products, but I'm not saying that is the case either.
Hey, the spools of my favo(u)rite [insert brand name here] have no guides! What do I do?
Well... you have two choices.
First one is contacting me, because maybe (who knows) I have a spool of that brand lying around and I can check. If not, you _could_ pass me the measurements, but if I don't have the spools then I won't be able to check that it really works.
So the preferred option would be for you to use the customizer, that lets you make a guide fitting your needs, and share it as a remix of this object. Please keep the suggested filename, or even better, the full set of settings: this way is far more transparent and saves the community time when doing more remixes or fitting the guide to the new models that inevitably will appear.
Final note
Printing the texts and ruler lines will often require a single-extrusion width. For that, you will need a clean bed, maybe some adhesion agent (though I haven't needed it), and a well-tuned printer. I have developed a collection of calibration utilities, all of them parametric or customizable, which are the ones I have used to get the results you see in the pictures with a Prusa i3 MK3S (not + yet) and a 0.6 nozzle. You can get much finer results with a 0.4 or thinner nozzle, of course; I just use the 0.6 a lot.
Changelog
Update 2022-10-14
There are “some” additions and changes to the .scad file. Don't worry, it's just a bit more of feature creep; there is full backwards compatibility. The only issue you may run into is having to specify anew the thickness of the guides, in case you didn't use the default 3mm value.
- Added files for many spool models:
- Alpaplastic RS200GH improved snap-on version ("v2"). This can be used with the "nerved" spool variants. The inner guide is slightly weaker (as it has a hole for the nerves), but this has proved to not being a problem.
- Esun new "opaque" spool variants.
- Prusament short straight snap-on version, in percentage, meters and grams.
- Eryone & al “4-bar”
- Eryone & al "4+1 sectors" or “4-sec” for short.
- Discovered that 3DJake and AmazonBasics use the exact same type of spools, almost but not completely identical to Hafner Spools SD200/52-80K. Improved the snapability with those flexy PP spools.
- Alpaplastic RS160 (500 g)
- Alpaplastic RS140 (250 g)
- Polymaker 750 (PVB spools, others may vary slightly).
- Sunlu.
- Filament PM ("Made for Prusa").
- "Raised card" and "engraved snap-on" variants added for all the models. This helps printability the when print-on-print technique is not possible or isn't wanted.
- Added the .JSON text file with the presets for all the published gauges. This will make it easier for you to modify them to suit your tastes and needs (no more decyphering hash-like filenames!).
Changes to the .scad file
- Thanks to the skills and suggestion of user Celta, an additional MMU text option was added. It's still experimental as of writing this, but hopefully it'll be working fine soon (if it isn't already!).
- Applied the suggestion of user Dave, and added an option for arcing scale lines.
- Added an offset parameter for primary and secondary scale texts. This helps with too thin extrusions for a given size, especially with the percent sign (%), which many fonts have in different thicknesses for the 0 and dash. This improves especially the print-on-print gauges, but also applies and improves the engraved ones.
- Better adjustment for the "side text" position on the outer border.
- Added a "slot" option for the inner/bottom border guide. This allows to mount the guide in the "nerved" RS200GH spools, as well as on the side (not axis hole) of the Prusament spools and the Chinese "four bar" spool model used by Eryone and other manufacturers.
- Split "Guide thickness" in "Inner guide thickness" and "Outer guide thickness", to make better use of the "inner guide slot" option.
- Added a "skip" option to both scale rulers. This will omit adding the line/text for any nth division out of X (for instance, show only the even or the odd, 1 out of 2). This allows for "zigzagging" texts; it has been used in the Prusament snap-on meter variant, for better readability of the secondary ruler.
- Added an option to omit the ruler unit when there is text. This may help with the rendering and printability of some units; egr., the dash in "%" is very thin in many fonts, the minuscule "m" may not be well displayed, the lowercase "g" may shift the text box or touch the bar below. This also allows for other, arbitrary, non-included units. Also, the unit is not especially useful to display; first, you'll know which unit you'll prefer, and I doubt that many people will go mixing units; second and more important, you can easily deduce the unit by looking at its maximum value (and spool size). Anything from 500 to 1000 and upwards will be grams; 100 will be a percentage; around 300 will be meters; 1 or less will be kilograms; and it's hard to confuse a 2.2lb spool with a 2.2kg one.
- Added a two-digit rounding when the maximum unit value is equal to or less than 10. This may help with huge capacity spools.
- Added kilograms as unit to both primary and secondary rulers.
- Increased precision of maximum values of both rulers to allow for one decimal digit.
- Improved the behavio(u)r of the recycling symbol with PETG, now using the Recymbol 1.1 library version. and included an extra field for a custom recycling code. This is due to a material+code clash, as PETG is preferably with code 1 in the European Union (as in PrusaSlicer's gallery) but code 7 in the United States.
- Allowed no-slot, centered single-scale rulers. These can work nicely with transparent filaments, especially in "card" format. A ruler is automatically centered when the slot has a width of 0 and the other ruler is disabled (set to 0 intervals).
- Allowed centered textless double rulers (with or without slot).
- Allowed the rulers to span up to the borders of the gauge, and increased the maximum values for min and max length. Now they're trimmed to the gauge area.
Tags
Model origin
The author remixed this model.