Swatch + Modifiers - Filament/Infill - Customizable OpenSCAD

Description
PDFUPDATED 2023-07-07 - version 1.1. Added new features and presets (for HueForge and a single-panel swatch aimed to use with colorimeter Nix Mini 2), plus a new set of STL (Nix Mini 2). The STLs for HueForge calibration can be found here at Printables. See the full changelog of the OpenSCAD file at the end of this text.
This is a fully customizer-friendly OpenSCAD file (and many sample STLs included), which means that you can use it in OpenSCAD as a model-generating app without any knowledge of programming whatsoever. Just set values, hit F5 to preview the results (if they're not shown automatically), F6 to actually create the model, and F7 to save it. (See the much more detailed tutorial Using OpenSCAD customizer, here in the "Other files" section, for much more info, examples, details and poor jokes.)
The swatch has up to 6 elements:
- An optional matrix of panels or blocks, to display the filament printed at different heights for opacity and color intensity purposes. Though you cannot set columns or rows to 0, you can set their width and depth to 0 effectively disabling them. Note that if there is more than one row or column, the row or column spacing still will be applied (which can be useful to match a specific size).
- An optional area for adhesive label (which IMHO work better than adding a 3D printed text). It's intended to be "engraved" in the swatch, so it may sit flush with the surface, but you can make it raised and even a hole.
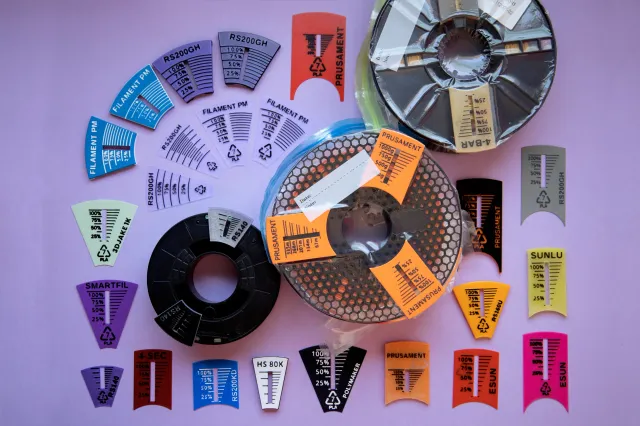
- An optional recycling symbol to display the material in the swatch (about this, see below).
- An optional hole for a cord, screw, chain or keyring, which can be of 4 different head types (countersunk, cap screw/Allen, hex and simple cylinder or "grub screw").
- Up to 5 text lines (optional) displayed in the label area. Whenever there is a text, its calculated size (including user variations) will be shown in the message console.
- You can also add a raised frame to the swatch, and a raised reinforcement to the screw hole.
It also features a visualization of the element height by gray heightmap (white on top, black on bottom), and a grid in preview to locate the panel positions.
Plus, the customizer file can generate modifiers for any of the elements: a single panel, row or column in the matrix; and the label, recycling symbol, screw hole, frame and texts. This modifiers can be "surface only" or "full (height)", and can be added to your slicer to add several effects to a single element. Modifiers are always self-centering; set the modifier to 0, 0 x/y coordinates, and "flat on the bed" (using the "drop button"), and they will be in their right place, if just dragging them to the slicer wasn't enough.
This allows you to, for instance, add ironing to the label area for perfect adhesion, set the recycling symbol to 100% infill for better visibility with transparent filaments, make infill types and percentages and top infill swatches, compare non-ironed vs. ironed results (as in the "K7" type swatch) and much more.
The Recymbol library
The recycling symbol uses the Recymbol library v1.1 (which you can get here from Printables), but it's not actually required to run the customizer file. The console will output some error, the symbol won't be available (but will be counted as present), and that's it. But installing the library is so easy, and I use it so often, that is strongly recommended to. You need to:
- Download from Printables the "library.scad" file
- Create a folder named "Recymbol" in your OpenSCAD library folder. Go to OpenSCAD menu File->Show library folder.
- Move the file library.scad to that Recymbol folder. That's it, it's installed. No restart, registering, renothing required.
The presets
There is a bundled file with some presets (for which STLs are also provided), so you can get started right away; just download the file Parametric filament swatch.json (found in “other files”) file in the same folder where you have the scad file, and that's it.
Some of the presets are inspired in already existing designs, but (except for the Fillamentum one) they are not size-matched, and maybe not size-matched. All sources are stated in their description, and also as remix sources. This is so if there is a design you'd generally like but wanted to tweak, you could do so. Most of the swatches are generated for a 0.2mm layer height (and 0.2mm first layer height); if otherwise, it's indicated.
As a rule of thumb, if you plan to add paper stickers in the label areas, is better to set them at 1 or 0 layers depth; this will make the sticker label flush or almost flush with the swatch surface. If you engrave the recycling symbol, using a positive depth for it, you'll have a uniform height swatch that can work perfectly with storage solutions.
The filament presets
- 0-panel 3x4: A 3x4 matrix of panels, where the first one is empty; this helps matching against another color. To make a "transition swatch" that shows how one color overlaps another when using z-based color height and 1 or two layers, like the one in the picture with its name, change the "Swatch height" (in "Main parameters") to 1.8, and make sure that both recycling symbols and label/texts are set at -2 depth (if you're using texts, better leave the label at 0, unless you want engraved text, not raised); note how even an opaque filament such as the Prusament Pearl Mouse may need more than 1 layer to show its full color (which gives way to interesting combinations). This way you'll get a 2-panel, 2-layer max color transition in the tallest panels; otherwise, the swatch preset is set at 1 layer height above swatch height max for label, symbol and panels.
- 7-ladder: A stepped, 1-column, 7-row, labeled and stepped vertical swatch that works well for translucent and transparent filaments. It's more compact yet more granular than the Old Standard.
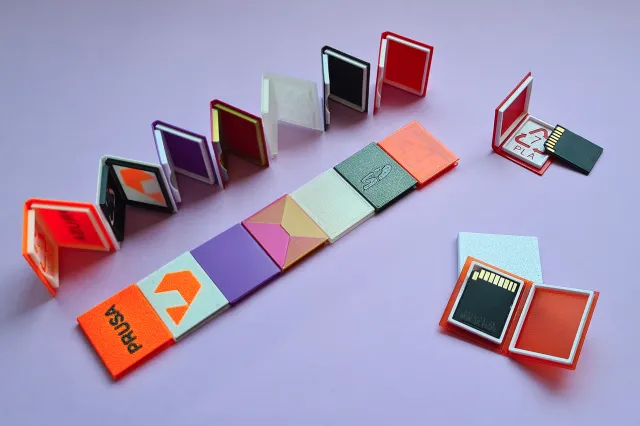
- Card (thick): This is a credit-card sized swatch (but thicker), with 10 panels, the first of which is empty. This is especially suited for translucent/transparent filaments, so you can see how transparent does it get. It has a thickness of 2mm, but if you want to add text, it's better to make it 2.2 and the label area with a depth of 2 layers (0.4mm, since the preset has 0.2mm layer height), and the text with a depth of -2 layers (that is, 0.4mm raised above the area; negative depths mean "raised"). This will allow a z-based color change at height 1.8, with 2 layers of "coating" in different color, that won't affect the swatch sampling panels.
- Card (thin): A thinner version of the credit-card sized swatch, this one prepared to print at a 0.1mm layer height, 0.2mm first layer. Make the label area 0 layers deep (flush with the main swatch body) and set -4 layers deep the recycling symbol and texts to get the sample in the pictures.
- Dog Tag (with label): This is a chip in shape and size of an identification "dog tag", 3mm at its thickest, with a label area and a single strip of a single layer. This (and the next label-less version) is useful for identifying spools in closed, opaque containers, and burying them with honors (in the recycling bin) once they've proudly served.
- Dog Tag (no label): This chip is far thinner than the labeled dog tag, can be the fastest STL swatch to print in just about 6 minutes without ironing and uses a measly 1.73g of filament (PLA). It has 4 panels of increasing height, up to 0.8mm, and a thicker base of 1mm, a frame (up to 1.4mm) and reinforced hole; so, even though its apparent nimbleness, is up for hard jobs.
- Fillamentum: This one is size-matched to the swatch from a filament brand that is not named after a printer named after someone named Josef ;), using their publicly available blueprints. For the size-match, it prints at the unusual layer height of 0.25mm (0.25mm first layer height). The symbol-less version is slightly different from the with-symbol version, having a greater label area.
- Jens Willmer-style: This is based on Jens Willmer's Simple Filament Swatch. For some reason, one "l" fell off the named sample... and it's strange, since one very nice feature of this is the amazing amount of label real estate; it has a complete stepped panel strip, and a frame. It comes at a bit of a cost, since it's mostly on the "heavy and slow to print" side, which actually amounts to less than 10g of filament and 30 minutes; so no sweat for a very useful piece.
- K7: This is my personal favorite. It resembles the size and shape of the RAL K7 color chart, making it very easy to compare shades. The K7 is the most affordable color chart by RAL, which is the most used color system for plastics. There are, though, some manufacturers that use other systems. This swatch preset has two identical columns, which makes it ideal to compare non-ironed vs. ironed results, or some other variation, by using column modifiers.
- Makkuro-style: This is very loosely based upon Makkuro's Filament swatch/sample, in overall shape only. See, Makkuro's swatch holds so much information in it that it's rather a filament DNA strand than a simple swatch. If you're interested in OpenSCAD swatches, you should definitely check it. And since we're at it, you should check also all of Makkuro's other work because, people, it's one of the masters of OpenSCAD we're talking about. Go check, I'll wait.
- Old Standard: This is the design I've been using until recently (substituted by the K7). It's thick, with 4 well-separated panels and a label area. Whilst is just slightly below the K7 in time and material consumption, the two rows of the K7 allow for both ironed and non-ironed panels —and I've grown very fond of the ironing feature, so having it in swatches was a must for me.
- Panettone: This one owes its name to it being as huge and chewy as a certain type of Italian sweet bread. It has no relation whatsoever, endorsement or otherwise, with or by any registered color-matching trademark. If there was some relationship, it would be purely coincidental. And if there was a coincidental relationship, that would be as humor/satire and covered by fair use of the brand we're not saying, because there is no brand. Just cake.
- Ryan's: This is a tiny one, based in Ryan's Material Swatches. It has stepped panels, though they're "barely there". The label area allows writing, especially when ironed. It's the less material-using example (just by 0.1 grams less than Dog Tag no label).
- Nix Mini 2 (new from v1.1): This is quite similar to the “single infill type” swatch (see below), with a hole, space for recycling symbol and a label, and a single thick panel. This is aimed to make a swatch big enough (yet not that big) so it can be used comfortably to get the color data with the Nix Mini 2, whose sensor head is an octagon 2cm across (including its “walls”).
The infill swatch presets
All infill swatches follow the same pattern: one or more equal height panels, with per-panel modifiers (that is, single-panel, one for each) to which the settings are added. Same-height panels mean that both the "Column step" and "Row step" parameters are 0, so there is no variation from the "Minimum panel thickness" neither by column nor by row. There are example .3mf files for each. So you may use, for instance, the "top infills" model to actually display infill percents, or have big, single-type examples of the top infills using the "single infill type" swatch. With the new infill types (egr. "Lightning infill") it might make sense to have different-height panels, but usually what you'll want is to change just one variable, not two (which would be panel height and type).
How to use the swatch
Have fun.
No, seriously. There is a truckload of parameters, that are self-described in the customizer file). So, start playing with them, see what each one does in practice, and if you come across a combination you like, use the "+" button at the top of the customizer to save a preset, ready to use (or modify) later. Bear in mind that some parameters are only used with certain combinations or layouts, not always; those cases are specified in the parameter description.
Now, if you want to do a more specific swatch, let's make some considerations on design.
The panel matrix and (if present) label area and recycling symbol will always add to a dimension (width or depth), and possibly also height (Z axis). The screw holder won't add size when in a corner (top or down), nor in the center of the swatch, but will add to a single dimension (asymetrically) if it's on a center/middle position (either X and Y). Remember that the console will output the final size of the swatch, so you can make any necessary adjustments to fit some intended dimensions.
Whilst the layout is by default in a "portrait" style, this can be changed to "landscape" (and reversed) simply by using the rotation and position parameters, and if needed swapping the x/y values of the intended coordinates. This may be a bit odd to work with in the customizer, but it's better than the alternative of having the parameters meaning very different things depending on the layout. We need some reference frame, after all.
For printability and design sake, there are many safeguards to avoid elements touching (meaning "almost overlapping") each other. You can make them if you will -you will just to make a little bit of extra effort. It's suggested, though, that spacings be greater than 0 and of such a size that can be made with an integer number of perimeters.
If you want the swatch of a very exact dimensions and you don't need one of the elements, you can use it as a "ghost spacer" by setting its z-height. Also for printability, many values of z-axis (height) parameters are measured in layers, not millimeters or inches. Remember to set the slicer layer heights at the same values of the swatch; you can use different values for the first layer height and the overall layer height (just as the slicer does), and are displayed in the suggested filename as "-lh" (layer height) and, if the first layer height is different, "_flh". So, a setting of 0.1 layer height and 0.15 first layer height would be "-lh0.1_flh0.15" in the filename.
The console will output a suggested file name, which is extremely long. That is because the filename packs all relevant parameter values. This also may help you replicate one of the sample swatches, or redo one that you may have lost the preset for. The parameter blocks for each element and main params are separated by a dash -, whilst the different parameters for the same element are separated by a underscore _.
Other notes of interest
As you see, I use the filament swatches much like… swatches of paint or materials. I prefer specific tests fors specific things, like bridging or temperature; after all, the filament swatch should be the last of your test pieces, after you've tuned your printer and filament, IMHO.
So, you might find useful my collection of parametric OpenSCAD tests and calibration files:
- The extruder multiplier/flow/walls calibration cube
- The simple temperature tower, with G-Code generator)
- The advanced temperature tower, with G-Code generator and tests for bridges and two overhangs
- The parametric overhang test, with support enforcer generator.
- The E-Cor tower (waveform for the TMC stepper drivers), with G-Code generator.
- The parametric ironing calibration matrix, to fine-tune your ironing settings.
And, also, the non-parametric-but-modifiable precise Live-Z calibration test.
Changelog
Version 1.1 (2023-07-07)
- Added the "outline" panel modifiers. These are not the whole panel, but just an outline, and they are intended to be used as very thin negative volumes, to force the slicer to consider each panel a separate cube.
- Added a new option for a modifier that affects all panels at once (but only the panels).
- Added an optional base difference for panel modifiers. These two improvements may help with swatches that mostly work with raised/protruding panels, such as the HueForge step test.
- Added an option to “compensate” the optional base difference, so the trimmed panels rest at z=0.
- Fixed a small bug with the panel column modifiers.
- Increased the maximum number of panel rows and columns in the controls.
- Added a new parameter panel (in OpenSCAD customizer) specific to panel modifiers.
- Moved there the panel row and column parameters, from the "Object creation" panel.
- Added the grayscale for panel modifiers.
- Added the option to make panel modifiers as either parts (with its exact height) or modifiers (as they were in v1.0).
- Changed the steps/definition for Layer height and First layer height parameters. Now they can have up to 3 decimals, instead of just 2. This allows for layer heights such as 0.075mm.
- Adjusted the precision (number of decimals) for Horizontal padding, Vertical padding, Panel width, Panel depth, Column spacing, Row spacing, Screw diameter, Screw spacing, and most label parameters to 4 decimals instead of 2. This is to help with conversion to mm from imperial units.
- Added the option to make a “screw hole only” modifier ("Do screw negative volume"), so you can create a modifier to batch-convert one size of hole to another, instead of having to render each one separately.
Tags
Model origin
The author remixed this model.