Stress Free First Layer calibration in less than 5 Minutes to perfection

Description
PDFTL;DR
First layer calibration howto which works for anyone.
Collection
update 2024.0229
- added STL file
update 2024.0103
- added right hand / left hand version to make notes easier
- added CURA right hand
- added CURA left hand
There it is dear Ultimaker Cura users, just for you.
update 2023.0723
- added Temp Tower Series
update 2023.0522
- added elegoo neptune 3
update 2023.0518
- added Snapmaker A250 and A350 gcode
update 2023.0310
- added 3mf for prusa mini
update 2023.0226
- added collection with the full bed test
update 2023.0224
- cleaned folder structure
- added bambustudio PLA
- added bambustudio PETG
update 2023.01
- added gcode Prusa Mini
- added gcode ender 3
- added gcode ender 3 pro
update 2022.11
- minor text changes/edits
- added step file
- added 3mf file to make self slicing easy
- added final full bed test print
- print in place giveaway model - spinning ring
Let's get started!
First layer the base of everything
If you are one of us who runs into the problem to not get calibrated the Z layer and spends already hours of trying - it all ends now. Soon you will have a proper Z Layer calibration with your printer and can enter the world of successful enjoying 3D printing. (*)
Soon
That is less than 9 Minutes, typically less than 5 Minutes. Read carefully.
Let's go
Print and observe the process carefully, the model is designed in a way to give you a good view on the print. It starts and draws a frame. The gcode prints, after drawing the perimeter, horizontal from the bottom up to the top.
It starts from the bottom when the frame is done.
If you slice by yourself make sure the bottom layer is printed horizontal and not in the default 45° way. The 45° way will hide issues but we will fix them.
Preparation
- make sure your print sheet is cleaned with IsoPropanolAlkohol or whatever you need to clean yours. I recommend the 99.9% pure IPA over the 90% because i don't like to have the whatever 10% addons on my print sheet.
- even if it looks clean, cleaning is very important to get a good first layer
- These 5 seconds of cleaning before every print with less than a teaspoon of IPA will save you a lot of money from ruined prints, wasted time and damaged sheets
- clean while the bed is not heated, just pour a little amount on the print sheet and wipe with a towel.
- don't use a dark filament for this calibration, I say that while deep dark black is my favorite PLA but using a dark during calibration makes it hard to see what you have to see.
- the galaxy silver you got with your prusa is best for calibration, but you can use any color with a good contrast to the print bed
- make sure that you have a good lamp you need light to see what's going on
- really a strong flashlight, a dive lamp, whatever, better than light is more light, the lamp of your phone is great for that.
- now we can start
How IPA works
The alcohol solves any grease and transports it by capilar effects into the paper towel, while you wipe the sheet. That happens very fast and you only need a small amount of IPA, just a teaspoon is enough.
Learn what you have to look out for
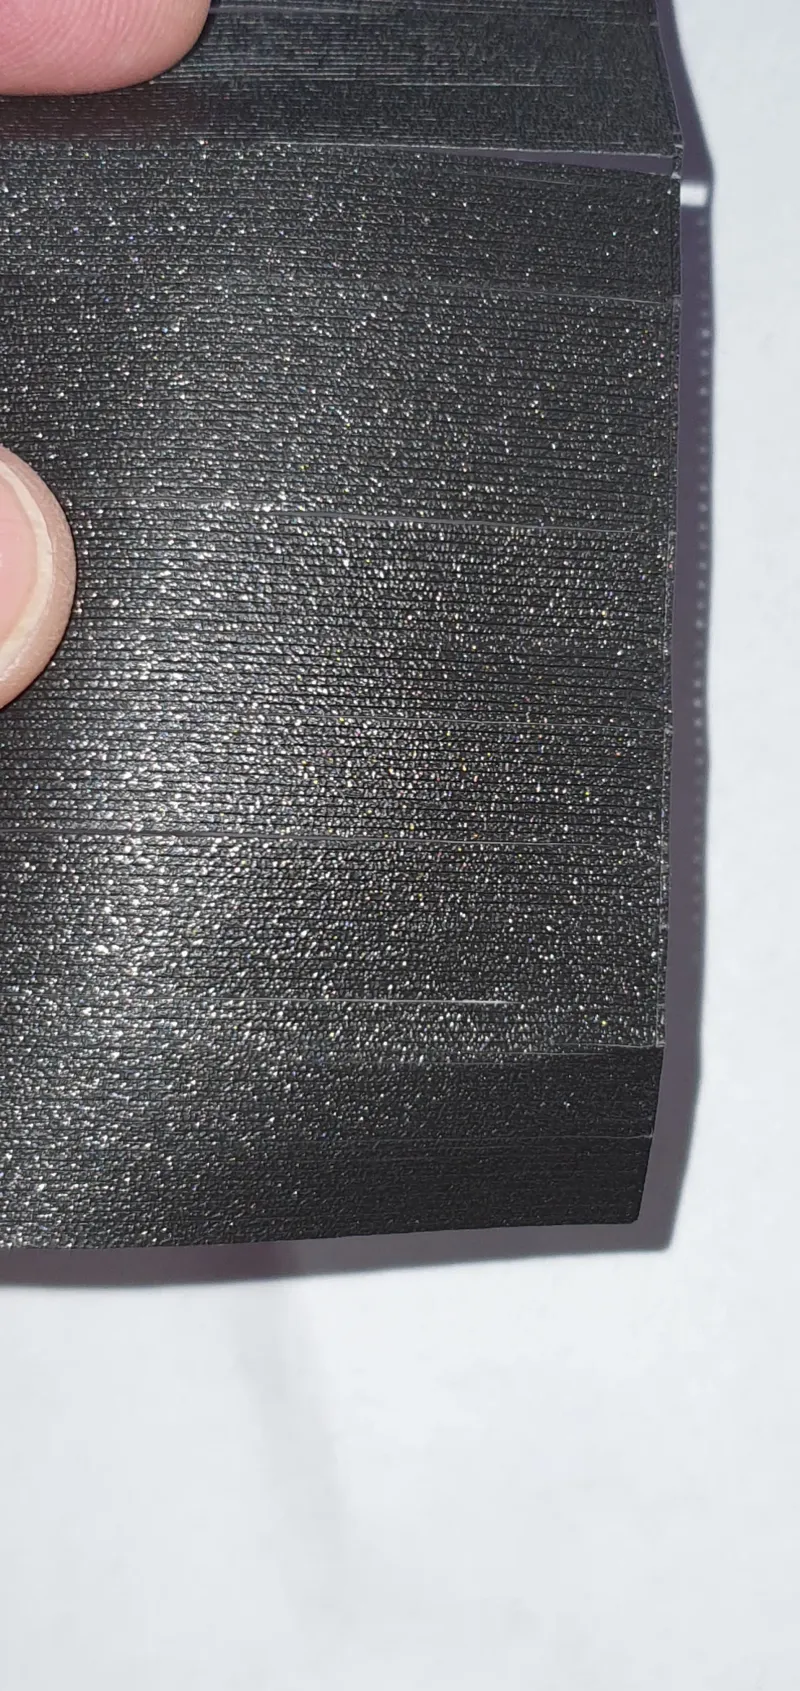
This picture doesn't show a good first layer, this first layer is a complete disaster. I show this to you to help you understand why black is a not such a good idea to calibrate the Z layer. It hides to much.
The next pictures, you may know them from your own prints, trying to get that first layer fixed. This is what a not working first layer - nozzle much to high - looks like.
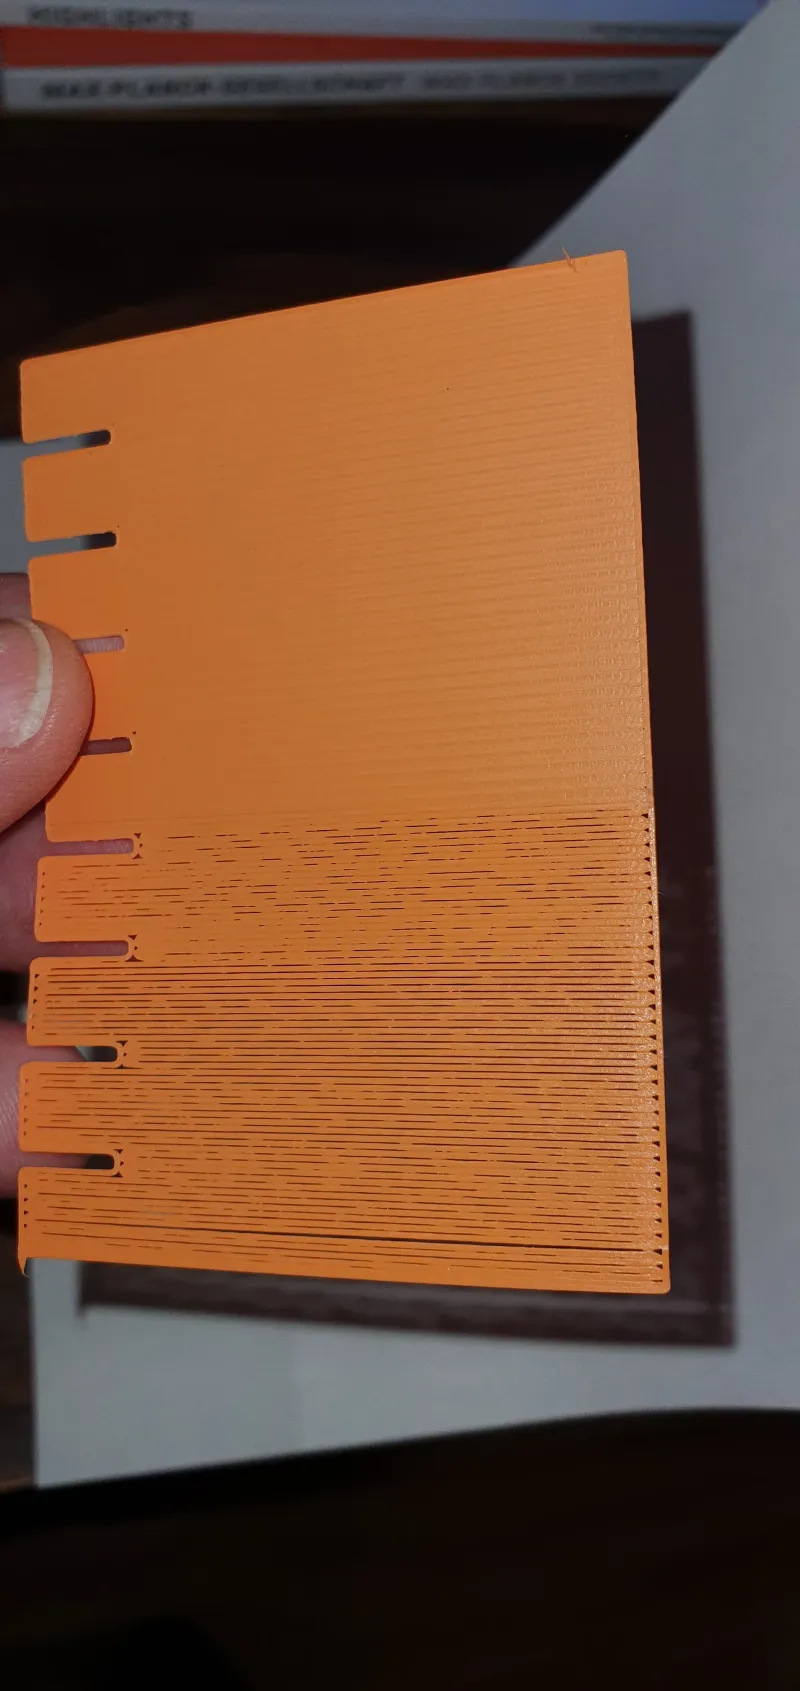
This one is printed with the exact same setting as the black one. With this pale orange you see what the black didn't show you.
- no binding between the filament strings
- you can rip them apart without force
- you can look through
- holes and blobs
That is not a first layer, that is a bunch of strings.
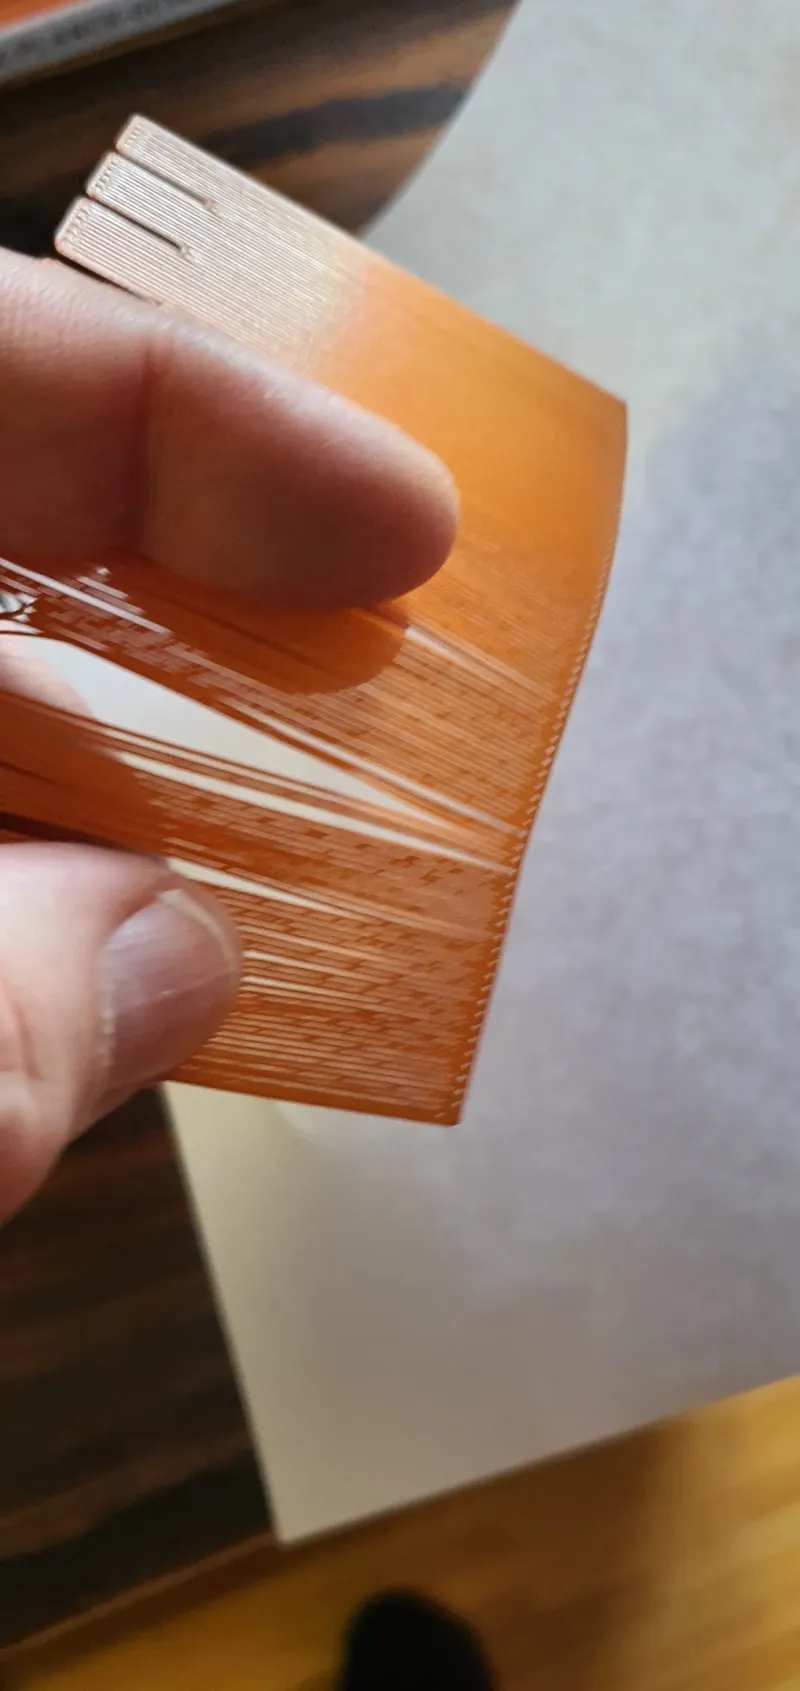
(Socks)
Now it is your time
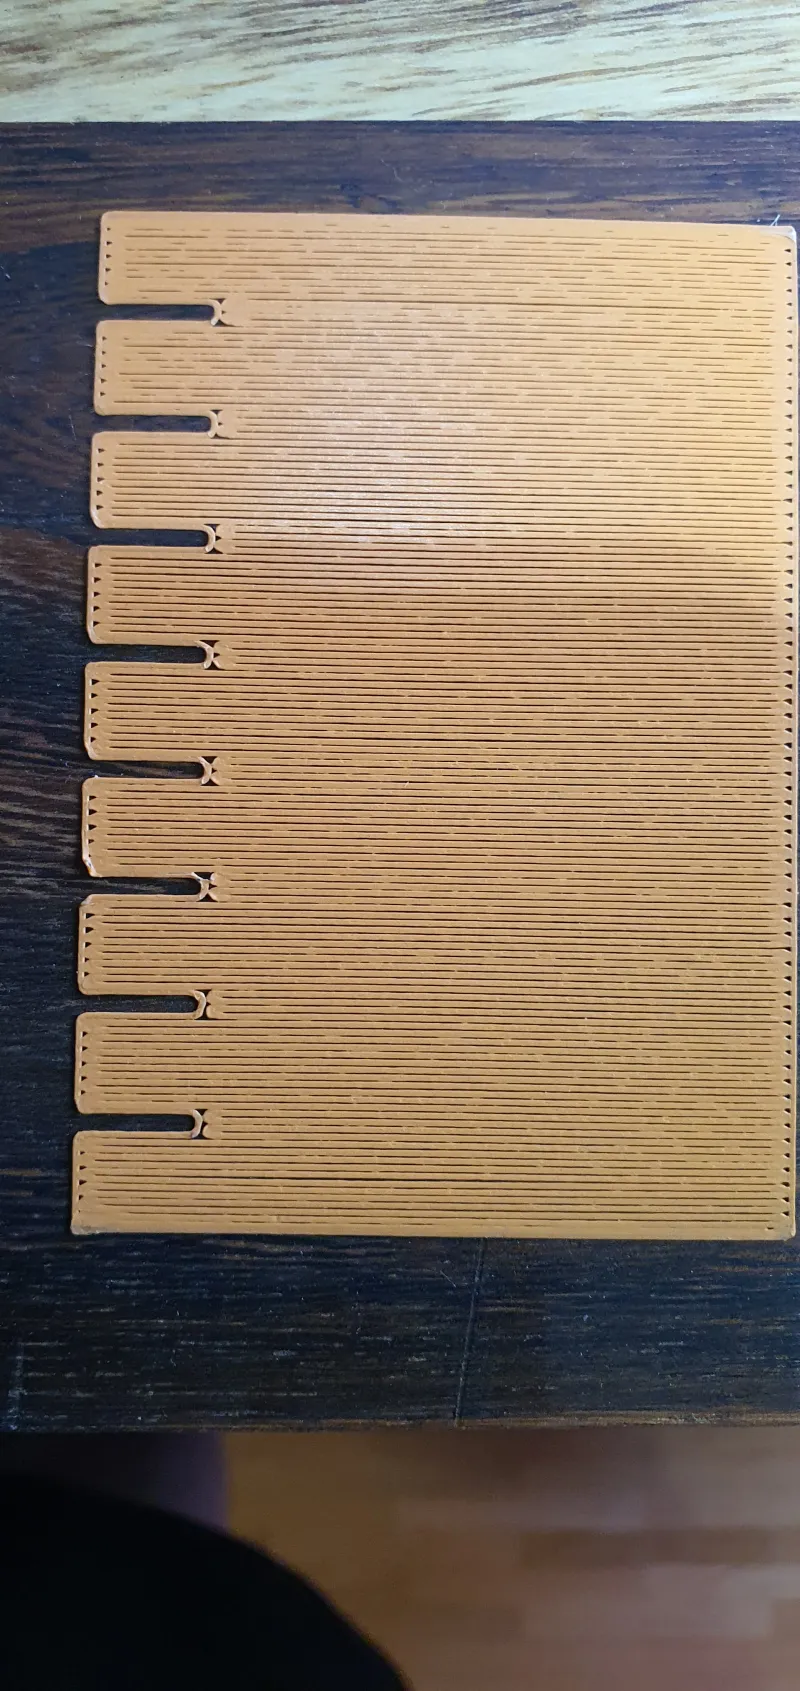
This time you will win, you will achieve the perfect first layer. Look at this picture this is what you will see on your printer when you start printing the model. Read the text after that picture and than start printing the model and adjust your z level to get the perfect first layer.
You see this marks on the left side, i count from bottom to top.
You see how ugly the first 3 look and you see how it starts to get better with the 4.
How did that come from?
It is done with the live Z tuning of your printer, while you print the model and watch carefully how your print looks, you turn the value up or down in little steps of 50. Bring the nozzle down by 50 micron watch a minute or how long you need and than decide if more up or more down.
In most cases you start with a nozzle much much much to height over the bed, like on my pictures.
Above section 5 you see how your first layer should look like.
Printing the whole thing takes 9 Minutes, in this print, after 4 Minutes the optimal level was reached.
As often
It is like riding a bike, after you get it for the first time, you know it and from there you can do it just by the way and any time without trouble.
If you get it, it is so easy that you now understand why the experts don't care and fail to give this knowledge to the new users. If you know it, it is incredibly easy.
If this howto was helpful for you,
click on like and follow me.
The next step to increase print quality
Next step is to find the optimal print temperature. I made a very fast less filament needing temp tower series with pre configured 3mf files for prusaslicer and bambustudio. 38 models, 19 different kinds of filament and 19 different temperature ranges in steps of 10°C and 5°C.
What to print next?
You now have a well calibrated first layer and could for example print one of this fidget spinning rings. They are printed in place, no assembly no glue no screws. This rings are gerat giveaways for visitors and your printer is now able to print cool stuff like that.
https://www.printables.com/model/272994-one-ring-not-to-rule-but-to-roll
Going deeper?
The final level of first layer calibration goes straight into the mesh leveling. If you like to see how your printer print at any position of his bed, try this.
https://www.printables.com/model/303825-full-print-bed-many-printers
Please publish your makes
Publish your first layer print here as a make to help other users to see how it looks when the Z layer goes from bad to calibrated. The more different views we get the less stress.
Donation
If you like to donate you can buy me a coffee
DESASTER
Desaster is the german word for disaster. I choose to use german because in german every problem sounds more dramatic and nothing is more dramatic then a 3D printer without a proper first layer calibration.
.
.
.
Stop reading here.
.
.
.
(*)
It takes me more time to do my very first first layer calibration than to build the mk3.
Tags
Model origin
The author marked this model as their own original creation.


