Ghost Clip

This 6 cm x 13 cm ghost fella is a paper clip, bookmark, and can be used as decoration!
0
5
0
21
updated October 25, 2024
Description
PDFMade in collaboration with @JackMuld_2527449
Assembly/Construction Instructions:
Creating constraint box:
- Create a new part
- Select the front plane
- Using the center point rectangle tool, create a rectangle with dimensions 13 cm in height by 6 cm in width.
- Make sure this box is centered on the origin
- Use smart dimensions to make sure that the dimensions are correct
- Select the box on the sidebar that says ad construction lines from midpoints
- The entire sketch will be inside this box
Creating top triangles:
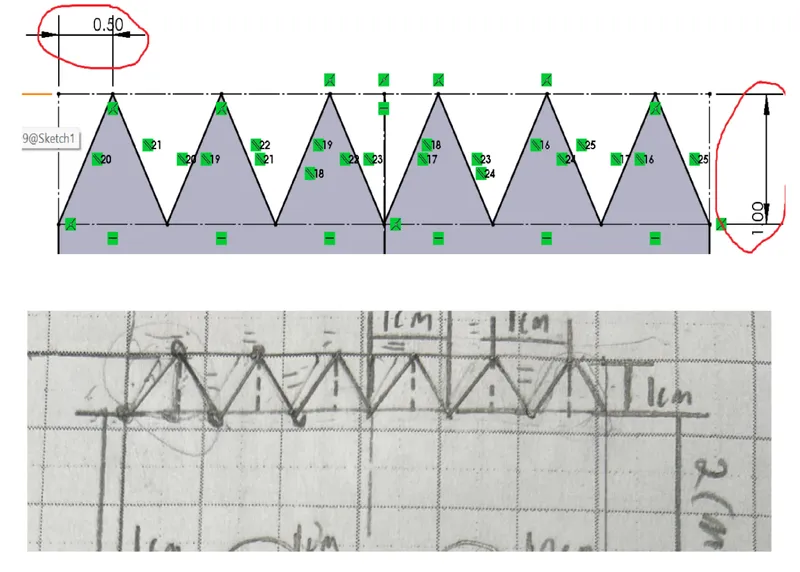
- Make 6 consecutive horizontal construction lines going from one side of the rectangle to the other, 1 cm down from the top line. Use the equal relation to mark them all as equal.
- Draw a vertical construction line from the middle of these six segments to the top of the constraint box.
- Use the line tool to connect the dots across the top to create six triangles with construction lines for bases.
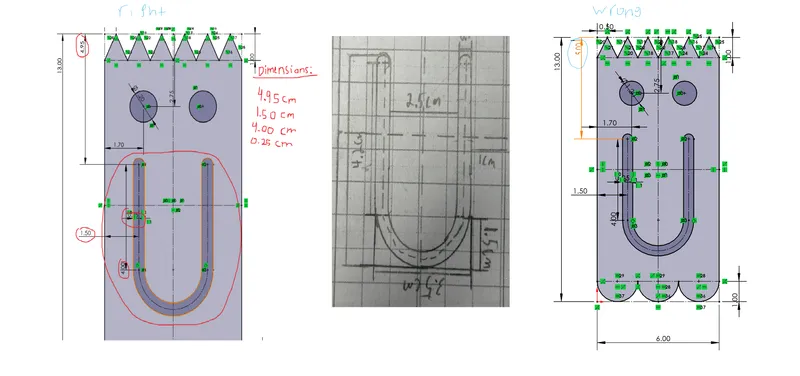
Creating bottom circles:

- Make 3 horizontal construction lines 1 cm above the bottom line of the constraint box.
- Make 3 consecutive center point arcs that go across the constraint box and construction lines, make sure each arc point is 2 cm apart and line each arc to each point on the 3 construction lines and connect each point
- Each point for each arc should be 1cm from the left of the constraint box, then 3 cm then 5 cm.
- Make sure all 3. arcs are equal and lined up to the horizontal construction line, all 3 arcs should reach 2 cm in length,
Creating eyes:
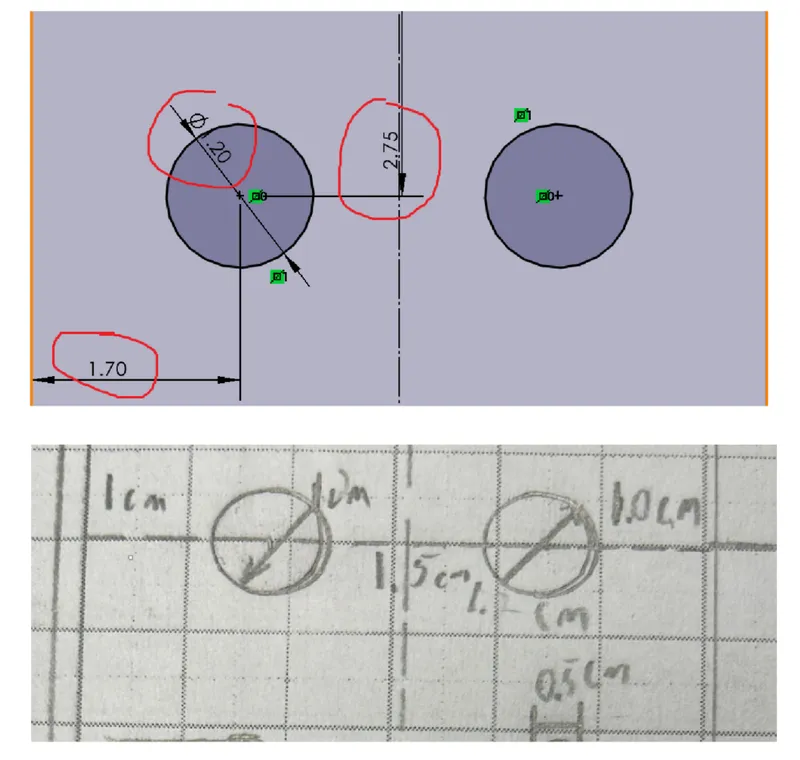
1. Make one circle located 1.5 cm from the side of the constraint box and 3cm from the top of the constraint
2. Make the radius of the circle .5cm or a diameter of 1cm
3. Use the mirror tool to mirror the circle across to the other side of the middle line of the construction line of the constraint box
Creating smile:
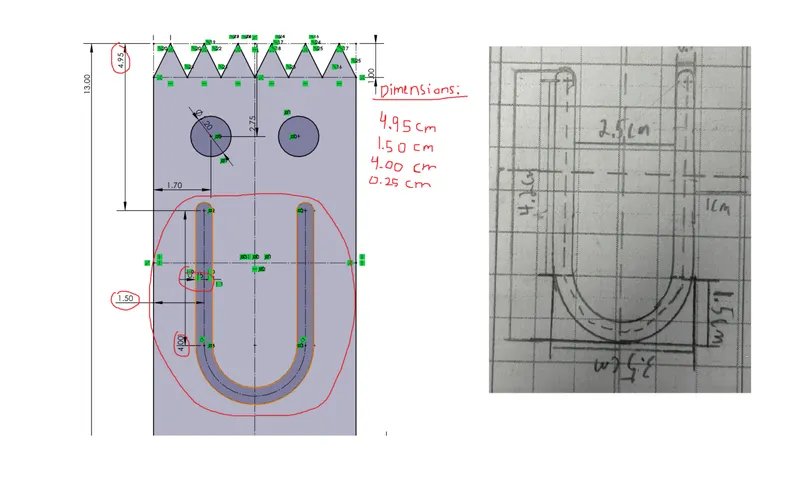
- Create a vertical line that is 4cm long and 1.5cm away from the left side of the constraint box and 5 cm from the top of the line to the top of the constraint box.
- Select the mirror entities tool to mirror the line across the middle construction line
- Using the tangent arc tool to connect the two lines at the bottom to each other
- Mark all the lines for construction
- Using the offset entities tool select the line and then select the bidirectional box.
- Offset 0.25cm
Select the add caps box.
Make it 3D!
- Click the features tab and the extrusion icon in the menu
- Now select the figure and extrude it by 1.0 cm
Carving your Initials:
- First, select the sketch icon and select the front plane
- Put 2 construction lines in between the mouth that connect to the inside of the mouth
- Use the text tool to make one of your initials on the line, use the Impact font, and use any font, or size that fits onto your figure.
- Repeat step 3 for your other initial. Make sure to space each initial apart so they do not overlap.
- Click Extruded cut and engrave it with 0.0495cm cm
Design Choices / Changes:
- Changed the circumference of the eye from 1 cm to 1.2 cm to make the eye bigger during our sketch process, we were, comparing our figures to physical copies and we found that the eyes of our figure were too small.
- Changed the eye distance from the top of the constraint box from 3cm to 2.75 cm. When comparing the figures we discovered only were the eyes too small but they were also too far down so we changed the values to move the eyes a little higher up the face.
- Changed the distance of the mouth to the constraint box from 5 cm to 4.95 This change was done because the figure’s mouth was only slightly off but it was incredibly noticeable, this 0.05 cm difference was able to line up the mouth of the figure completely
Model origin
The author marked this model as their own original creation.


