


These print and work excellent! Slight downside, will not work if you use any of the backstraps.


View one more comment
@PhantomAura_1179965 is there any change of you making on thats a lil shallower that will work while using backstraps? I can beta for you if you want lol

@TjJenkins_1068332 Sorry, just saw your comment. I’m think I’m done working on this model. I spent a ton of time as is, but you’re more than welcome to modify it as necessary.
Fits my Glock 22 Gen 4 w/o using a modular back strap. Very nice fit. I really like the cutout for magazine removal. I printed with Prusa ASA. Very nice! (edited)
@Phill_633460 Thank you for your feedback. I’m glad you like it!
@Phill_633460 Thanks to your feedback, I’ve been able to update compatibility to include the Gen 4 standard frame handguns.


It kind of works, but is still difficult to grasp onto the lock. Probably best to just get an extended slide lock.

@death4u Thanks for your comment. that’s definitely an option. I’ve had positive feedback on this design, but obviously your mileage will vary.

@billho_1985337 Glad you like it! I made them for all my Glock friends as well.


Only used the end for the motherboard, but design works great. I know it's supposed to go in between the shroud, but I opted to attach it with a ziptie because my settings weren't quite right. (edited)

@azerik92_2362938 Thanks for the comment and for posting your make! Glad it worked for you.

Only printed the motherbox end for now, using 10% lightning infill and tree (organic) supports. It came out great! Very easy installation as well.


@CrescentM00N_2894967 Thanks for your comment! Glad it worked for you.

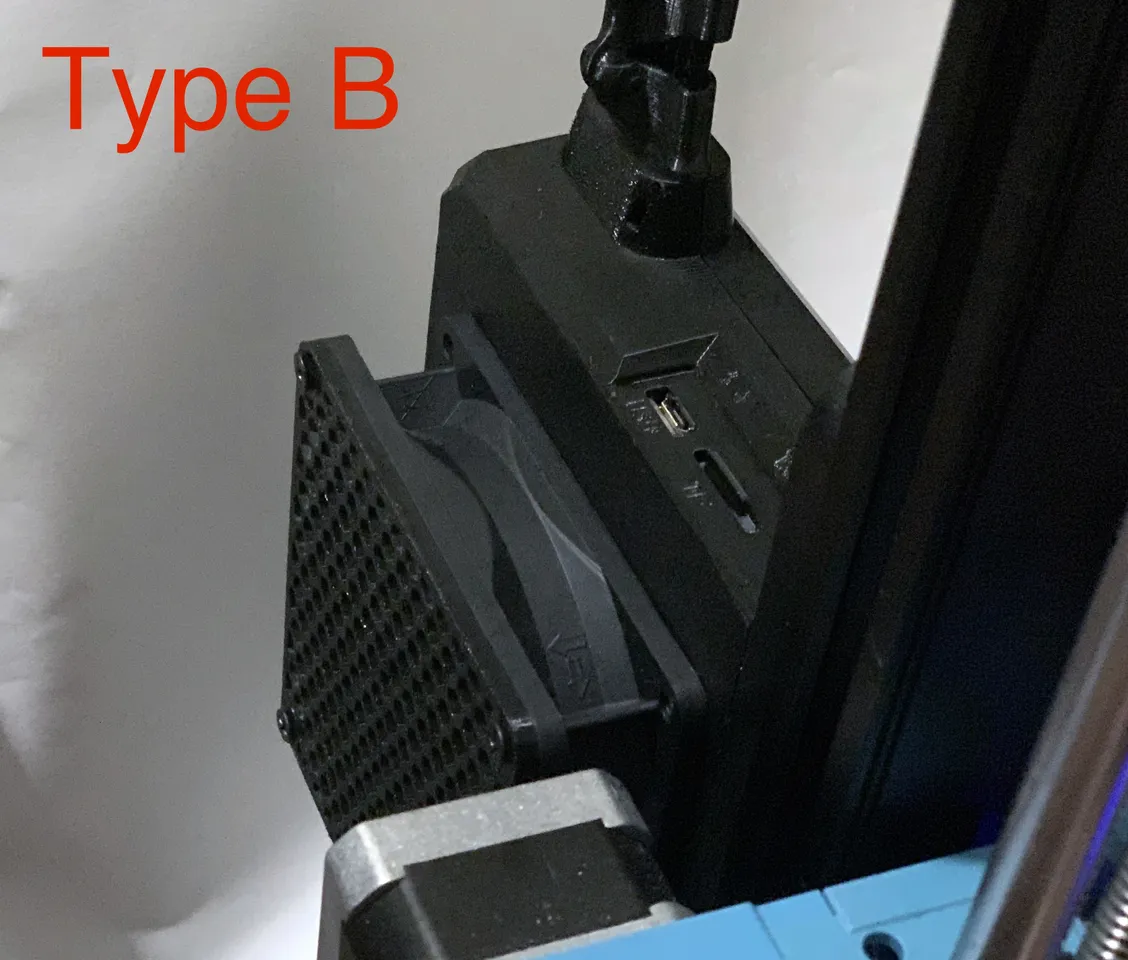

One big drawback of this type A model is that if you are using the nautilus fan, it would crash with the 92 mm fan.
I have created this model to shift the motherboard to the left, thus avoiding the collision.
https://www.printables.com/model/959952-sovol-sv06-motherboard-hanging-plate-shifter
@NoobEngineer_2153297 Great idea! Thank you for sharing. This will make it a lot easier for people using the type A as well as a large part cooler.

This is a nice build. I went with the type B cover, but did things a little differently. First off, instead of removing the stock fan I flipped it so it would pull air out while having the 92mm fan push. Second, since my power supply is not in my enclosure I decided to just wire in a DC stepdown buck converter outside the case and run it back to the fan. The more I think about it, I might turn them both around so they don't blow air onto the build plate. It hasn't caused any issues yet though.
BTW, if you want to avoid the whole fan coupled with the part cooling fan just wire them in to pin 1 and 2 on the screw in terminal. It is also silk-screened on the board. (edited)


@DavidObert_2307502 Glad it worked for you. Thanks for the info!


@dmdouce_1649672 Glad you like it! Thanks for the feedback.


@Boomer_1779679 You’re welcome! Glad you like it.


Printed in clear petg. Works great, can be a bit tricky to get filament through it Sometime

View 2 more comments
@GT_Reaper Good info. I haven’t used ASA yet so had no idea. I’ll definitely add that, then.
@PhantomAura_1179965 glad I could help! 😃


@Chinchill_2282011 So glad you like it! Thanks for your comment.


@tmayad_1577741 Thanks for posting!

Printed using regular (recycled) PLA, slipped on just fine. A tight fit but that's perfect. Protopasta PLA, 0.15mm, 10% infill.

@chesamo Glad it worked for you. Thanks for posting your make!


I followed the lead of @alfarofilms_1593387 as I also didn't want to solder anything (and because I couldn't find a converter with the same hole configuration as the model (and I didn't want to mess around with modeling). I didn't want to have to futz with the screw on the converter to control fan speed so i fount a potentiometer with a PWM fan connector on Amazon.
I have the buck converter connected to the potentiometer, which is connected to a 3 way fan splitter: One to the PSU fan, one to the Mobo fan (I also installed https://www.printables.com/model/565011-sovol-sv06sv06-plus-ultimate-motherboard-fan-mod-9), and one to the exhaust fan for the enclosure for my printer. The unfortunately thing about this potentiometer is that ther isn't any mounting holes, and it's too deep to have mounted through the converter screw hole, So I... utilized the plastic case that it shipped in.
This was one of my first prints, and you can see my z-offset wasn't quite honed in yet, but function of form and all that.
Pairs great with https://www.printables.com/model/403384-hex-fan-grill-for-92mm-fan/comments


@DupsMcKracke_1733828 Great work! Thanks for posting your make and info for others that don't want to solder. Totally agree, function over form, and yours definitely fits that bill.

Nice model. Printed in PETG.
Fan grill from https://www.printables.com/model/403384-hex-fan-grill-for-92mm-fan
and LM2596S housing from https://www.printables.com/model/408716-gehause-lm2596s-dc-dc/comments (edited)

View one more comment
@PhantomAura_1179965 I used the housing for the LM2596S from https://www.printables.com/model/408716-gehause-lm2596s-dc-dc and attached it with 2 M3*4 screws (+nuts and washers).
But that's a good idea, both models could be remixed to cover less intake and not have to use screws.

@Aferac_1360715 awesome, I hadnt gotten around to making or finding a housing, this looks perfect!


thanks did this exact mod to my sovol sv06 plus and it worked perfectly. Its a little hard to put the screw for both of the buck converter but overall very satisfied
@Hitness911_1913354 You’re welcome! Glad it worked for you. Having the flexibility of OctoPrint really adds a lot of functionality to the printer. One of the surprising things for me was that the SV06 Plus doesn’t let you control flow rate on the fly. Even the standard SV06 allows this. OctoPrint gives control over that for the SV06 Plus.
Thanks for the feedback. I had my hands tied for mounting the buck converters. Overall, mounting is only something you have to do once, so I went this route to keep from having to print with supports.
THX for this File. But 3 of 4 Stands of the PI broke at srewing in. It still holds and a bit of super glue helps but on Version 2.0 it would be nice to make the "pins" Stronger. (and a bit wider for the screw)
@TheMaster_763513 Thanks for the feedback. I didn’t have that issue, but I’ll keep that in mind for a V2. Were you using m2.5 screws for the Pi?
@PhantomAura_1179965 yeah m2.5 screws. But overall i love the design. No more Cable from there to there all in one box. (ok only the 2 usb cable for the usb cam and s06+) Thank you
PS: Wish List for Version 2.0:
- Slot/Opening to grap the SD Card? Maybe move PI to the other side? So the USB Ports are hidden, and only 4 Slots for the Cable? Would be a cleaner look.
- 1/2 mm more space for the Raspberry and the Converter? Move the Fan 1-2mm to the top? If possible. So it is more Room to work?