ARA - Another Robot Arm!

Description
PDFI gave myself a challenge to create a small robot arm and control it in one month! April 2021.
I used a lot other projects in the 3d printing space for inspiration and understanding. (EEZYbotARM, MeArm, and many others, Thanks!)
This Arm was created in OnShape, controlled with and Arduino, and has an HMI (human machine interface) Created in WinForms.
With the controls you can do manual movements, but you can also teach each position, and play it back as a looping script!
You can get or view the Arduino code and download the HMI .exe file, made in WinForms from GitHub: https://github.com/Hobbesdcc/RobotArm (see “Releases” on the side of GitHub page for the windows binaries, exe file)
There might be other 3d printed arms out that that are more refined then this one! So if you are looking to put something together without much tinkering, might try one of those!
Controls overview:

- Upload "ArmControls_Arduino.ino" program to Arduino.
- Run "ArmHMI_WinForms.exe" winform application.
- Input the "COM port" number your Arduino is connected too, and Hit "Connect".
- Click, "STOP" and then "RESET" to return system to "IDEL" state.
- When in "IDEL", you can hit "START". This should engage the safe relay, powering on the servos.
- If you are in MANUAL mode, you can use any of the Manual controls.
- You must "STOP" and "RESET" the system to switch to AUTOMATIC mode.
- When in AUTOMATIC mode you can use the Automatic controls.
- (hint: the Machine Control will be GREEN in Started, BLUE in Idle, RED in stopped)
Script Builder:

- To build a script, go to Manual mode.
- Go to a position you want, and click on "Teach Current Point" is Script building section.
- You can also click on other commands in the Script building section to add them to the list.
- Once you are happy with the Script, Stop system, go to Automatic mode, start system.
- NOW you can "Start Script".
- (hint: the Scripts are just text, you can edit them, or copy them in/out)
Example Script:
GOTO_X12,Y12,Z0;
GOTO_X4,Y4,Z0;
GOTO_X8,Y0,Z0;
OpenGrip;
GOTO_X12,Y-3,Z0;
CloseGrip;
GOTO_X12,Y4,Z0;
GOTO_X12,Y4,Z5;
GOTO_X12,Y-3,Z5;
OpenGrip;
GOTO_X12,Y0,Z5;
CloseGrip;
Loop;
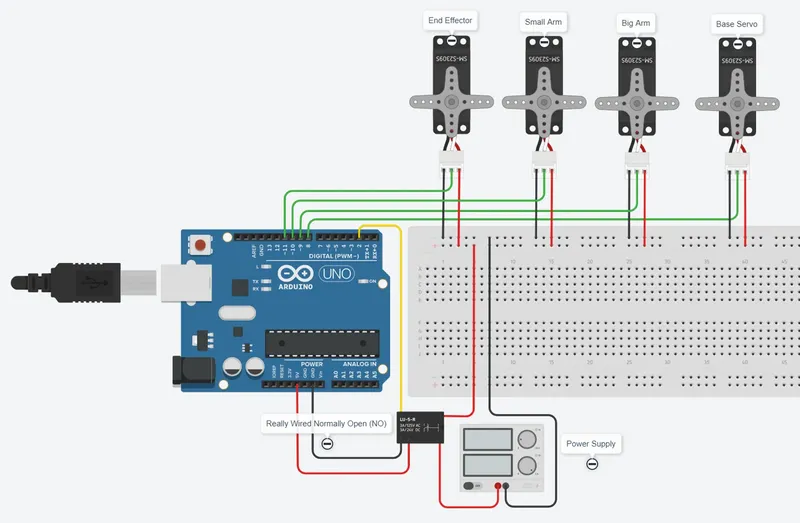
Parts list: (Besides the 3d printed parts)
- Arduino & Jumper wires
- Power Supply (for Servos)
- 3x Axis Servos (MG996R)
- 1x end effector Servo (Micro Servo)
- 5v Relay Module (used for safety, enables the servos)
- ~20x Machine Screws (#6-32 x 3/4in - flat head Philips)
- 1x Machine Screw (#6-32 x 1in - For the Major Center axis between Servos!)
- 4x Machine Nuts (#6-32 - optional for base plate)
Tags
Model origin
The author marked this model as their own original creation.


