3 filament holder and with 3 buffer in one Ikea Samla 22L box for ERCF and Voron 2023


Description
PDF
This is motor buffer in Samla box from the store
https://www.printables.com/model/1185160-motor-buffer-for-mmu-in-samla-box
(sorry it's not free)
This is newer version of buffer in Samla box 2024 ( use this instead)
https://www.printables.com/model/1091893-3-filament-holders-with-3-buffer-in-one-ikea-samla
Overview
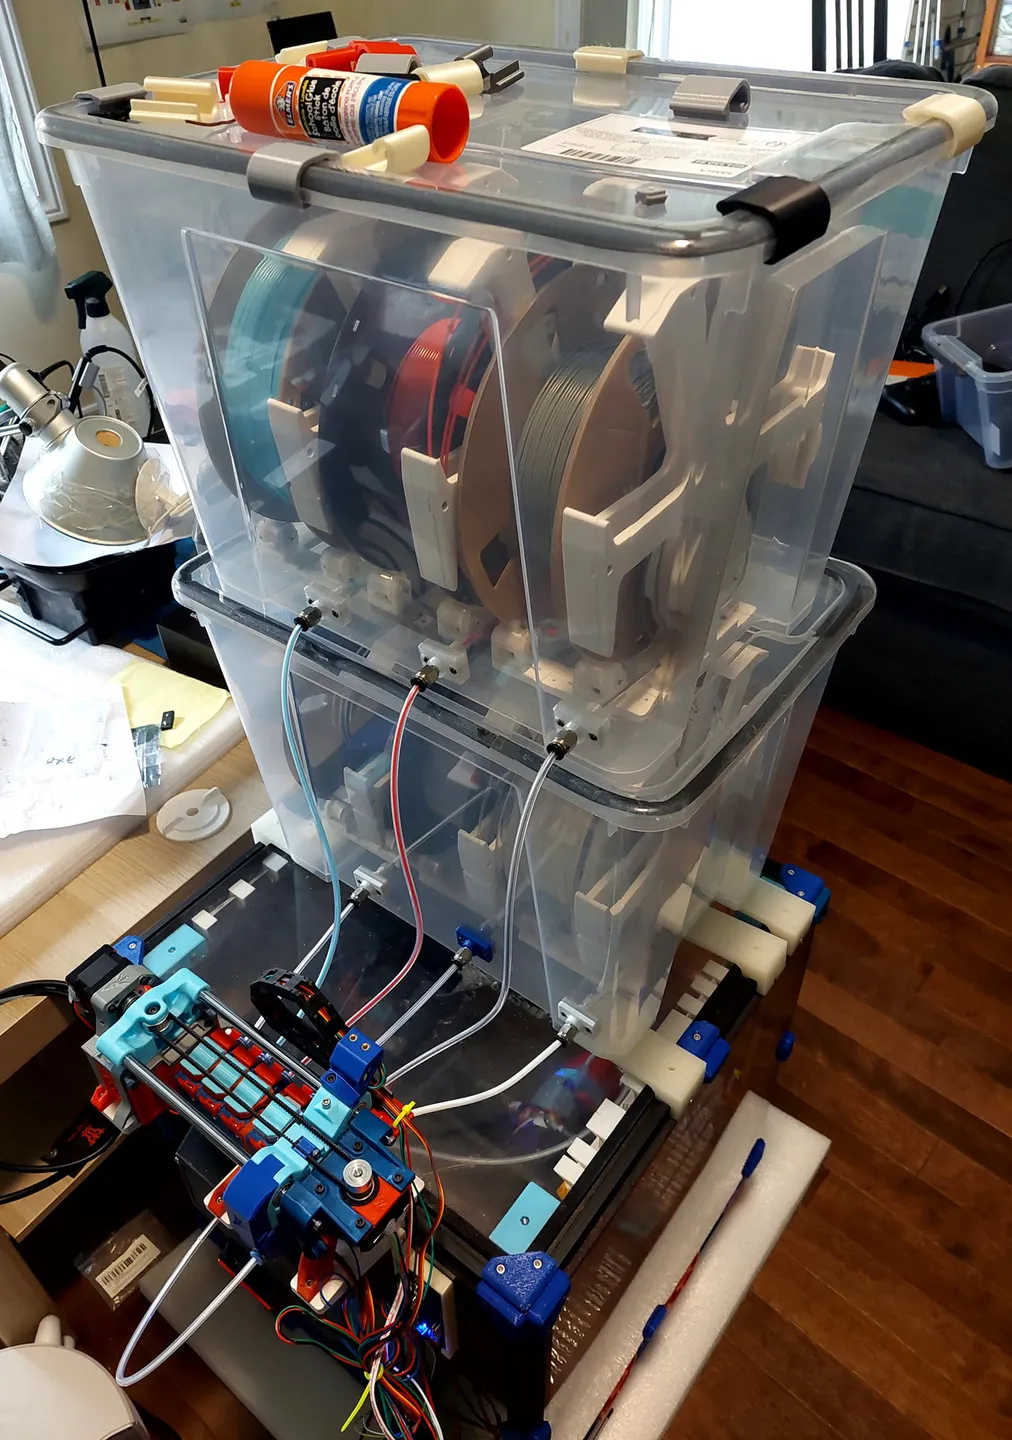
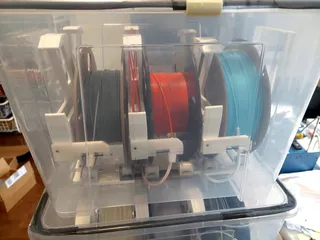
There are a lot of filament holder and buffer design, enraged rabbit ERCF has its own buffer design as well. but this one, is for IKEA Samla 22L box, to hold 3 filaments with buffer.
( box top cover size measure 39CM X 29CM X 27CM, ikea code name 801.029.76 , cover code 904.550.86 , 22L ).
The 22L samla box is a “small” size box, it's just right size for 3 filaments, and it's cheap.
So we can keep filament dry.
Main features
- Samla box to keep 3 filaments in box to keep them dry.
- Print while they are inside the box, filament can roll and print while inside.
- Each filament has buffer of their own, so they can work with multi-material system like ERCF. And everything is inside the 22L Samla box.
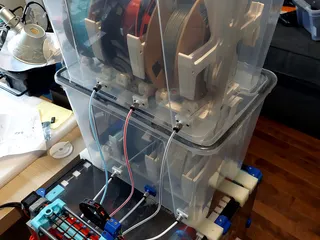
- We can put 2 Samla box on top of a VORON printer with ERCF, so we have 2X3=6 filament types to work with ERCF, perfect match for ERCF (6)….or 9, if you don't mind to lay down another box.
So that our filament won't be left outside of open air, they are kept inside the Samla box, they are dry, since we have built in buffer for each filament, we can use them to print while they are in the box, and use them with multi material system , like ERCF.
The buffer system is inspired by ERCF 's buffer system, but designed from scratch.
About buffered filament length:
I use 3 rounds in buffer wheel, with 3 rounds, it can hold about 950CM length of filament.
I believe 4 rounds could be too tight, the friction is too large for ERCF and extruder to pull.
but YMMV.
The buffer cage/base size is optimized for samla 22L box, it's a very tight fit for 3 filament holder in the box.
If I make the filament base larger/wider, then we can't fit 3 filament holder system in one 22L samla box.
I have tried quite a lot of brand of filament , they all fit, amaz*, polym*, overt*, sunl*, crea*, filame*, . The only one brand (pril* ) of my old filament roll is too thick/tall/high to fit, and that brand stopped selling in my country, so who cares.
thickest filament roll to fit is 68mm.
How does it look
Please take a look at the pictures how my samla box/buffer/ERCF look:
I have two Samla Box (22L) on top of my Voron, so I can hold 6 filaments.
my Voron is 250mm size.
My ERCF is 6 colors so two boxes is just right.
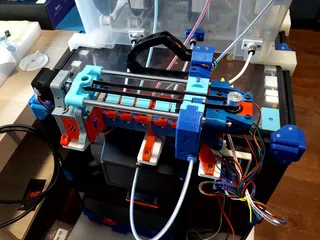
My ERCF is mounted on the top/back of my voron printer using my ERCF mount design
https://www.printables.com/model/572132-ercf-enraged-rabbit-carrot-feeder-voron-24-mount
It's not a 10minutes small project, quite a few components need to print and some hardware is needed.
there are 3 main parts to print and assemble:
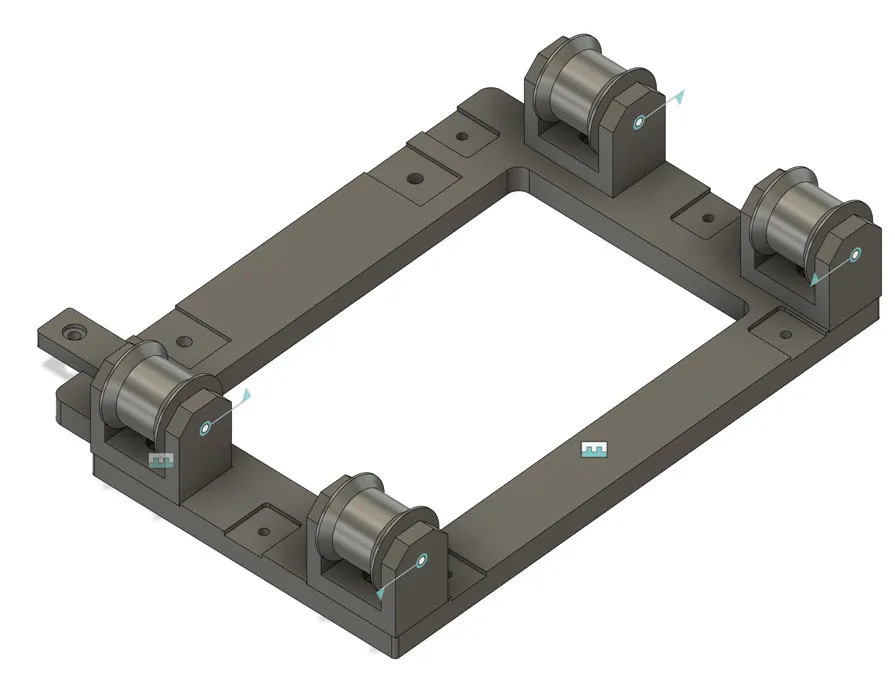
1 filament roller base
2 filament buffer
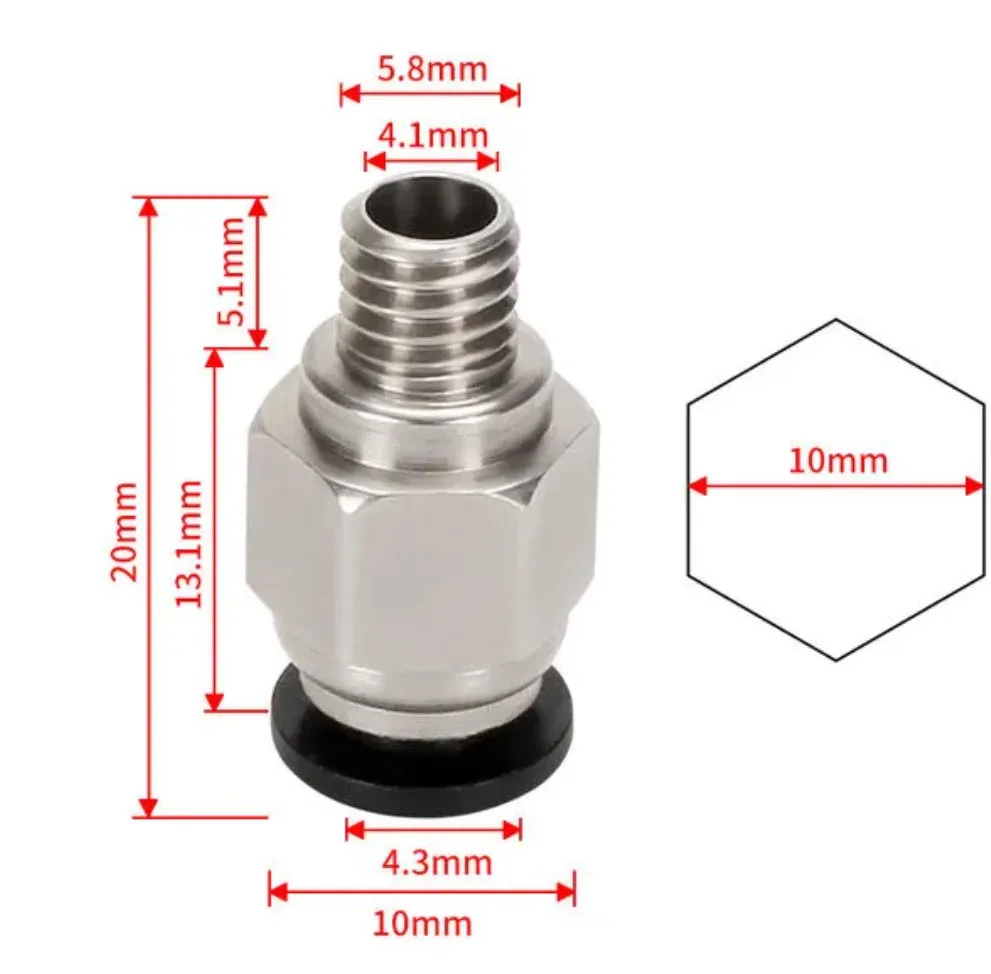
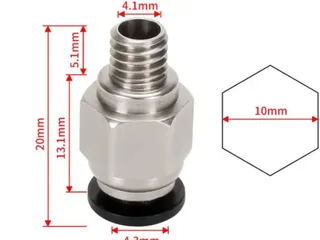
3 box fitting for Pneumatic Connectors ( PC4-M6 straight )
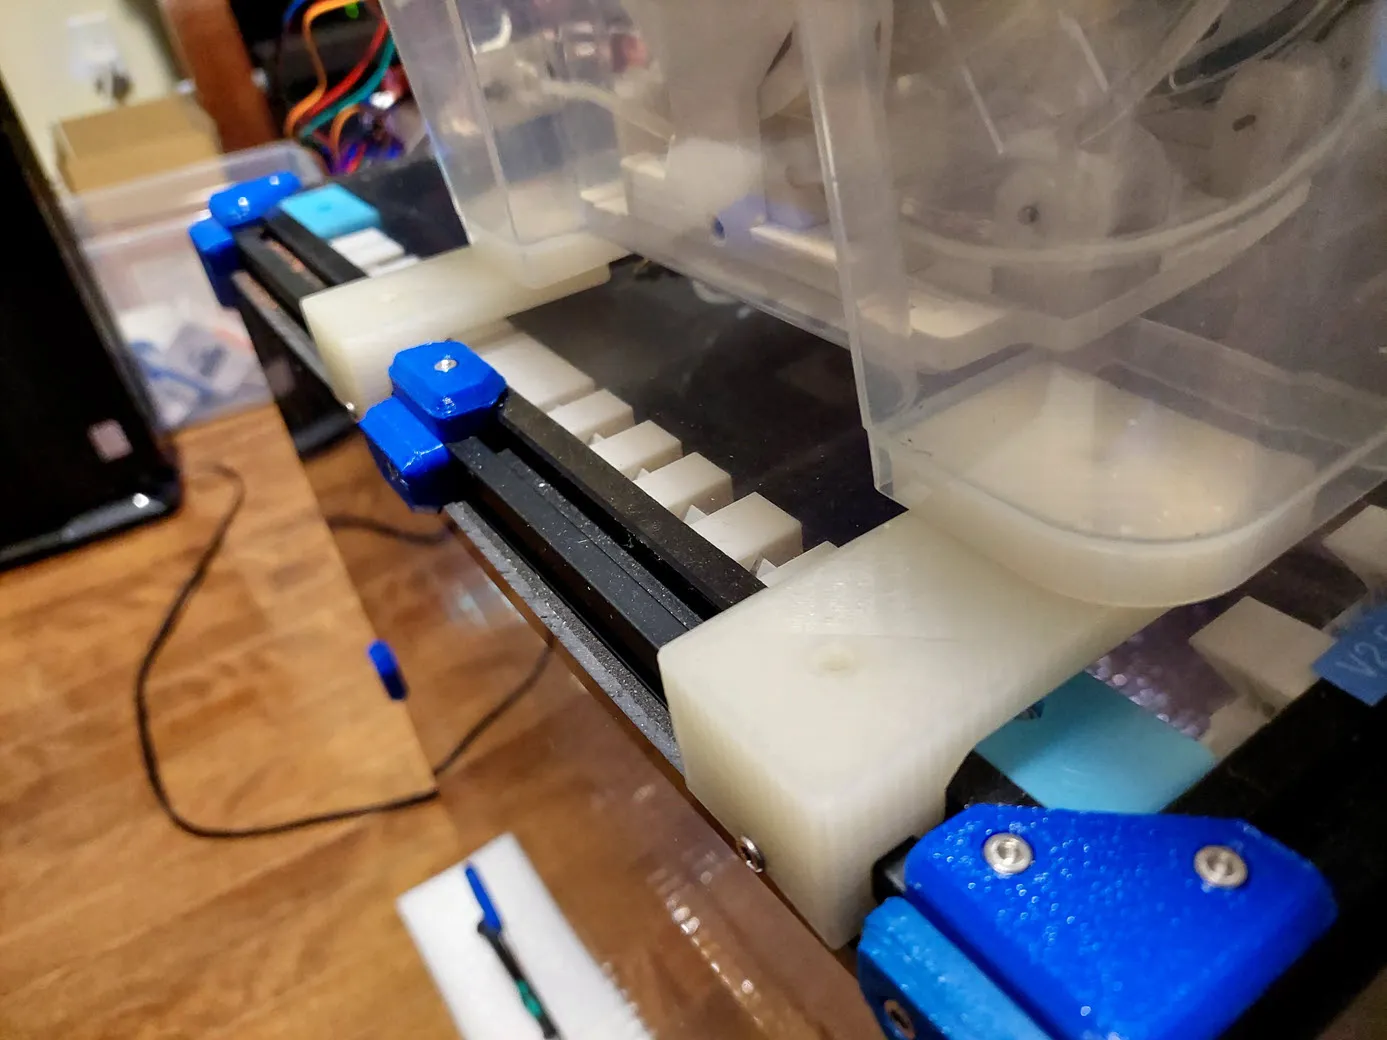
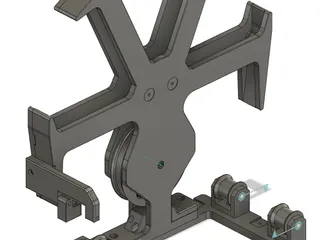
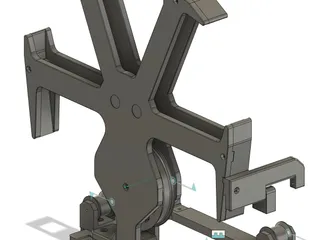
Filament Roller Base
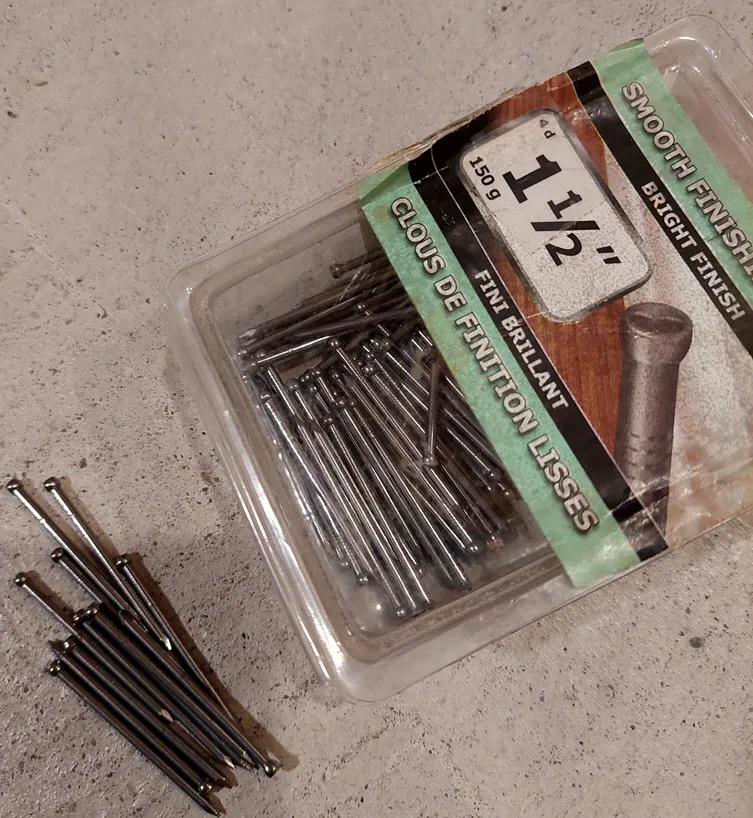
Design consideration about bearing or nail+ptfe:
I saw a lot of filament roller base design use bearings, I tried that too, it turned out bearing is indeed not a good choice for the job.
I also made and tested bearing roller and nail roller, obviously nail roller has much smaller friction than bearing design. Check the compare video.
- bearing is expensive, even cheap ones from ali. one filament base need 4, so 3 base need 4X3=12, two boxes for ERCF 6 color need 24!
- bearing's friction is too large, in most of the time it couldn’t even roll when we pull the filament, the filament roll just grind on the bearing or plastic since the filament roll's friction is even smaller than bearing itself.
- I even saw some design had to use foam tap on the roll to increase friction between bearing rolle and filament roll. it costs more and more work and it doesn't reduce any friction in the system…it just make the hard to rotate bearing roller to rotate so it doesn't look too bad.
- Use finger to roll the bearing roller hard, it always stops instantly. but with nail roller, it can keep rotating for at least 3-4 seconds.
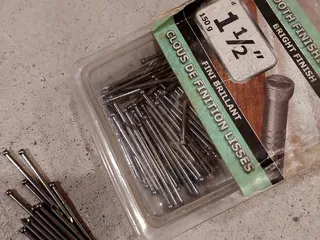
In this design, I use nail ( finish nail, dia 1.8mm , they have smooth surface), . They are cheap, 3-4-5$ for a box about one/two hundred pieces. And PTFE (2mm inner 4mm OD diameter)
The nail diameter is not highly precise necessary, it's not rocket surgery, about 2mm and can easily insert and rotate in the 2mm ID PTFE tube is good enough.
Hardware needed for base
some finish nails, standard PTFE tube (ID 2mm, OD 4mm), M3 hex nut, 4pcs, M3 Hex socket head screw 8mm long 4pcs.
Assembly Steps
- print the base samla_22L_filament_base.stl
- print 4XComponent_roller_nail_A.stl , print 4X 4XRoller_holder_nail_A.stl
- insert a piece of standard PTFE tube (ID 2mm, OD 4mm) in the roller, cut it, but PTFE tube should NOT longer than the roller on both left/right sides.
- put M3 hex nut under the base, use M3 8mm long screw to install the roller holder on base. total 4 pcs.( If you put the roller inside roller holder now, the roller will block the screw, so don't do it yet)
- Put the roller in the roller holder, insert the nail to put them all together. If find it difficult, can use solder iron to help to push the nail, don't use too high temperature, 120-140C should be good enough, depends on your material, I use PETG.
- Use finger to roll each roller, they all should rotate freely, if some of they are too difficult to rotate freely for 2-3 seconds after push, most likely it's because the PTFE tube is a bit too long and it touches the roller holder side wall, so must remove the roller, and cut the excessive PTFE tube, so it's not longer than the roller.
- If happy with the roller, find a tool to cut the excessive nail so it's not too long. protect eyes when doing dangerous things. Could just use a pliers cutter or rotary tool. Don't hurt your eye or cut off your own finger.
check picture for roller base.
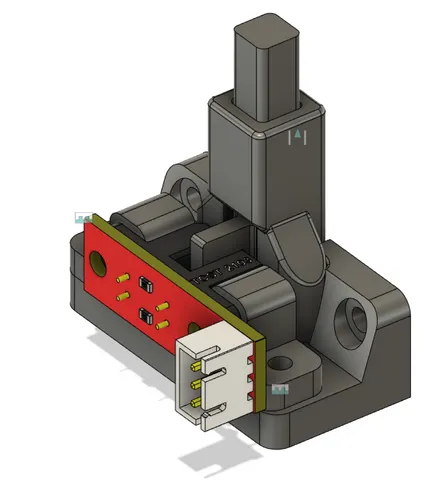
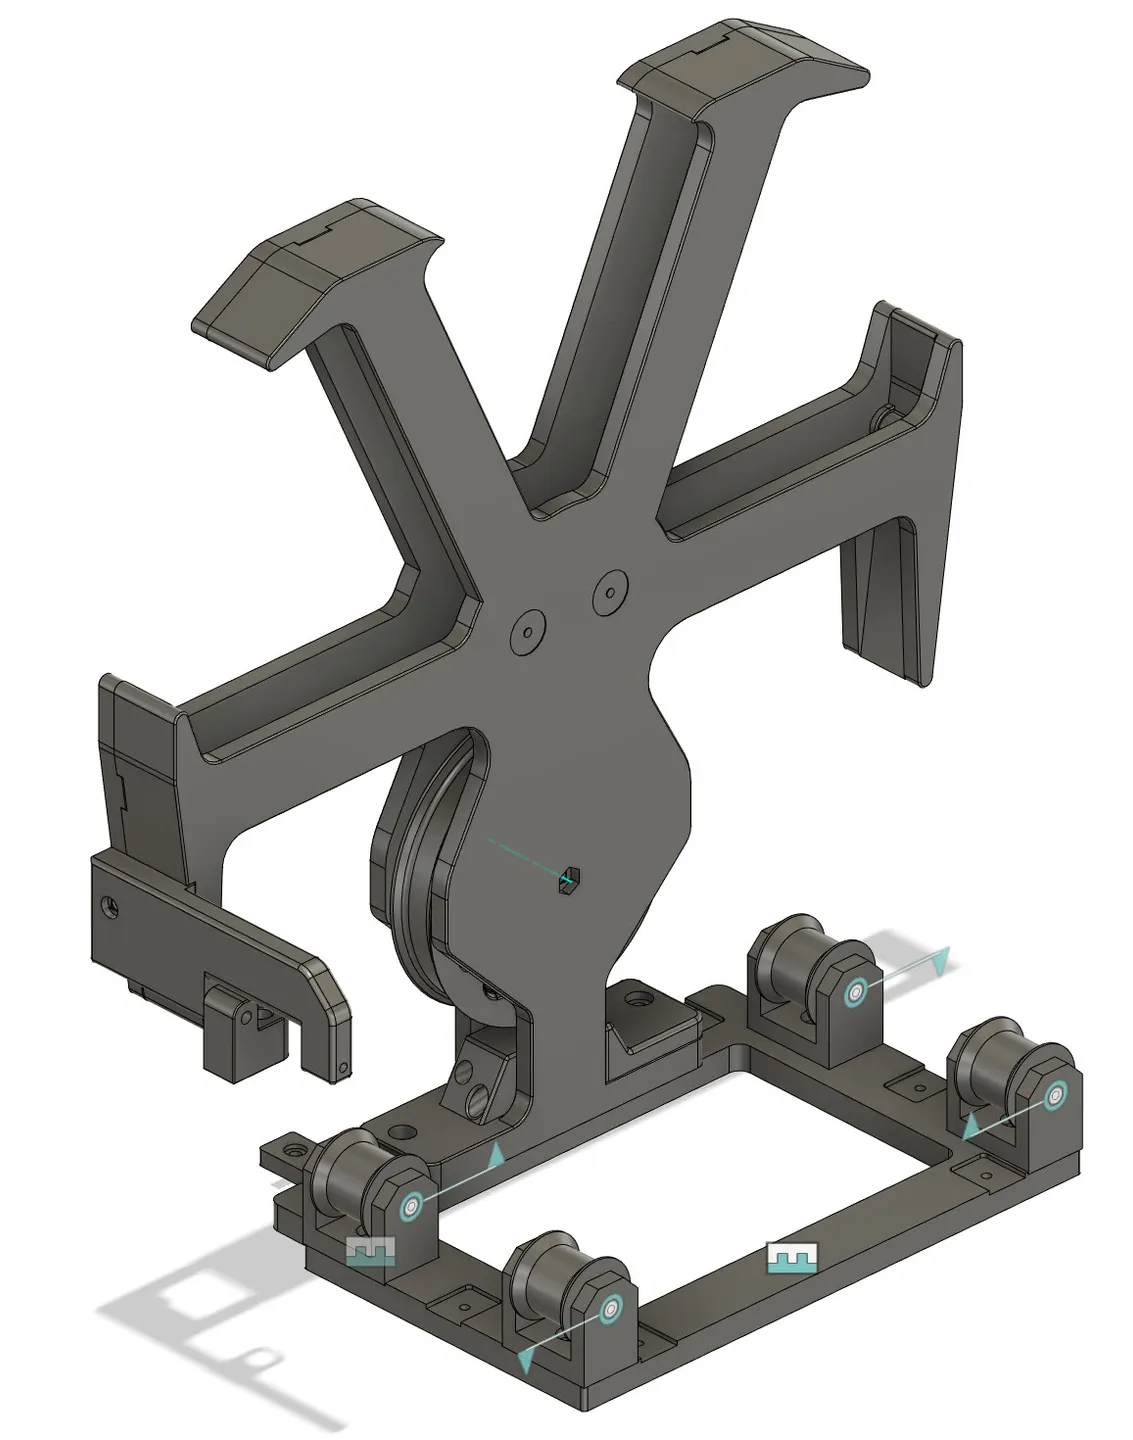
Filament Buffer
hardware required:
- bearing 626ZZ , OD 19mm X ID 6mm X height 6mm
- M3 hex socket head machine screw 20mm long 1 pc, 10mm X 1, 16mmX1
- hex nut 3pc
- M2.6 tapping screw 12mm X 1pcs,
- M2.6 tapping screw 8mm X5pcs
Tool require :
- Ball end Hex screw driver for M3, so we can tighten the M3 hex screw from an angle.
- M3 tapping drill. sorry, this is a less common tool, but it's necessary.
We need the bearing adapter tight fit, but currently our printer cannot be that precise.
The bearing adapter need a OD be 6mm, and and ID 3mm.
while OD is 6mm and be tight fit, we can print , but at the same time, ID cannot be printed as about 3mm, the easiest way is to use M3 tapping drill to make it 3mm to tight fit the M3 screw.
- printer the two large buffer parts buffer_holder_B.stl and buffer_holder.stl
- print the buffer wheel, buffer_wheel.stl , and bearing_adapter.stl
- print ptfe_slider.stl front_ptfe_holder.stl tube_holder_base.stl
Assembly Steps
- Use tapping drill on the bearing adapter hole.
- push the adapter inside 626ZZ bearing. It's a tight fit but shouldn't be too difficult
- push the bearing (with adapter) in the buffer wheel
- put the large buffer holder and holder B and wheel together. Use M3 screw 20mm and hex nut to slowly tighten.
- Optional, put a short ptfe tube in the tube_holder_base.stl middle position, it may help to reduce filament friction when it rubs the base.
- put the tube_holder_base.stl on buffer holder bottom.
- use M2.6 tapping screw X8mm to put the buffer holder and B together.
- check the wheel can rotate freely, or mostly can rotate freely.
- use M3 screw 8mm and 16mm and 2X hex nuts to install the buffer assembly on the roller base.
- use M2.6 tapping screw 12mm to install front_ptfe_holder.stl on the buffer holder.
- use a piece of PETG filament to install the ptfe_slider.stl in the front_ptfe_holder.
- Use a piece of PTFE tube (ID 2.5mm), insert into ptfe_slider.stl, and goes into tube_holder_base.stl's inner hole.
buffer and base is now fully assembled, for one filament.
optional, print base_link.stl part to link 3 filament roller base together.
If you so happen want to use other size of bearing, then you can design your own bearing adapter and wheel, since it's easy. the wheel should be 11.6mm thick.
Put it inside the samla box left most or right most position, plan the space for another two filament base/buffer.
at this time we can print and assemble the box fitting, so we can start using filament and printing while it's inside the box….to make other two filament buffer/base.
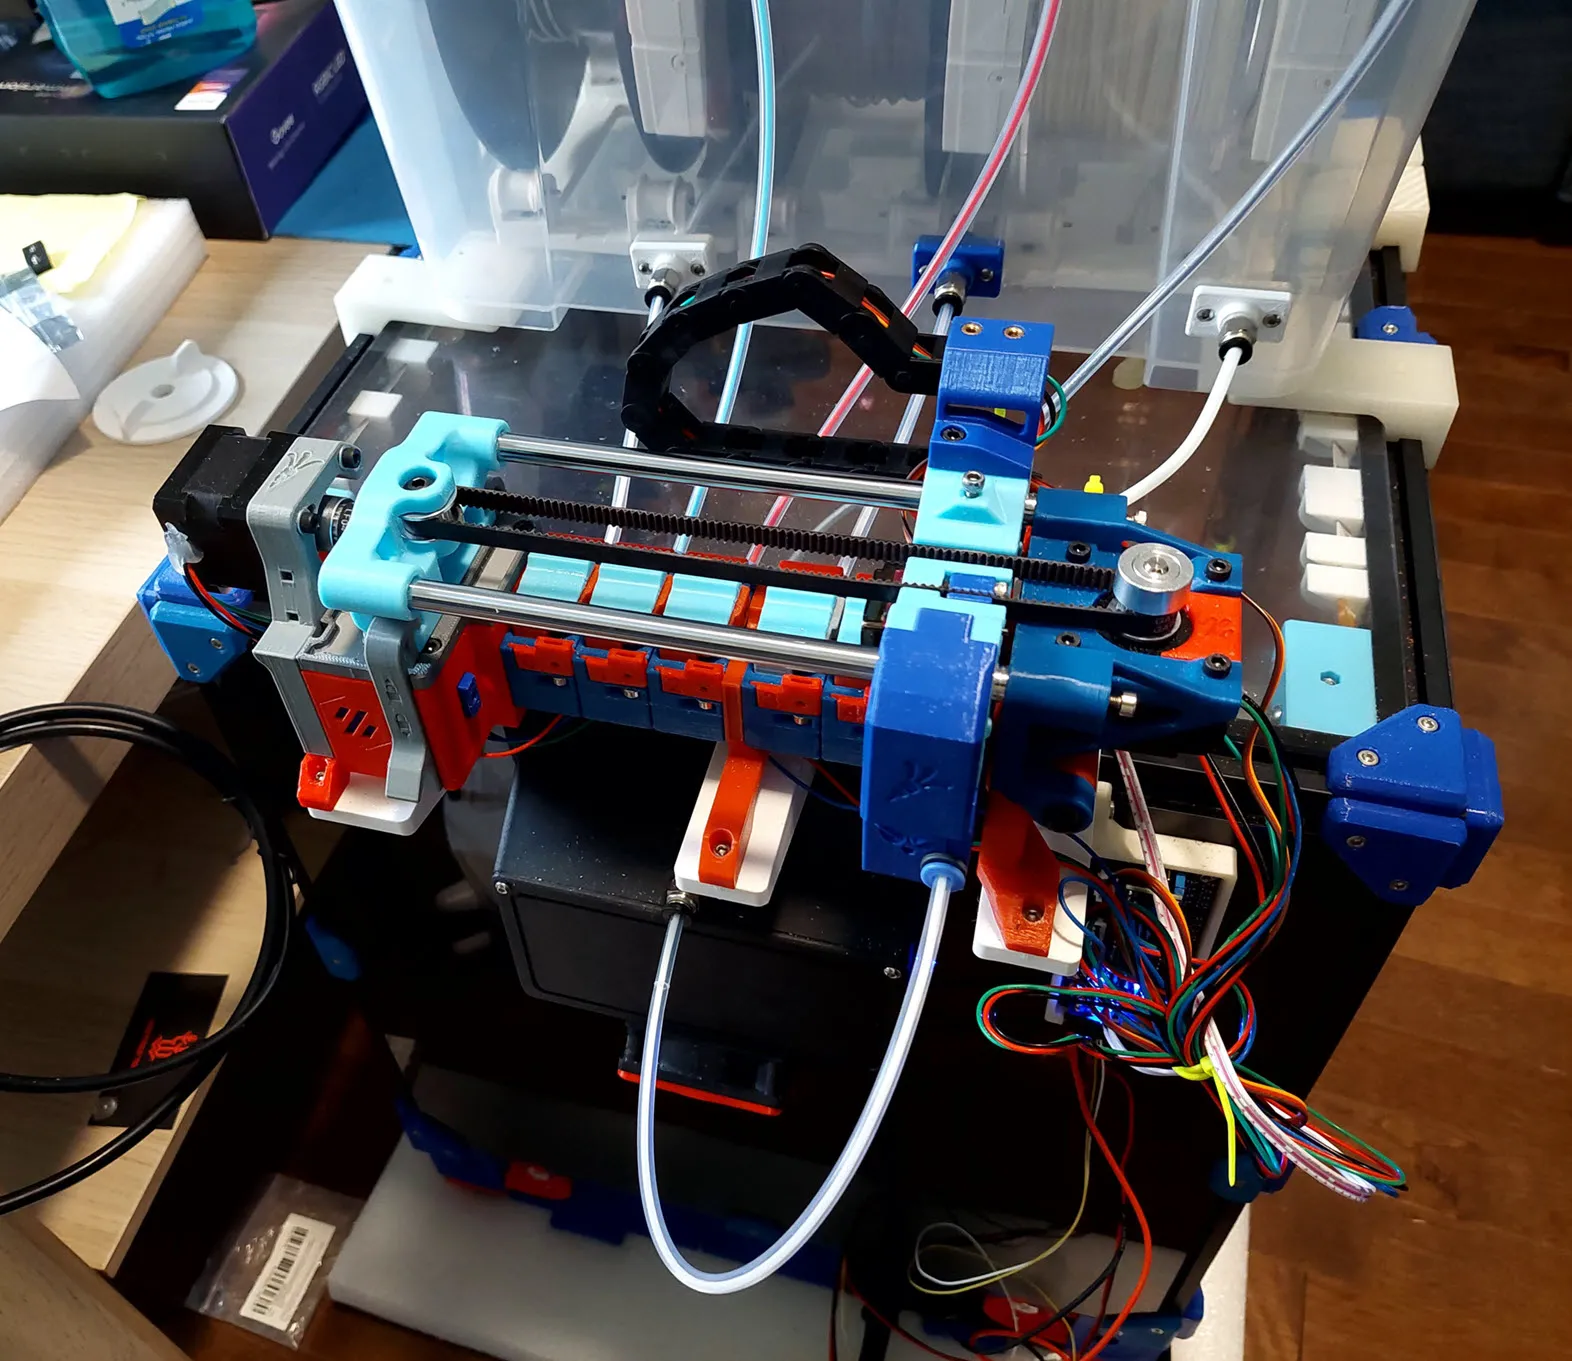
Box fitting
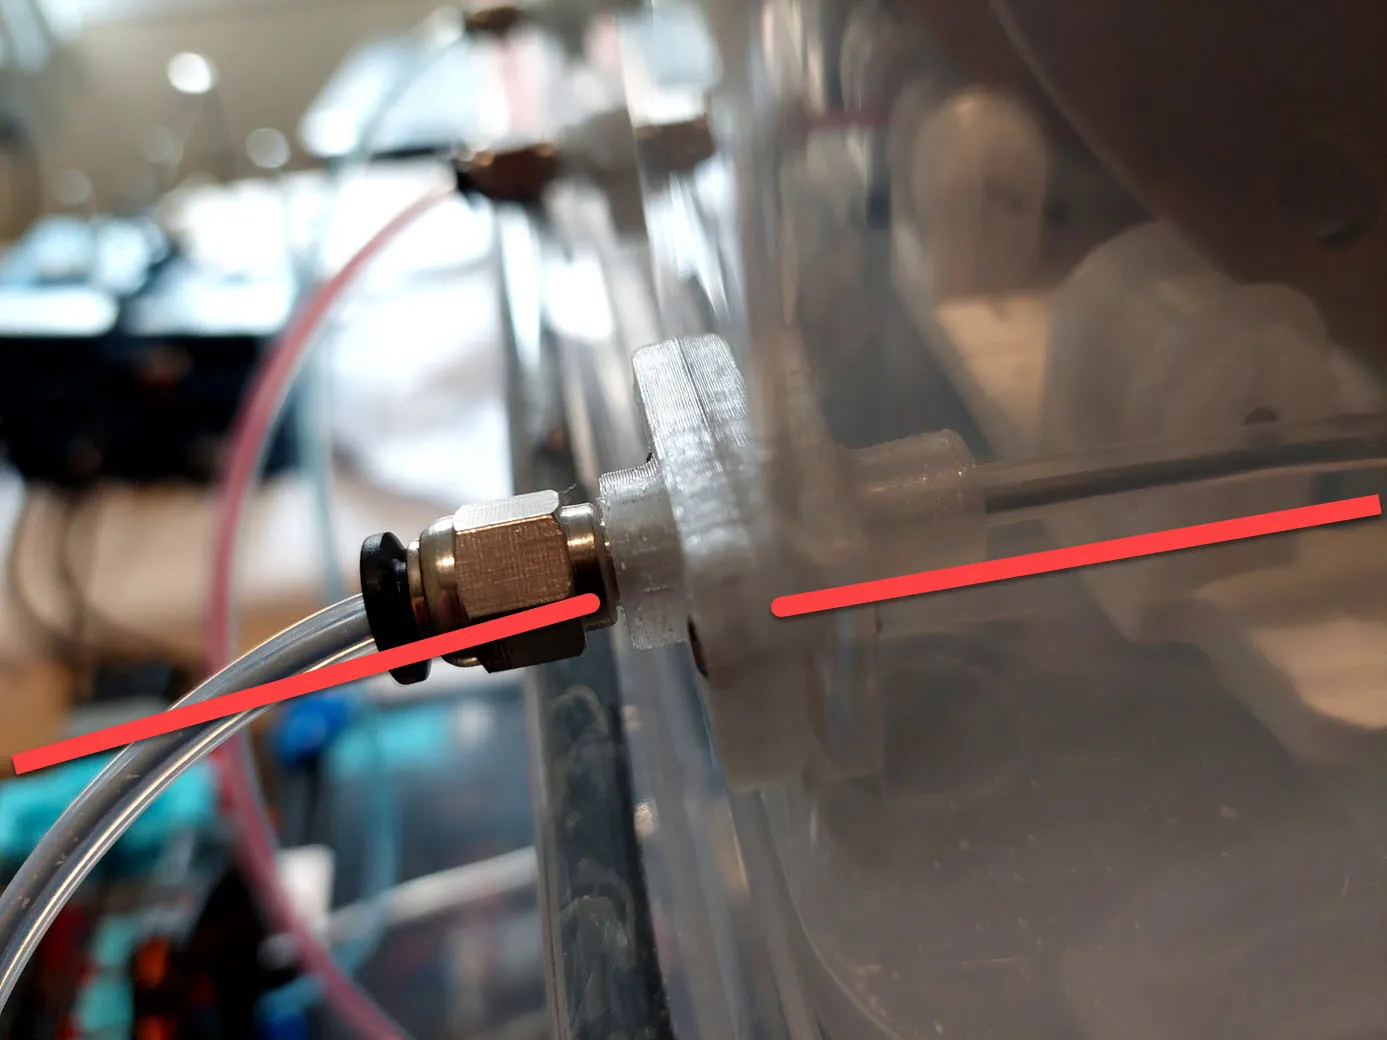
because we need the filament gets out of the Samla box, a box fitting is necessary, I use Pneumatic Connectors PC4-M6 straight for the job, check picture for detail.
Too bad we must drill holes on the box wall, without a hole, filament cannot get out.
to install filament fitting parts, we also need two more screw holes.
so 3 holes for one filament.
Measure and plan twice before drilling, Samla 22L box is not expensive but it's not very cheap.
the main filament hole should align and face the tube_holder_base.stl's outside hole.
hardware needed
use M3 screw 10mm X 2pcs for one fitting
M3 nuts X 2 pcs
PC4-M6 connector
PTFE tube ( ID 2.5mm and OD 4mm) as ERCF suggests. We use 2.5mm ID tube (instead of 2mm ID tube ) to reduce friction.
Steps
- Use a pen/marker to make the correct filament get out hole on the samla box wall.
- Use a sharp object /scissor to make a small hole on the position so the drill won't run away from the place.
- Drill the main filament hole dia about 2.5mm to 3mm. Can drill using a smaller drill bit and then a larger one. it should be about 2.5mm to 3mm, So the filament (1.75mm) can get in/out easily.
- Once the main filament hole is drilled, use the printed part box fitting as drill template to drill two more screw holes.
- use M3 10mm X 2 to install the box fitting part inner and outter, two parts together.
- rotate and install the Pneumatic Connectors PC4-M6 into the outter box fitting part.
- check the picture, a piece of PTFE (ID2.5mm) run from inner box fitting part , to tube_holder_base.stl's outter hole, length should be about 15CM, YMMV.
- use another PTFE (ID2.5mm) tube , put it in the Pnenumatic connectors PC4_M6, another end goes into ERCF inlet #N. Since this filament base/buffer is on the left or right most position, it's easier to let it goes into ERCF's #0 or #5 (left or right most inlet)
Install the filament in the box/buffer system.
- Don't put the filament roll in the system yet, since our hand need to go into the box and work on the filament/wheel.
- put filament line goes through in the ptfe tube from the slider , get out from holder base,
- wrap 2-3-4 rounds on the buffer wheel
- And goes into the tube_holder_base outter ptfe tube and go out of the box.
When a filament base/buffer/box fitting is not used, we can use the box fit block to block it to keep the air out.
Optional for Voron 250mm, Samba box holder
Samla Box top mount holder.
A box of filament could be 3kg + 1 kg (base, buffer, Samla box etc) = 4kg, so two boxes could be 8kg, it's heavy, the poor Voron acrylic top panel may not be strong enough to hold two boxes for long time.
We don't want to put it on the thin acrylic panel.
For Voron 250mm, we can use this box top mount holder, just print, easy, lost cost.
( For larger size voron, may need other solution, ie 2X 2020 extrusion with the right size. )
print 4X box_top_mount_vert.stl, install using M3 10mm X2 and hammer nut X2 for each on VORON top rail left/right. ( 8 M3 10mm screws and 8 hammer nuts)
Tip: install and tighten the vertical M3 screw first, the top screw later to make it stand straight.
print 2X spacer_block and 2X spacer_block_B for.
Use M2.6 8mm to install the spacer_block.stl or spacer_block_B.stl.
It only works for Voron 250mm. for Voron 300mm it's too small too weak.
now we can put the samla box on it, and the two heavy samla box not touching the acrylic panel at all.
Use 40% or more for the top mount holder since it need to carry 8KG of weight.
Check picture
Other Notes
1 When using buffer wheel, the friction is something must be deal with.
with everything we do, the friction is still large when using wheel.
so we must let ERCF to help to pull the filament out, it's better we use extruder stepper motor sync feature
https://github.com/ntchris/ERCF-Software-V3 (my fork of the happy hare ERCF software, has a few of enhanced features like always enable motor sync and different filament temperature handling etc from the original https://github.com/moggieuk/ERCF-Software-V3, from the original ERCF software…)
Also use Springy mod to help to let the ERCF gear to engage hard enough.
https://github.com/moggieuk/ERCF-Springy
2 can also use foam tap to help to seal the box cover better. put 1mm thick 8mm or 10mm width on the Samla cover.
3 samla box clip to help to close the cover tight.
search for Ikea_Samla_Clip_5-11-22L_by_Wookbert_Rev._G2.stl or other type you like.
Print Setting
no support needed.
any material should work, I use PETG.
20% or more.
3 or 4 parameters/wall
sorry it's a bit too large for MK3 print bed.
Tags
Model origin
The author marked this model as their own original creation.