ERCF enraged rabbit button style optical endstop for selector
Description
PDFpreviously I made a optical endstop for ERCF, check this link:
https://www.printables.com/model/596286-ercf-enraged-rabbit-optical-endstop-for-selector
in that design, a light blocker need to be installed on the selector, and nothing on the endstop hole.
However I also want to make a button style optical endstop, so that nothing need to mount on the selector. we will only have one button on endstop hole, triggered when selector hit the wall.
Because no one wants to disassemble the whole motor plate and two walls, so this button style endstop is designed to just install, no massive disassembly is required.
however, the top panel is needed to remove/print a new one.
Hardware require
- a Dia 3mm spring length about 15mm (or shorter/longer), for button push.
- M2.6 10mm tap screw , to install the mount under top panel
- M1.8 or M2 tiny screw about 6, or 7, or 8mm long, this is less common stuff, sorry
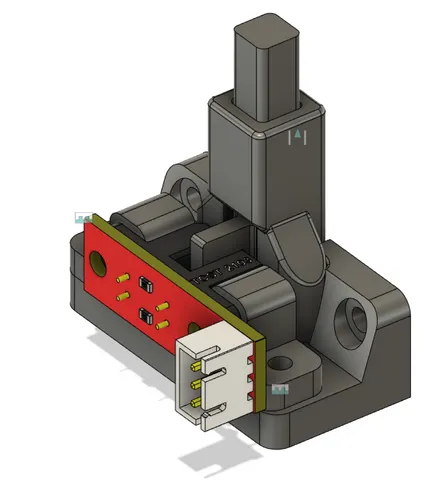
- optical endstop, see picture, this is very cheap to buy.
because we don't want to disassemble the ERCF motor plate/gear box and parts near, so this button style endstop has to be slightly over engineered, otherwise it's impossible to install/put inside the small gear box room formed by front panel and gear box back panel.
the button must stick out from the original endstop hole, therefore it 's too large to just put inside as is, so I have to make the button two pieces, and use a tiny M1.8/M2 screw to install after the main body install in place.
Print Settings:
easy to print, no support needed.
Orient the part properly using 3D print knowledge and common sense.
infill 30% or up
color, for the button body, it's a light blocker, so infill should be higher (30%, 40% 50%+), color should be darker ( I think any color works, translucent filament won't work )
pin_button_front_longer.stl: in case the pin_button_front.stl is a bit too short and cannot touch/trigger when home, use this longer version.
install steps:
- print all parts
- install the optical endstop to the mainbody, using 2 M2.6 tap screws, plug on bottom side
- Eject filament from ERCF current gate first if need
- Release the two latches for the M8 rails, if couldn't, use flat head screwdriver to pile it from bottom. Don't do it too hard, don't hurt your fingers or eyes!! ( If don't like it to be so tight, can use a round filer on it and add some grease. )
- With 2Xlatch released, Rotate the M8 rail part upward. so we have space on the ercf top panel.
- remove the ERCF top panel, just release 3 screws on top, easy.
- install the main body under the new ERCF top panel ( it has a screw hole) with M2.6 10mm self tap screw
- put the spring in the small hole, put the button back part in place, also let it hold the spring. light blocker inside optical switch. do not install the button front part at this point. it's too large to go inside the gear box room.
- put the assembled part back inside the gear box room, can push the botton backward part a bit to make it goes inside, when cannot go inside further, tilt the top panel a bit at an angle to make it go into place. when need to remove /take it back, be careful about the spring go missing as it likes to jump into nowhere.
- with the mainbody and top panel in place, use M1.8/M2.0 screw to install the button front part from outside of the gear box.
- put 3 screws back for top panel to finish the installation.
- Plug the 3 wires of optical endstop, VCC Gnd, signal to ERCF pcb. Their order is most likely not the same as your ERCF pcb's plug/socket, so check wire/pin definition order and check again.
- remove the endstop screw on selector, this design doesn't need anything to hit the endstop.
Test
- push the button, should feel easy and smooth.
- when not push the button , we should see some light coming from inside the gear box ( see picture)
- when push the button, the light should be gone.
- check it's working correctly: in webpage mainsail → machine → query endstop, when selector is not home, it's open, when it's home (light blocker is inside the hole), it's triggered. if it's reverted, check hardware config, may need to revert the pin with a !
now we can do a ERCF home.
Tags
Model origin
The author marked this model as their own original creation.