Hydra AMS - Enhanced Bambu Lab AMS


Description
PDFBuy Hydra AMS
You can now buy the Hydra AMS printed parts and required bolts from MatterHackers at a very affordable price, free US shipping is included.
Hydra AMS has a strict non-commercial license, it can only be sold with licensing through Hume Beam Engineering Solutions.
Update August 28, 2023
Hydra AMS has been updated to version 1.09. The roller slot placements have been optimized as there were some cases with 1.08 where smaller than normal 1 Kg spools (say 190 mm diameter) would hit the floor of the Hydra AMS with the roller in the rearmost position, causing the spool rotation to be restricted. If you've not experienced this yourself there is no need to upgrade to 1.09.
If you want to use larger diameter spools with the lid closed I recommend the optional Hydra AMS - Improved Rear Rollers.
Update July 17, 2023
Hydra AMS has been updated to version 1.08. It increases the max allowed diameter of the spools without having to use a lid spacer by moving the rearmost roller back and down as much as possible. Spools up to a little above 202.5 mm are compatible with the lid closed. If you want even larger diameter spools to fit you can use the optional Hydra AMS - Improved Rear Rollers. The max spool width is unchanged at 75.0 mm.
Also, the assembled Hydra footprint / width has been reduced slightly, making it easier to fit inside the AMS box without having to shoehorn it.
I still recommend using the Hydra AMS - Silica Dry Boxes / Serial Number Tags to ensure it's fully pressed to the bottom at the front.
Update June 23, 2023
Hydra AMS - Universal Spool Adapter is now available as well, download it here!
About
Download the files then follow the assembly guide a bit down on this page.
Optional but recommended files to print:
- Hydra AMS - Silica Dry Boxes / Serial Number Tags
- Hydra AMS - Improved Rear Rollers Highly recommended to widen the rear roller track
- PTFE Load Buttons to both save the funnels and improve ergonomics.
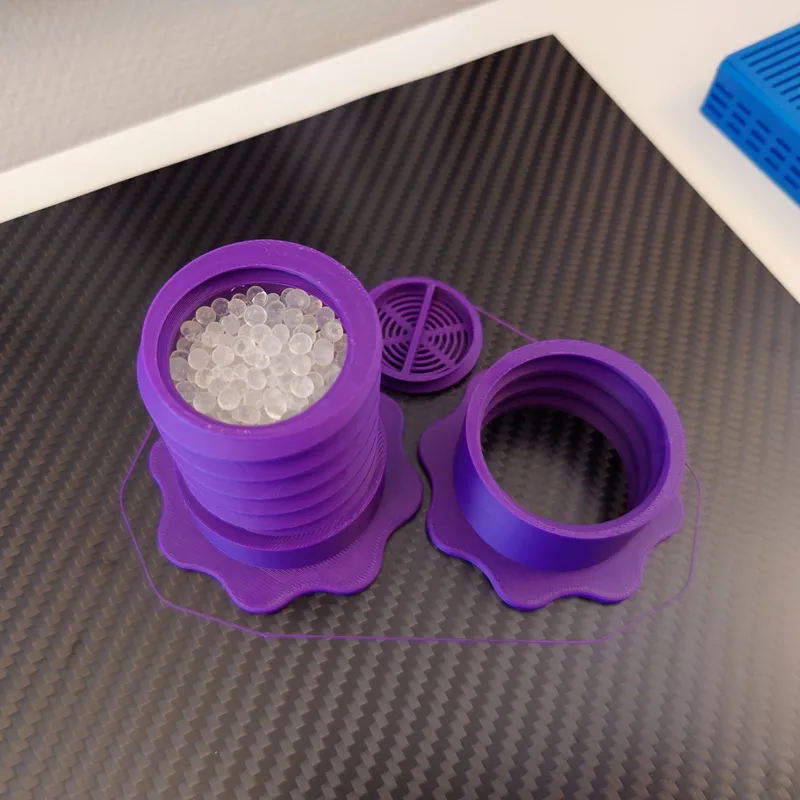
- Adjustable Spool Holder for Silica Gel / Spool Weight - Compatible with both Hydra AMS and Bambu Lab AMS.
If you download the individual 3MF files in the files section, they are design files only and can be easily printed on any printer / slicer. If you get a warning that they do not come from Bambu Lab just ignore the warning, they were exported directly from my design software.
Thanks to the testers for all the support and especially GuyH who has been instrumental.
Leave feedback in the comments. Thanks!
Reviews on YouTube
Nero 3D
MandicReally (Hydra starts around minute 5.40)
Support
All my designs and mods on Printables are free to use and remix. They have a non-commercial license. If you enjoy this or any of my other designs you can send me a small donation using the link below. Thanks :)
https://www.paypal.me/humebeamengineering
If you prefer Crypto/BTC you can send me a message.
If you send a donation be sure to mention Hydra AMS in the comments box and you will be added to the list below.
Official Supporters
If you have donated $5 or more you will be added to this list as an official thank you from me and you will also be assigned a serial number, the list will be updated as often as possible.
You can request a custom serial number if you send a $20 donation or more but please be aware it may take a couple of days before your custom silica box is uploaded as I need to make these manually. Cheers!
If you've bought Hydra from one of the authorized resellers you can also request a serial number by submitting a proof of purchase.
- Hume Beam #0001, Hume Beam #9999, Sven Hausherr #1313, Aaron Gray #1337, FireBall #1725, Trevor Mungovan #2425, Jamie Placzek #4759, 57y10 #8764, Katherine Jones #0666, Bernhard Birkfellner #3101, Guy H #0002, Kevin Pereira #0003, Phill Tran #0004, Bernard Ruf #0005, Justin Altemeier #0006, Remigiusz Kowal #0007, Jerome Grimminck #0008, Anthony Cascone #0009
- Thomas Finzel #0010, Seldon3dPrinting #0011, Dwizzle Roasting #0012, VipCold #0013, Bearded Bucket #0014, Hannes Schäfer #0015, Joseph Korang #0016, Brian Welty #0017, Elmar Wesle #0018, Paul M #0019
- Pippo pewte.ch #0020, Hampus Björk #0021, Martin Watley #0022, Riccardo Sacchetti #0023, James Majors #0024, Raia Gennaro #0025, Christopher Walters #0026, Andrew Shrapnel #0027, Kevin Kent #0028, Aron Gustafson #0029
- Szabó Tibor #0030, Nikhil Ramkarran #0031, Dorothy Rafferty #0032, Charles Ho Fung #0033, Anup Chavda #0034, Dorian Picard #0035, Mark Berg #0036, John Vinson #0037, Robert Martin #0038, Karl Liljeström #0039
- Kurt Althaus #0040, Martin Ziegler #0041, Miguel Contreras #0042, Todd Ferguson #0043, Joseph VonDohlen Jr #0044, Jacob Wine #0045, H. Schittko #0046, Rex Catron #0047, Meatbingo #0048, Barry Kwan #0049
- GnollProblem #0050, Sean Griffiths #0051, Yannick Lory #0052, Bonnie Gulliver #0053, Aki S #0054, Jeremy Rauch #0055, Jim Fano #0056, Jeffery Stephens #0057, Kimberly Booth #0058, Mikael Olsson #0059
- Michael Fetting #0060, James Beck #0061, Christian Bätz #0062, Eric Ridge #0063, Christopher Ondrovic #0064, Stefan Wollmuth #0065, Anthony Soprano #0066, Andreas Riebe #0067, ServTheNet #0068, Alan Kilgore #0069
- Gene Buckle #0070, Phil Harvey #0071, Neal Baggett #0072, Vincent Robel #0073, Zachery Hansen #0074, Matthew Shaw #0075, Scott Marcy #0076, Steven Lionel #0077, John Cardwell #0078, Chris Martin #0079
- Łukasz Szuman #0080, Ron Allison #0081, Bella Art de Nicole #0082, 7iron #0083, JKP Enterprises #0084, Klaus Löhr #0085, Harley Hong #0086, SSI Racing #0087, Chris McLeod #0088, Steven Mohr #0089
- Worked Wood #0090, David Adam #0091, Michal Kowalski #0092, Custom Computer Concepts #0093, Kenneth Ostromek #0094, Stigh Aarstein #0095, Patrick Lavoie #0096, Jeremy Hopke #0097, Erik Johansen #0098, Djundi Karjad #0099
- Jason Litman #0100, Robert Jorgenson #0101, Edward Cartier #0102, Robert Pence #0103, Andres Arrieta #0104, SpriteForge.com #0105, HRtechnik llc #0106, Swen Krauter #0107, Michael Bush #0108, Jordan Newman #0109
- Jared Stymiest #0110, Andreas Klotz #0111, Jordan Joiner #0112, Fred Logue #0113, Gregory Carlton Bouten #0114, Nicholas Daniel #0115, Eric James #0116, Rutger Bogaerds #0117, AtomicFilament #0118, Kevin Clack #0119
- Letusgo2Hell #0120, Gaspard Grosjean #0121, Poppy's Popcorn Co. Inc. #0122, Tony Herrero #0123, William Aprea #0124, Troy DeJesus #0125, Justin Schuhmann #0126, Belenos #0127, Jack Mettler #0128, Barracuda72 #0129
- Oz_Rob #0130, Ben Silber #0131, fatgeek #0132, Bernt Ahlbäck #0133, Joshua Warren #0134, Thomas Heuer #0135, Thomas Schulz #0136, William Hamilton #0137, Todd Schisler #0138, Phillip Perry #0139
- guruguys #0140, Johannes Cornelissen #0141, Jan Schermer #0142, John Kaminski #0143, SaintHate #0144, Josiah Netherton #0145, Steve Beverley #0146, Boran Li #0147, Jeff ONeil #0148, Joseph Palicke #0149
- Massimiliano Mancin #0150, Patrick Pennza #0151, Donald Lafferty #0152, Big Brook Pond Engineering #0153, Robert Schwinn #0154, Jacob Perez #0155, MIcheal Jeffrey #0156, Brett Corr #0157, Chris Reed #0158, Boris Ott #0159
- John M Murphy Jr #0160, Jose Serrano #0161, Peter Lewis #0162, Christopher Phillips #0163, Tyler Wickline #0164, Integrated Overland #0165, fixumdude #0166, Nic Alkema #0167, Torsten Steckenreiter #0168, Francisco Peebles #0169
- Jens Michlo #0170, Jon Libby #0171, Eric Sutherland #0172, Andrew Poth #0173, Mercury Cubed #0174, Louis Watermeyer #0175, Michael Müller #0176, kirikugo #0177, Markus Lohmann #0178, Stefan Zuegg #0179
- Thomas Kotowski #0180, James Hunt #0181, Marc Schauber #0182, Kenneth Ostromek #0183, Jakub Kanhäuser #0184, Ants-3D #0185, Ronny Stiffel #0186, John Cooley #0187, Christian Noack #0188, Christian Menz #0189
- David Bernabeu #0190, Christopher Mallery #0191, Ralf Ehleiter #0192, Andrew Wickham #0193, David Rouleau #0194, Bruce Milyko #0195, Sean Stoube #0196, Peter Biegel #0197, Dominik Popp #0198, @3dprintkings #0199
- samwiseg0 #0200, Susan Alvarez #0201, Thomas Jameson #0202, Benjamin Achtenberg #0203, Stephen McComas #0204, Volker Alkemper #0205, Daniel Pomierski #0206, Hagen Weigel #0207, Lex Hanna #0208, Dannel Albert #0209
- Jeremy Birdwell #0210, Jeremy Birdwell #0211, Jeremy Birdwell #0212, Jeremy Birdwell #0213, Edward Crouse #0214, Kevin Ford #0215
Get a Silica Dry Box with your serial number here:
Hydra AMS - Silica Dry Boxes / Serial Number Tags
Thanks again!
If you want to remain anonymous, leave a note with your donation. If I've missed your donation let me know.
About - Continued
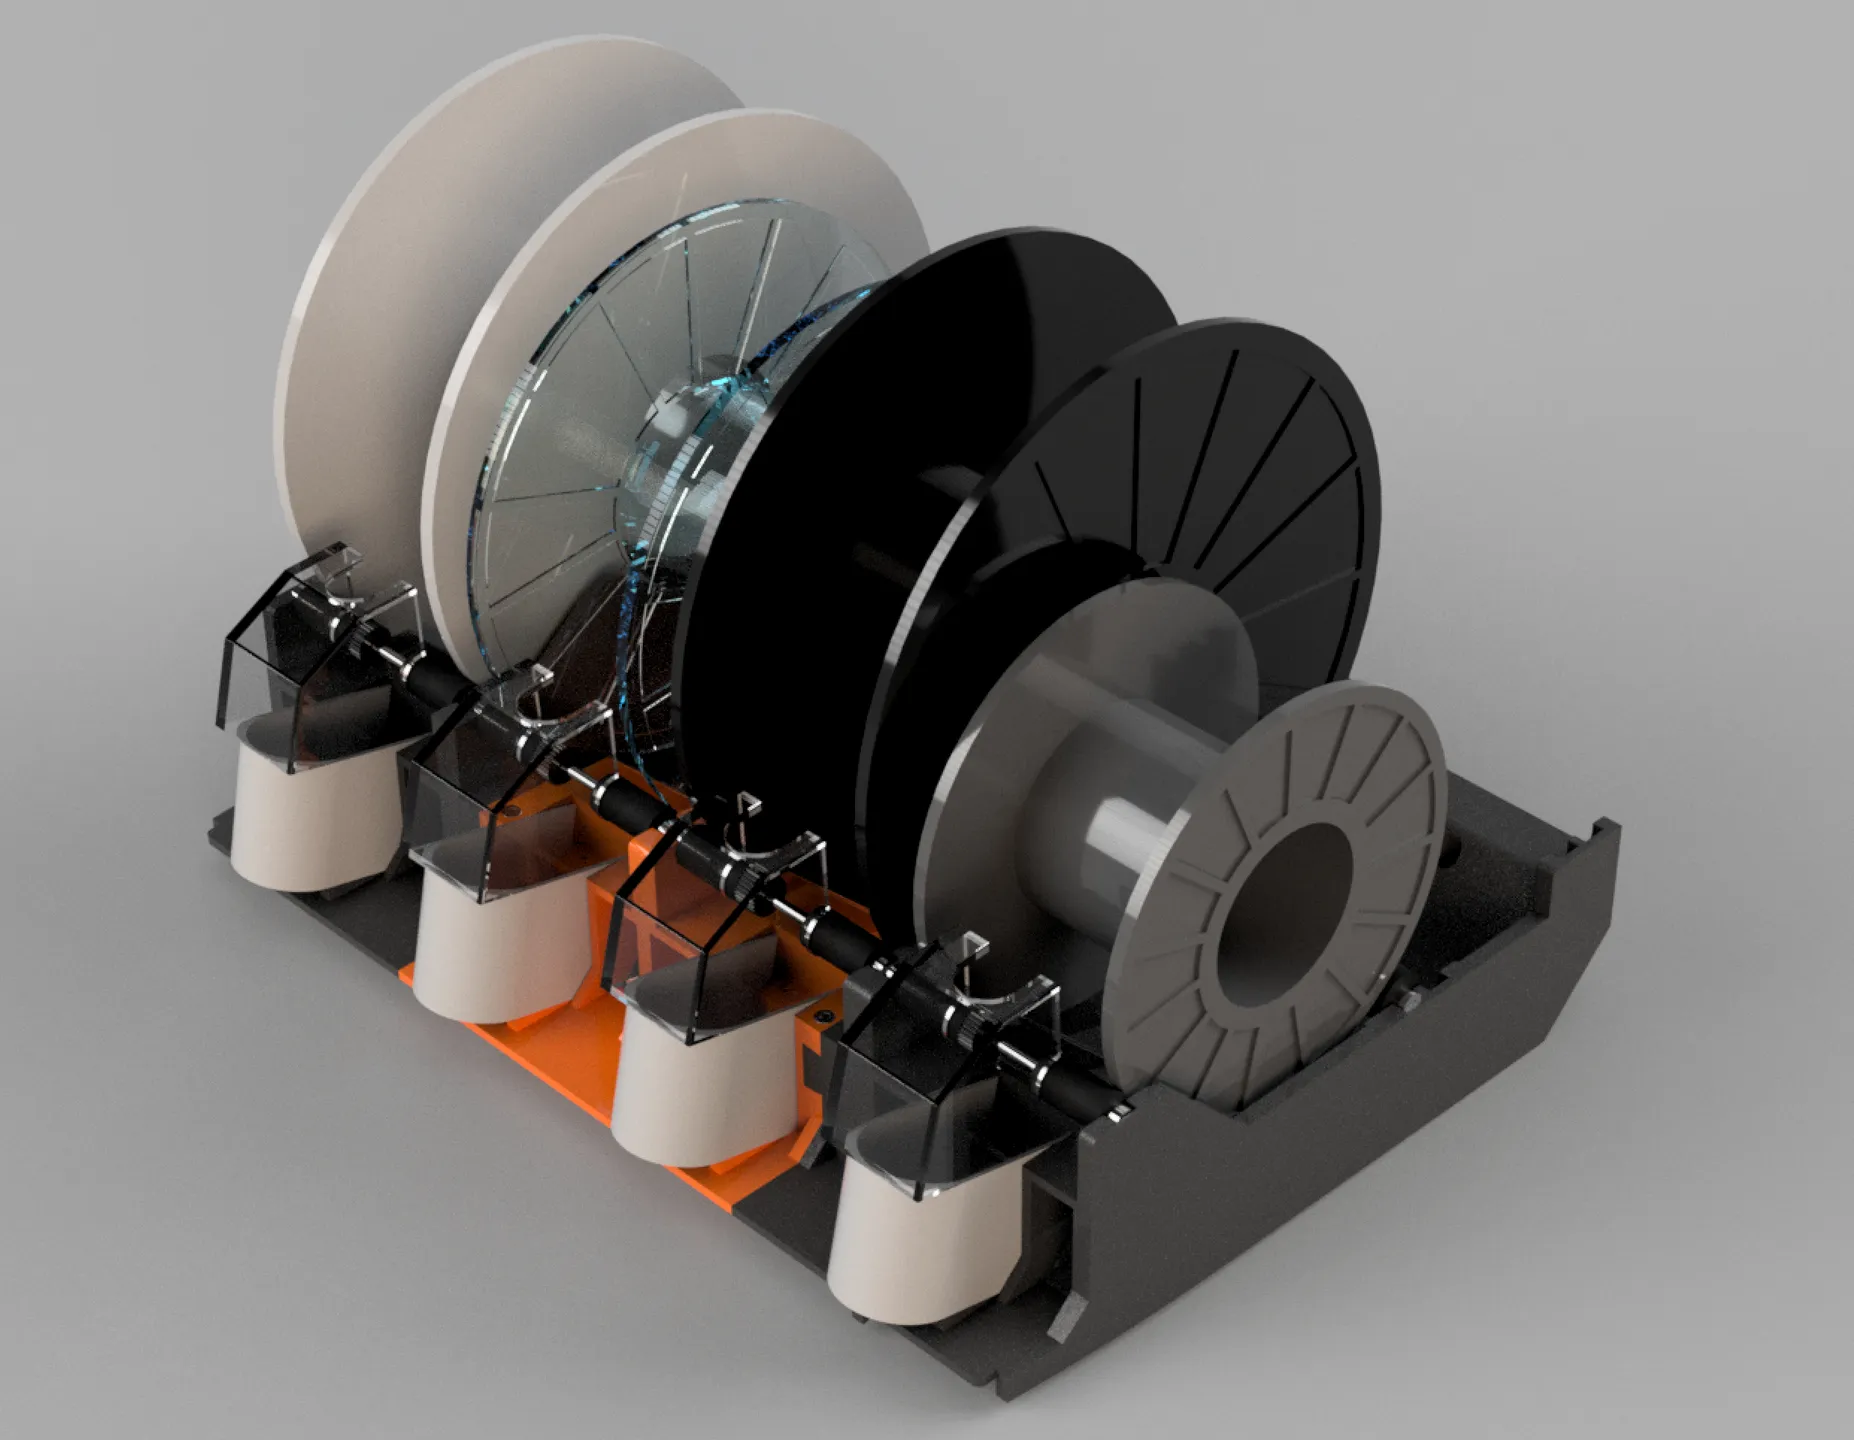
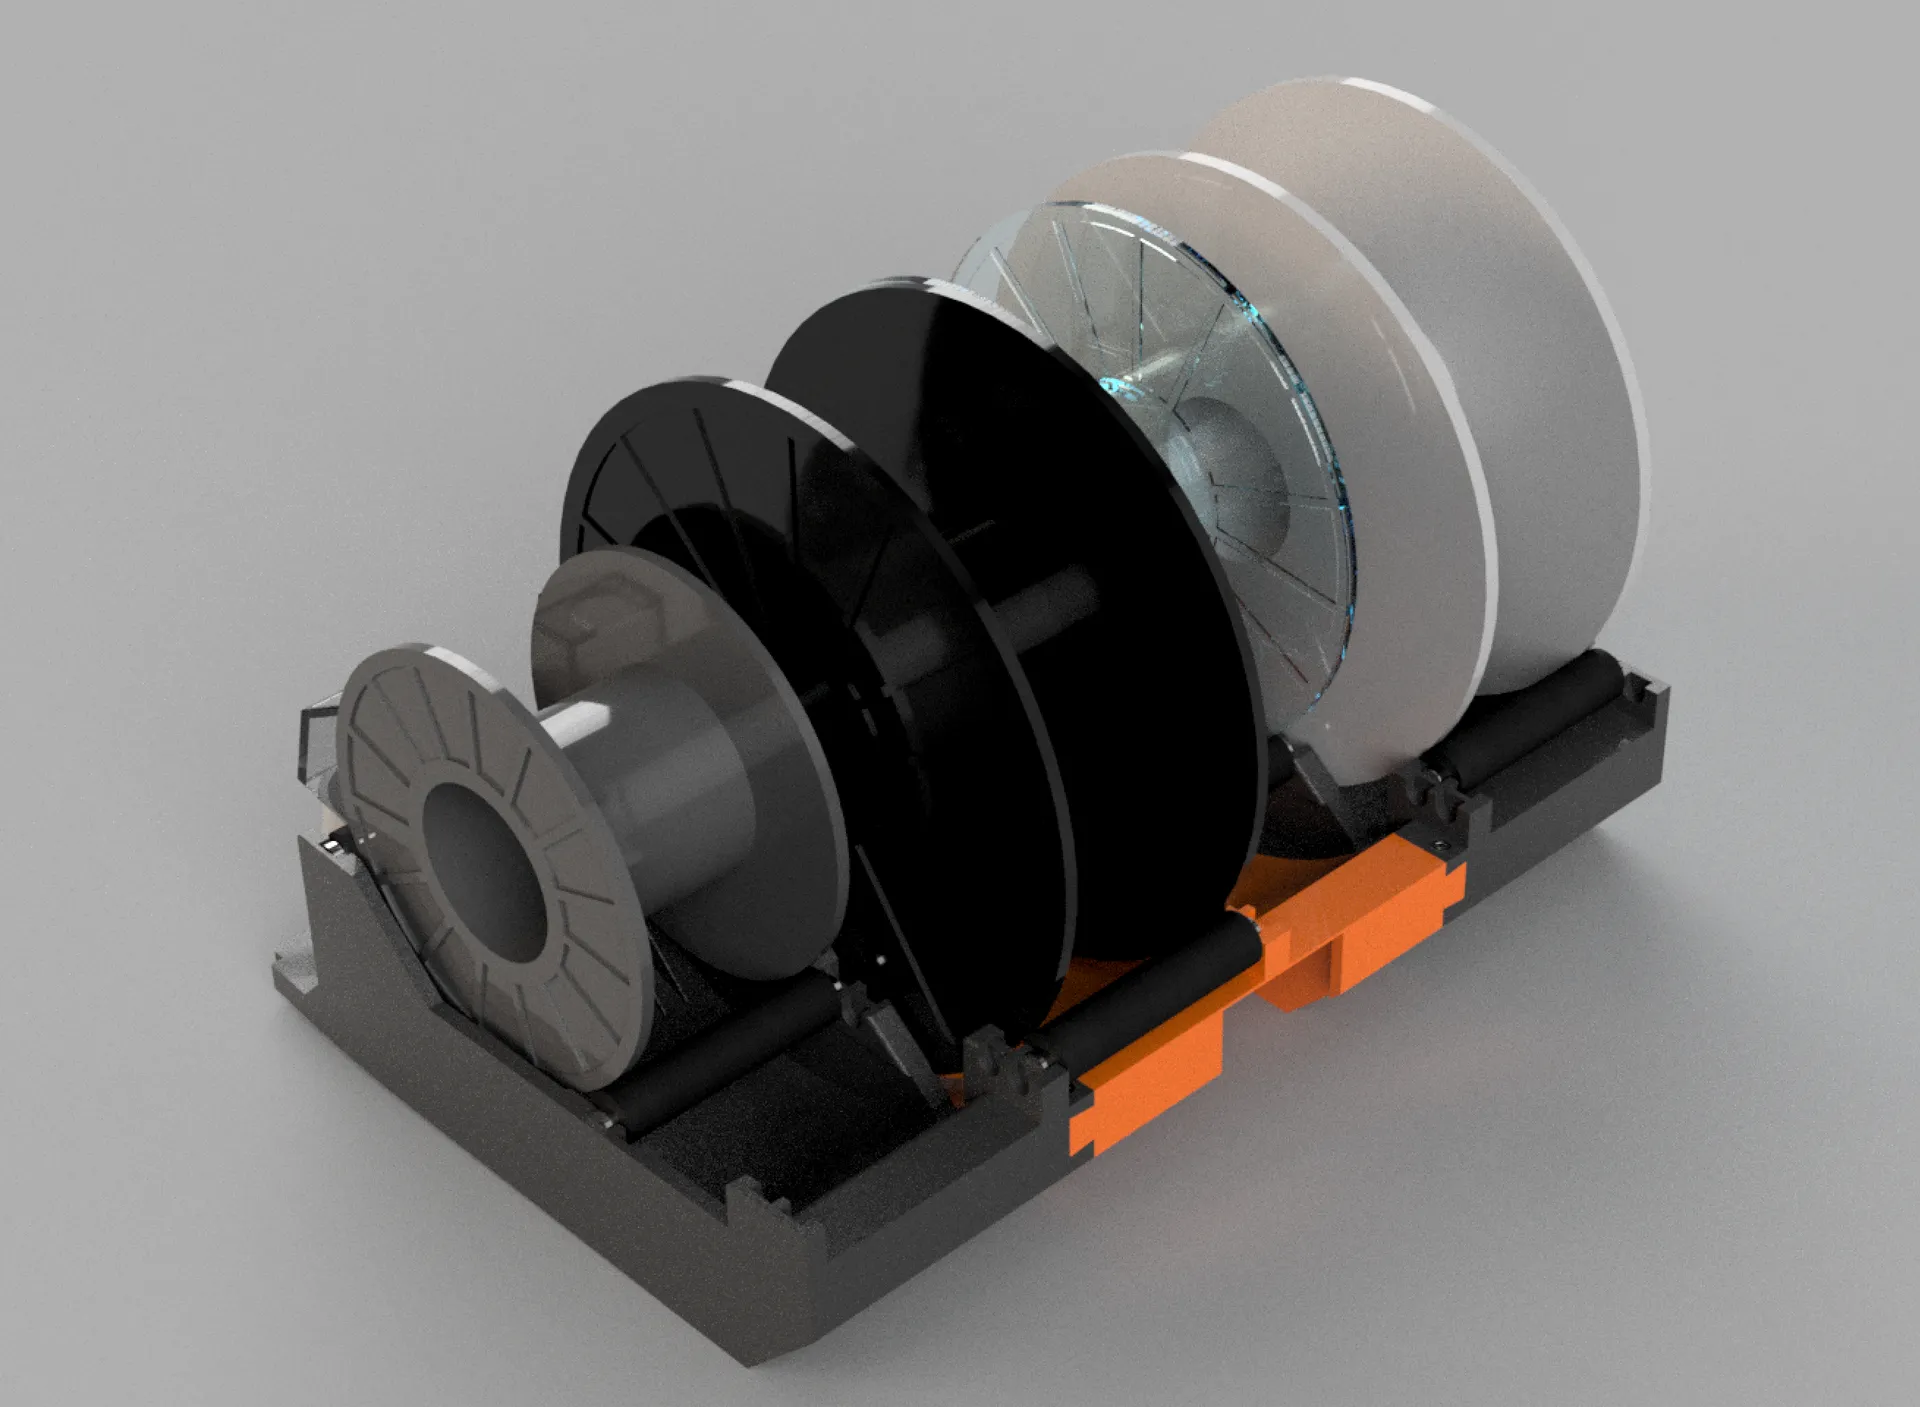
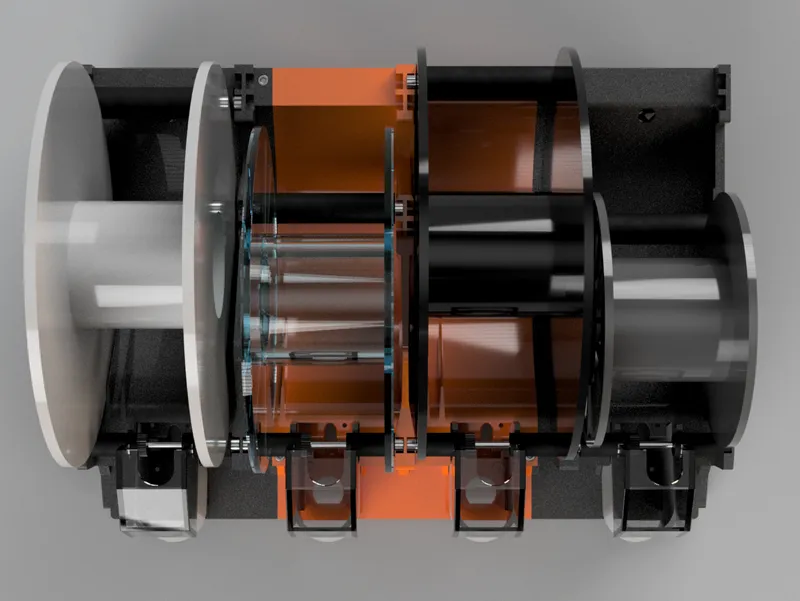
Hydra AMS is an enhanced drop-in main body replacement for the Bambu Lab AMS, a multi filament companion to the Bambu Lab X1, X1C and P1P printers. The Bambu Lab AMS internals are used, you just need to move over the parts; the four feeder motors, the rear motor, the front and rear rollers, the RFID boards and the main board as well as the PTFE tubing and cables.
The name Hydra is inspired by the mythological creature which grew two new heads as one was cut off, similar to how the AMS's tend to duplicate if you don't keep a firm grip of your wallet. I have other designs with names from Greek mythology (Icarus / Hercules) so I thought it was fitting.
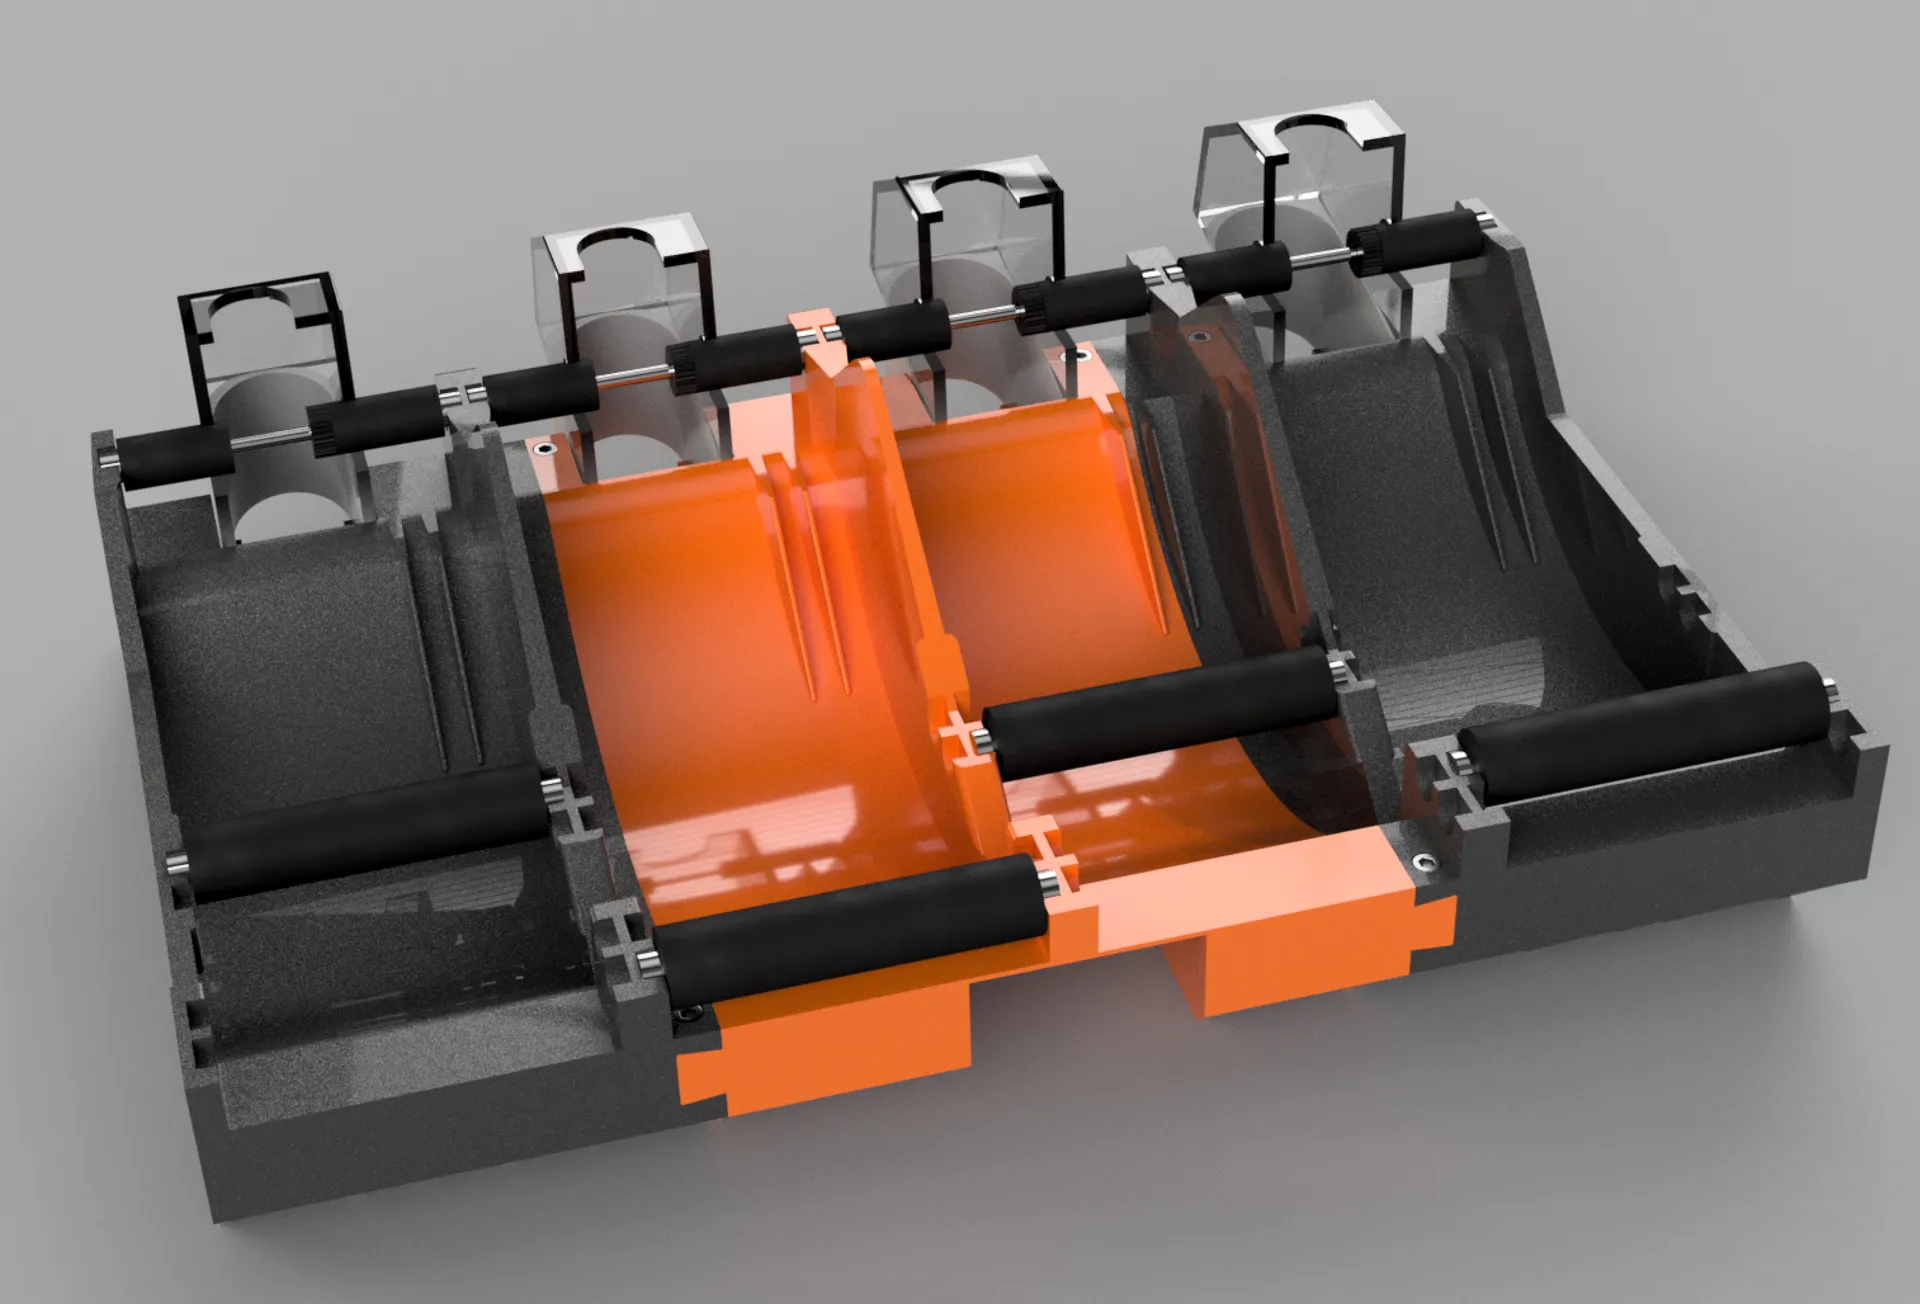
Hydra prints completely without supports and no extra parts are required for assembly, it uses dovetail joints for assembly and utilizes the standard AMS outer casing as well as maintains RFID compatibility. 4 x 20 mm cap head M3 bolts is recommended to ensure the three parts interlock and won't slide apart.
The main changes / improvements over the standard AMS are:
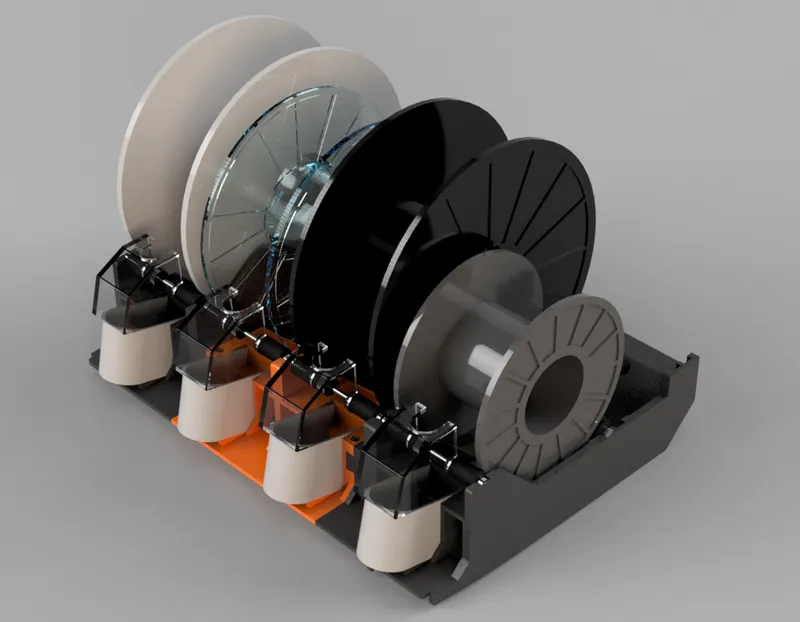
- Increased spool widths, up to 75 mm, meaning most 1 Kg spools will fit.
- Increased spool diameters, up to 202.5 mm diameter spools fit.
- Adjustable spool rollers in four positions for 120 mm to 205 mm diameter spools. Large diameter spools (> 201 mm) require a printed TPU lid spacer if you want to close the lid, just like the normal AMS.
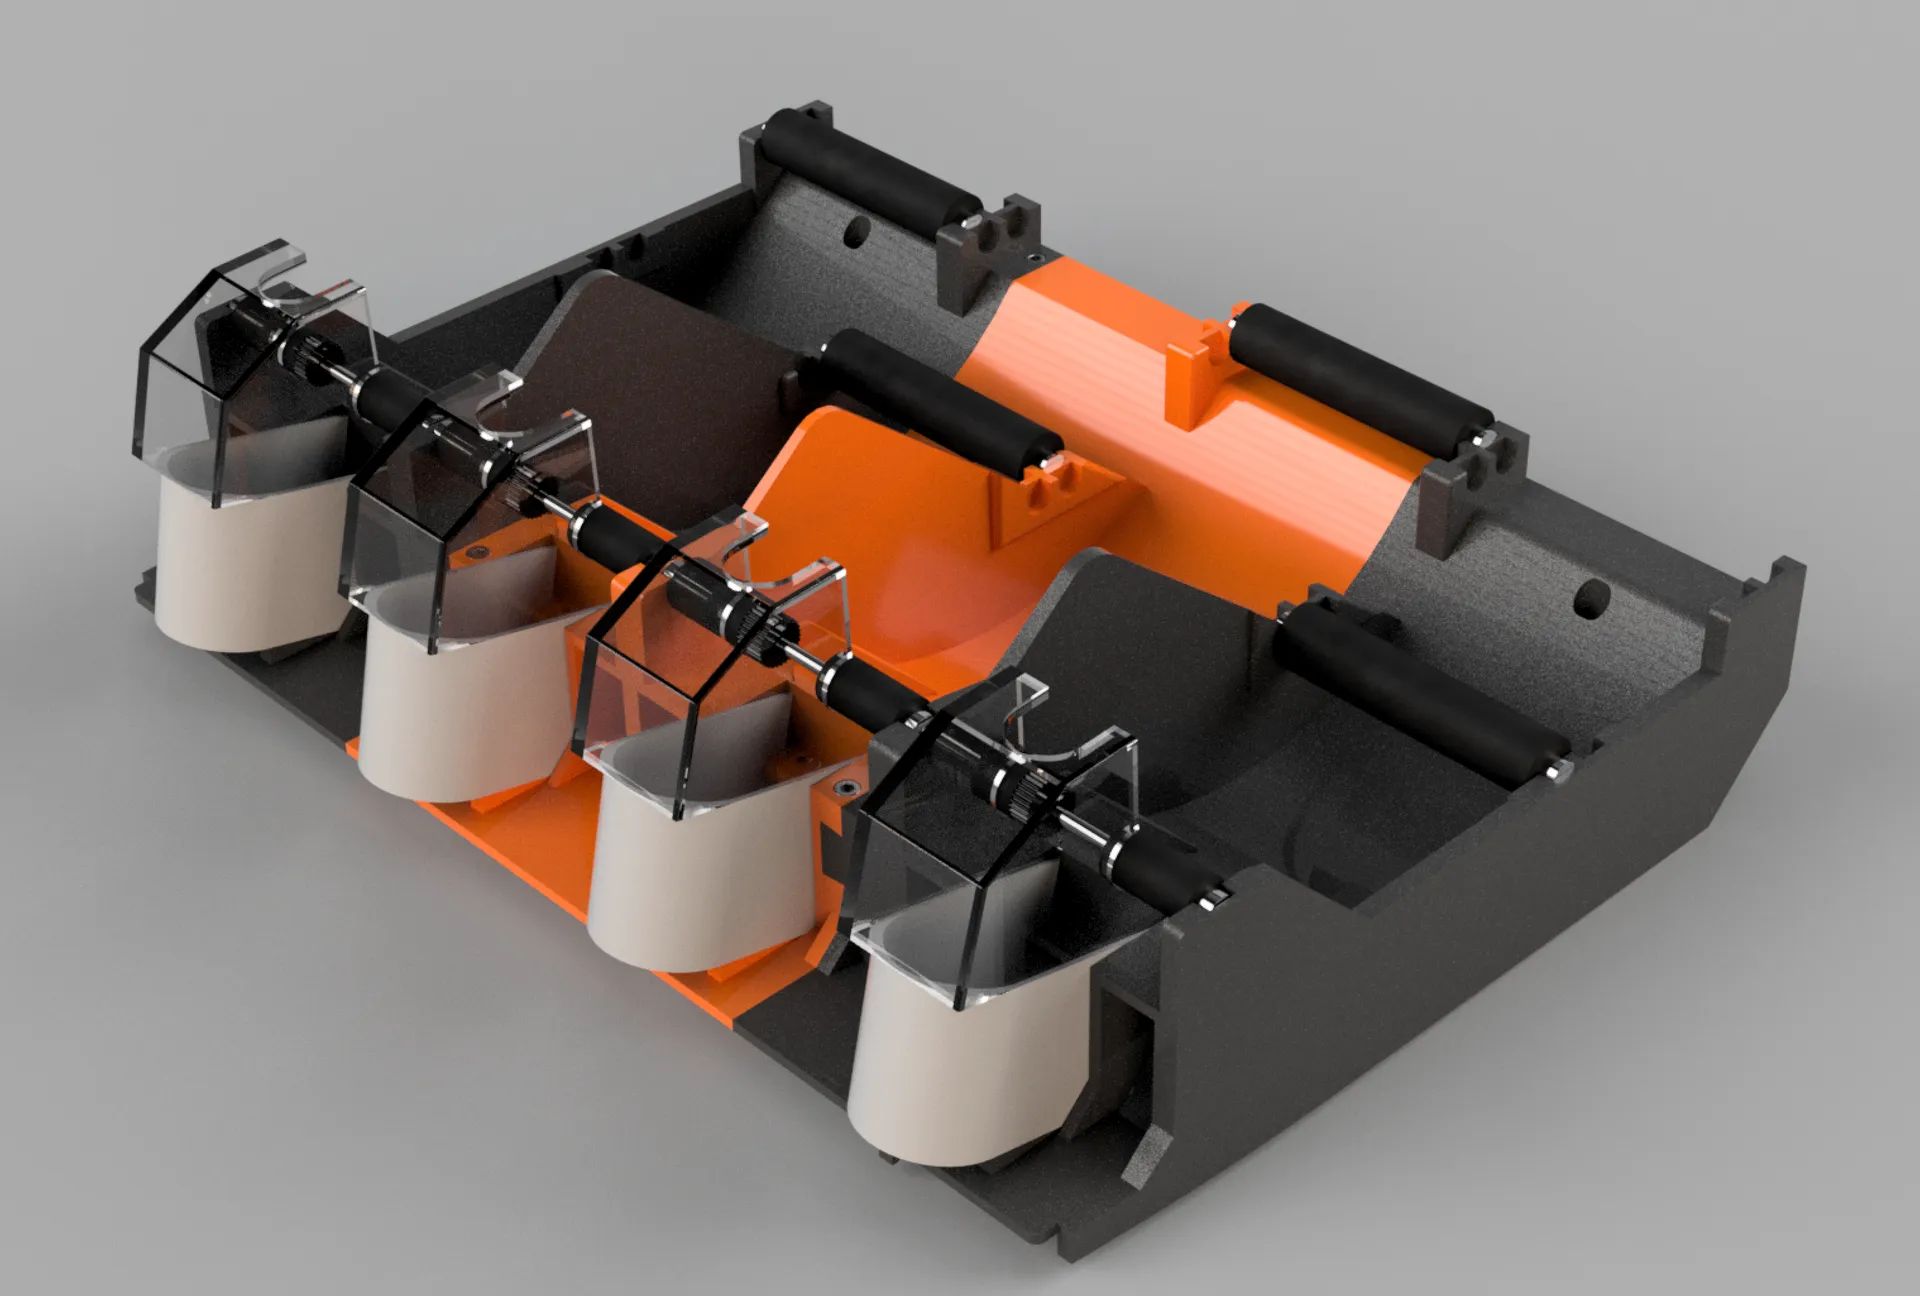
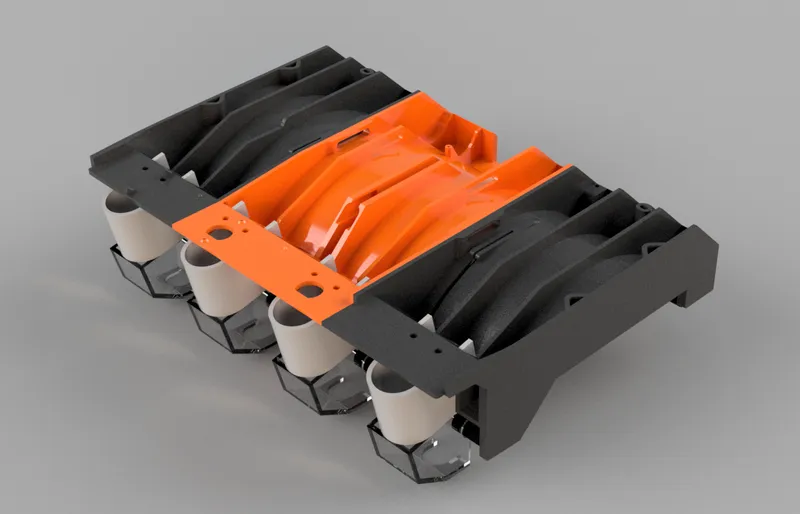
- AMS feeder / motor mechanism angled five degrees backwards to allow printing of full spools.
- PTFE Load Buttons to both save the funnels and improve ergonomics (optional, it's a separate download)
BOM - Bill of Materials
You can print Hydra AMS in just about any filament you like. However, if you plan on keeping the AMS on top of the printer it's best to print it in ABS or ASA as the heat from the printer can soften the printed Hydra parts if they are printed in PLA for example. Around 600 g of filament is required at the recommended print settings.
I've printed most of the test builds in Prusament ASA, PLA and eSUN PLA and ABS+, both brands and filament types work great.
Filament
Fasteners
You need some M3 hex bolts (socket head), I recommend 20 mm but just about anything between 15 and 25 mm should work. If you don't have any at home it's best to grab the kit below, it will have everything you need for this build and many more.
Optional
I highly recommend these Nano Coated Helical Extruder Gears from FYSETC, I use them for all my Bambu printers, they're inexpensive and offer a number of improvements of the stock gears:
Although not required these PEO/PEI/PEY bed sheets are great, I have most options myself, it gives a quite cool look on the first layer. There are a few shops offering different plates:
- Build Plate PEO/PEI/PEY Spring Steel Sheet (IdeaFormer)
- Build Plate PEO/PEI/PEY Spring Steel Sheet (Juupine)
The Hex Tools are superb for any 3D printer, I've had mine for years. They are particulary useful for the Hydra assembly.
Recent Timelapse Test Prints
Some test prints from Hydra AMS from the past few days. All of these prints except the first timelapse are prints through Hydra AMS. Some of them are single colour and some are with lots of switches, with and without prime towers.
The Benchy prints are just filament swaps with the flushing volumes set to 0 for all colours, an AMS stress test if you will, that's why they're a little more rough on the layer adhesion.
I've not included all test prints from the last few days as some are very similar and just for stress tests.
For those wondering, the bed used here is full 3.0 mm Carbon Fiber, Satin/Smooth finish with a high temp epoxy. I've cut it myself, glued with a double sided 3M sheet to a 250x250 steel plate.
Carbon Fiber has excellent thermal conductivity, is super stiff at this thickness and will not flex if prints attempt to. It has excellent adhesion for most filaments and prints just pop off once the plate has cooled off. When extra adhesion is needed, I use Nano Polymer by Vision Miner.
For prints needing a fancy first layer I use a textured PEI bed, link was posted above.
Before Printing Hydra AMS
Make sure you dial in flow correctly before you start, we've seen a few Hydra prints that were overextruded so avoid that. The problem then is you can't join the dovetail joints and assembly properly and the rollers can bind. Printed correctly, everything works just as stock but support for larger spools (among other advantages).
The Bambu Lab printers usually do a pretty good with automatic flow calibration but it's best to confirm flow anyway, sometimes it is inaccurate.
Once you have done that, print the Hydra AMS roller and dovetail test joints, more info here:
Print Settings
Print the three parts in the direction I have set them. I recommend using a wide brim for improved bed adhesion and Nano Polymer if you have some. The parts are tall and quite narrow.
I recommend using a minimum of 3 walls, top and bottom and an infill of 15% or higher. I've printed all my Hydra prototypes with a 0.40 mm nozzle and a layer height of 0.20 mm on my X1C with otherwise mostly stock settings. Supports are not needed, it was designed so they're not required.
Please use a wide brim (I like to use 10 mm for these prints) to ensure bed adhesion. You may want to slow down the print and set it to “silent mode” for the last hour or so of the print, that's where it narrows a little and slower print speeds can be beneficial for the print quality.
Use dry filament.
Warranty
Hydra AMS does not void your warranty but be careful, especially with the AMS main board, use an antistatic wrist band. Although the mod is completely reversible and you can't tell the parts have been installed in Hydra AMS, I take no responsibility and you're on your own. Be careful and take it slow, read this page twice before you start.
Assembly Instructions
Remove the Bambu Lab AMS internals from the standard AMS, follow this guide, it's not difficult:
https://wiki.bambulab.com/en/x1/maintenance/replace-the-ams-main-frame
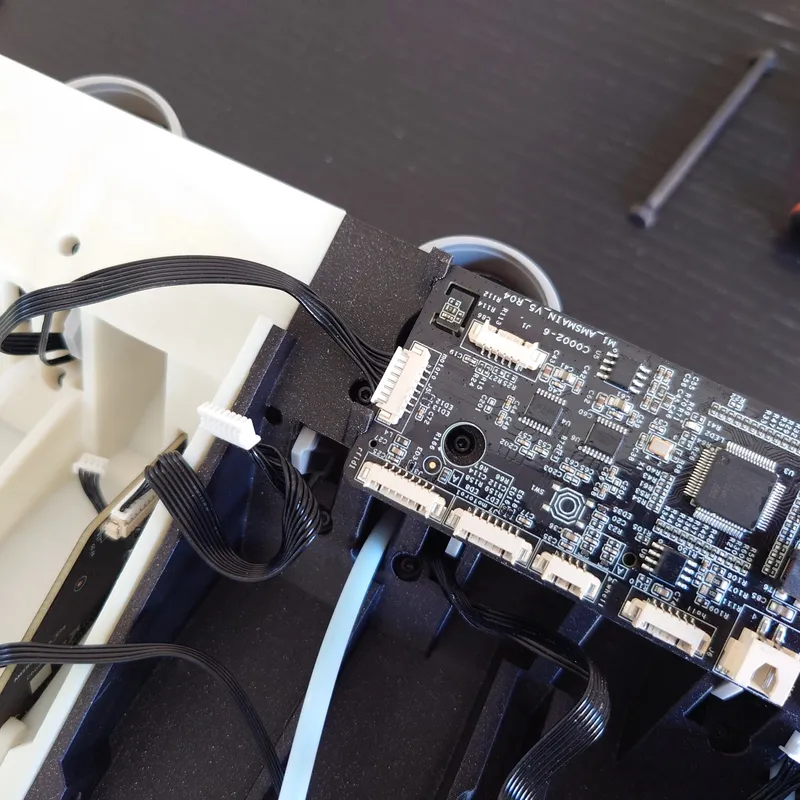
Be sure to mark all cables and connectors before you remove them. I recommend marking each connector on the board and corresponding cable with a thin permanent marker pen as pictured below:
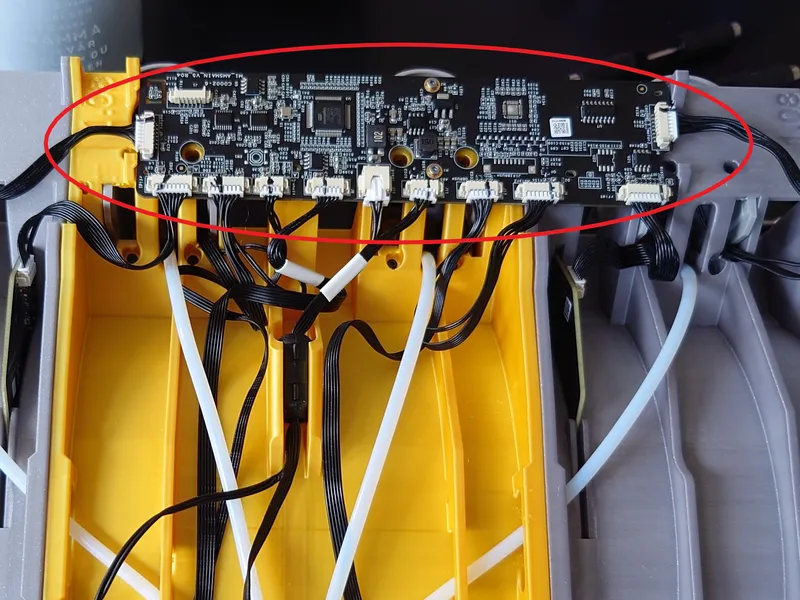
Precaution: Always wear an antistatic wrist band when working with electronics.
The RFID boards are secured with hot glue so pull that off before removing them, the same goes for the ferrite core on the cables between the AMS main board and the small board in the rear of the AMS. A user suggested some IPA to resolve the glue but I have not tested this myself.
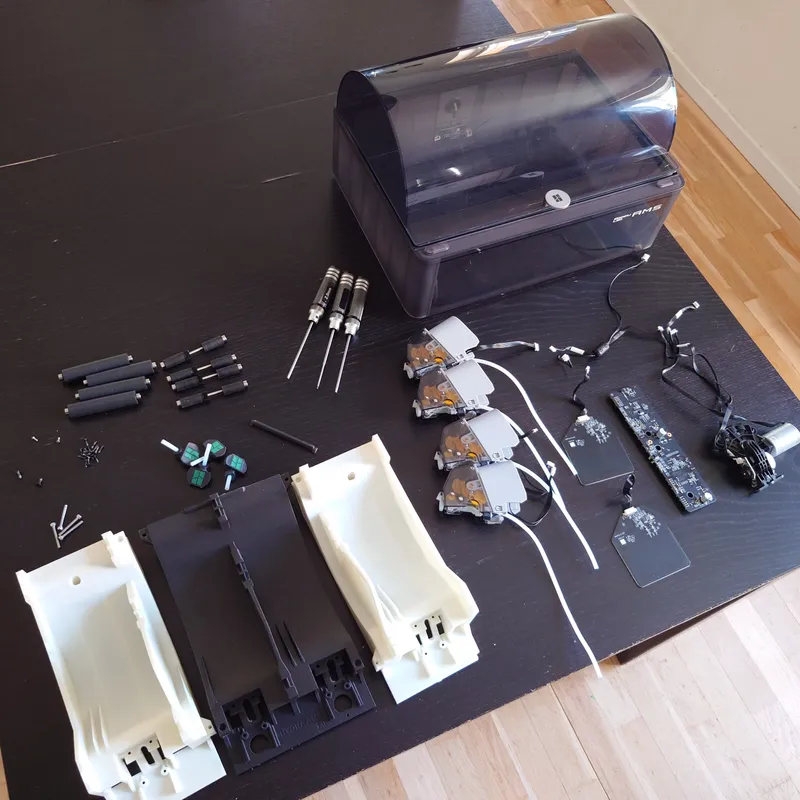
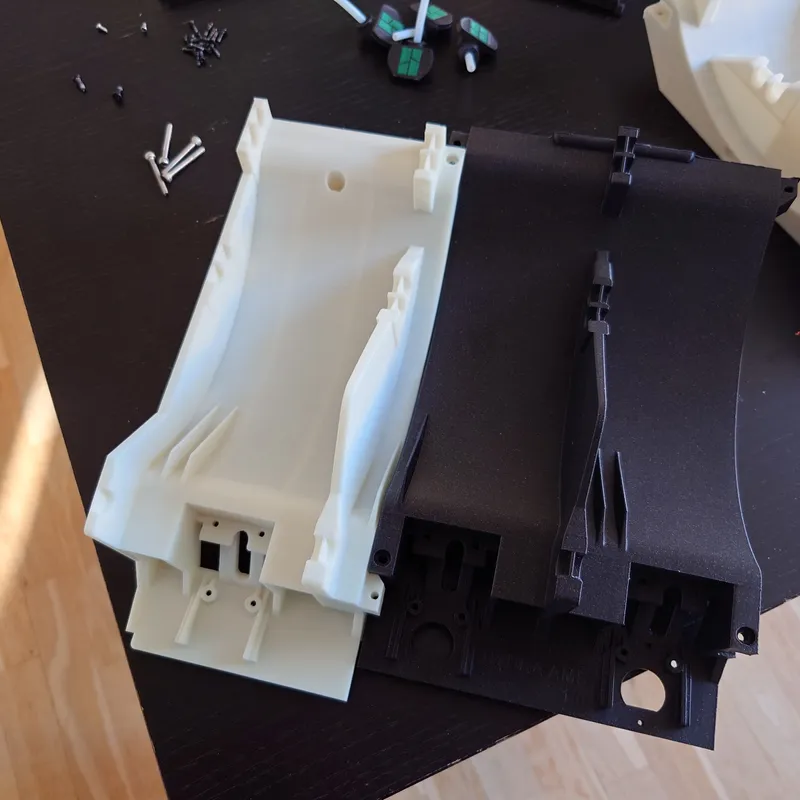
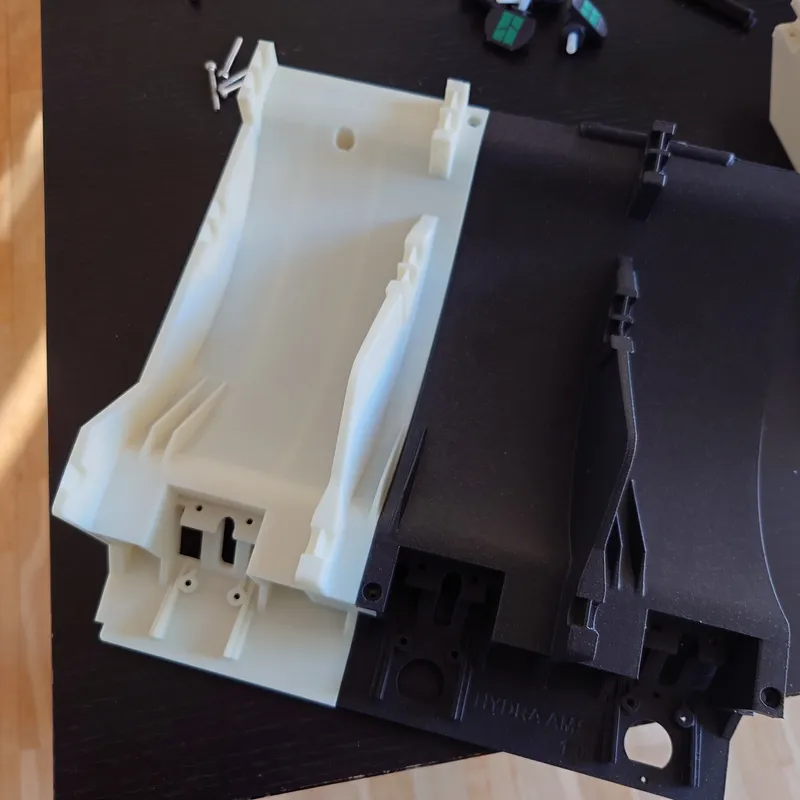
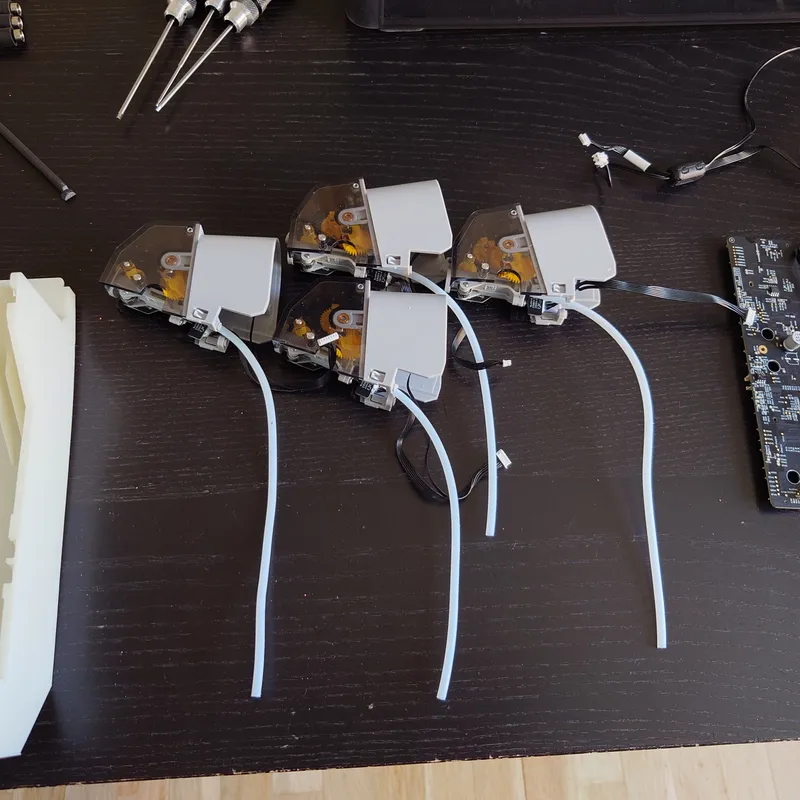
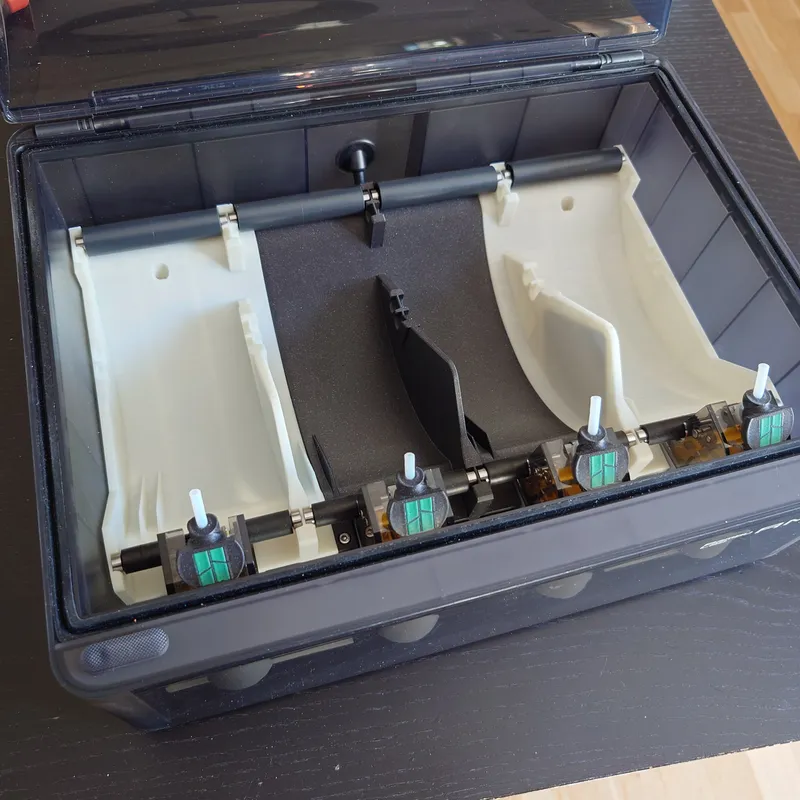
Once that is done, you should have all the parts as pictured below. If you are unsure on how to remove the parts, just follow the assembly instructions in reverse.
Here are all the parts just before assembly.
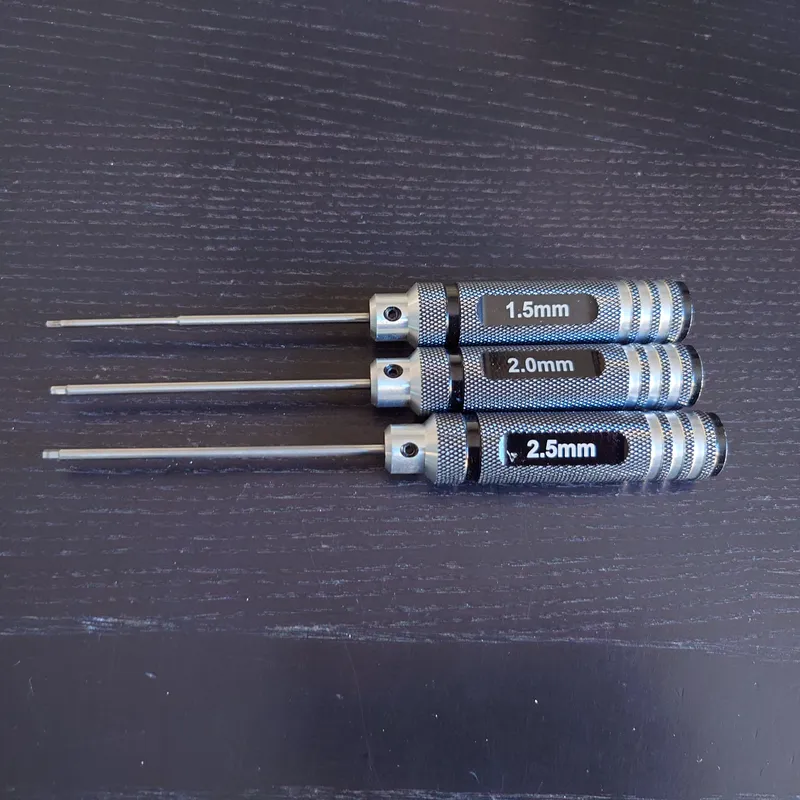
You need the following hex tools. The 1.5 and 2.0 mm are needed for the AMS parts and the 2.5 mm is needed for joining the three printed parts with the 20 mm cap head screws.
You can find these tools on AliExpress and I like to use them for my 3D printers but of course any hex tools will do.
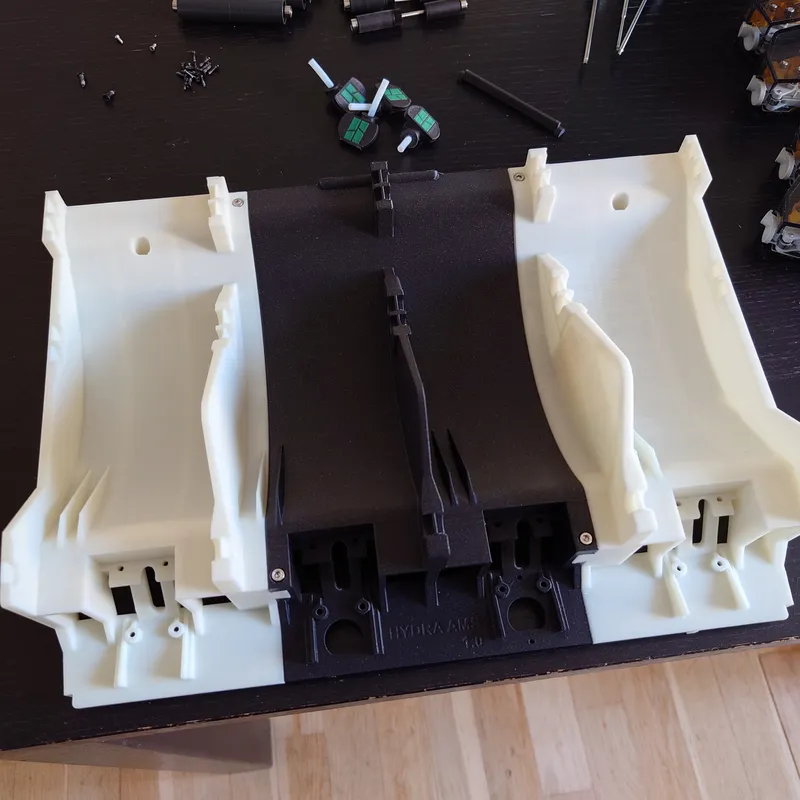
Slide the printed parts together and secure them with some M3 cap head (socket head) screws. I've used 20 mm ones myself.
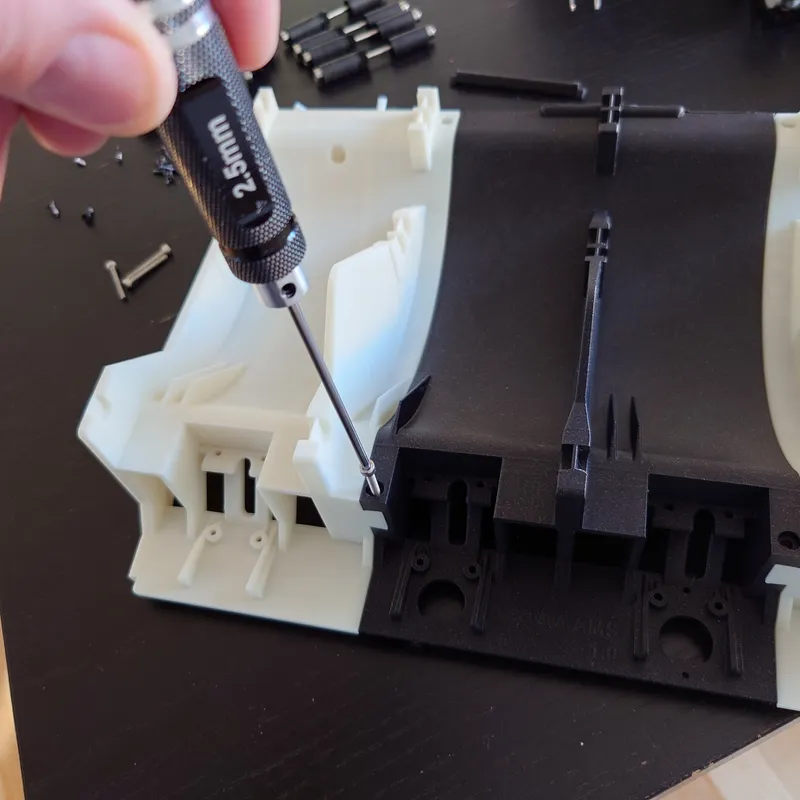
Printed parts assembled.
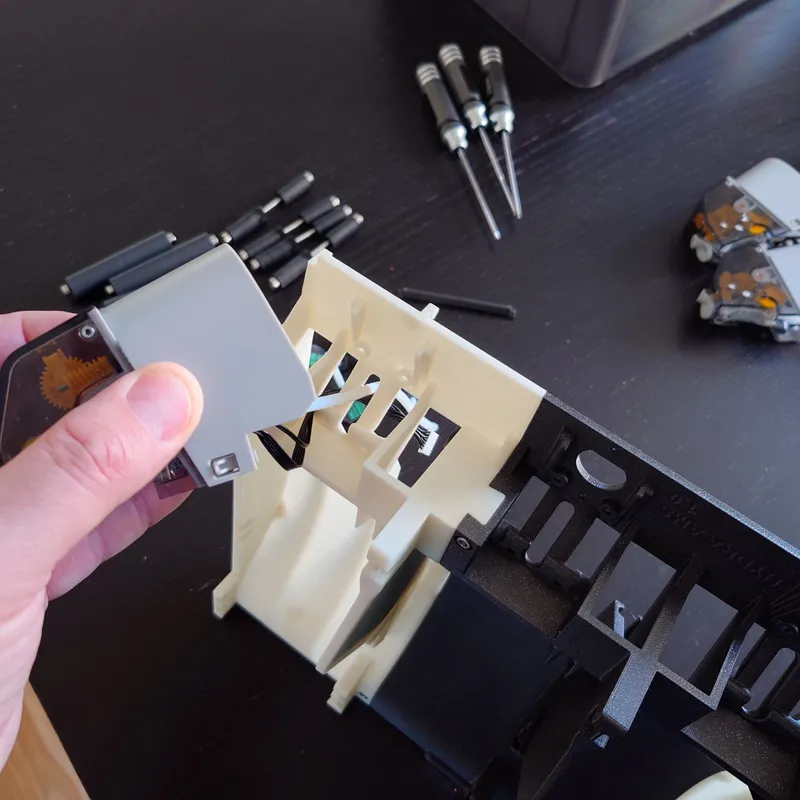
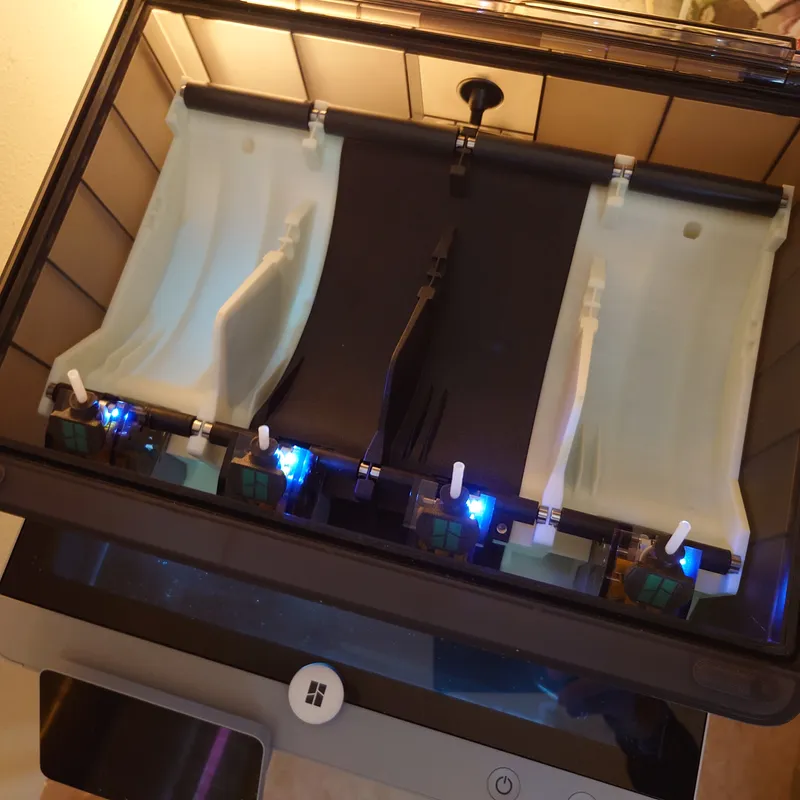
Install the RFID boards. They are friction fit. Be careful when you slide them in, find the correct angle and they will slide all the way in.
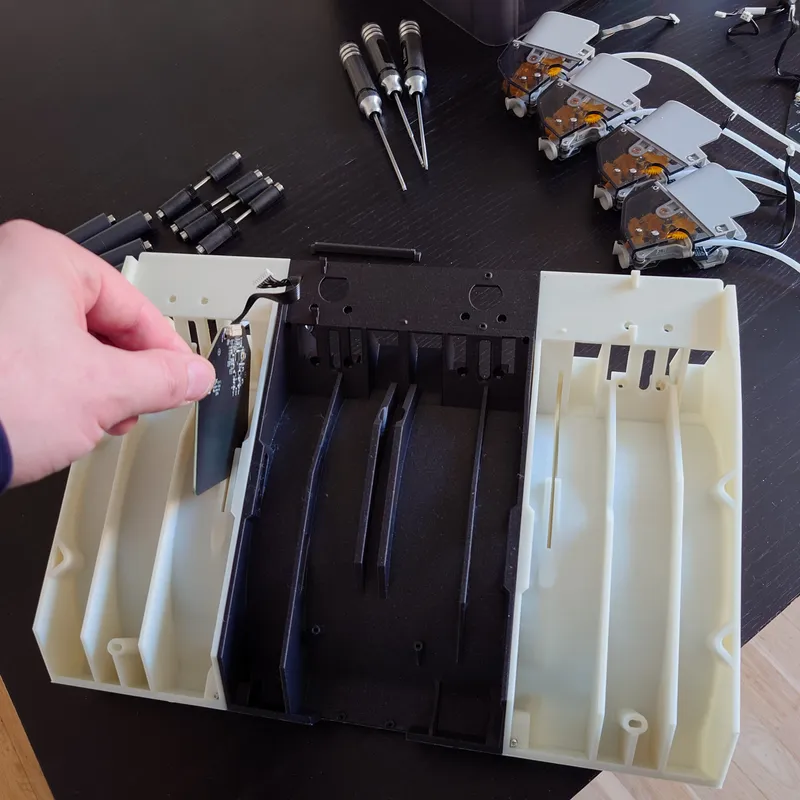
Here you can see the RFID boards through the plastic, they are visible if you use lighter filaments to print the parts (in eSUN Luminous Green here). The middle part is printed in Prusament Galaxy Black.
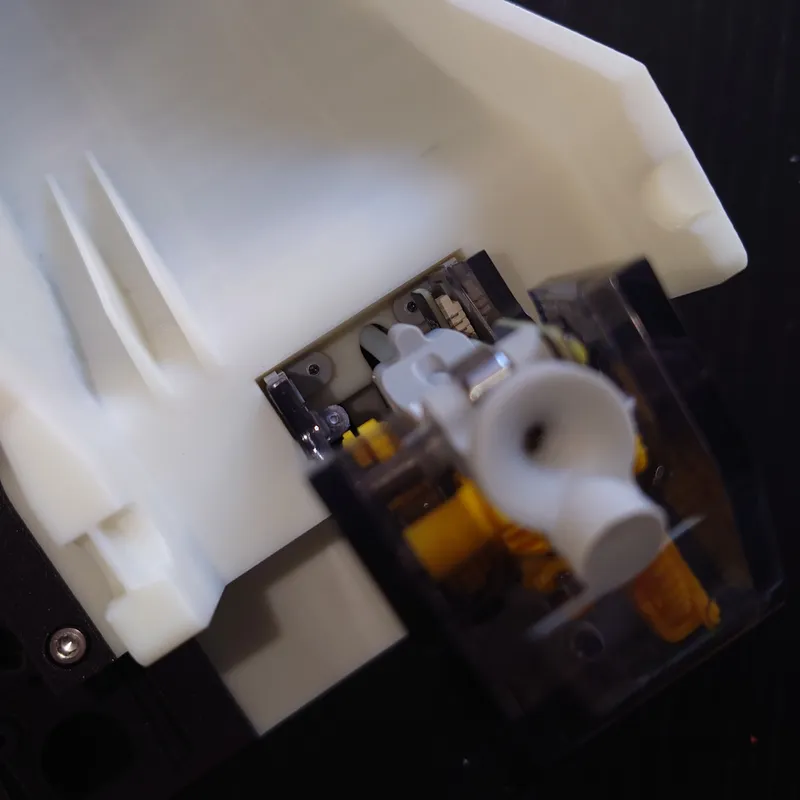
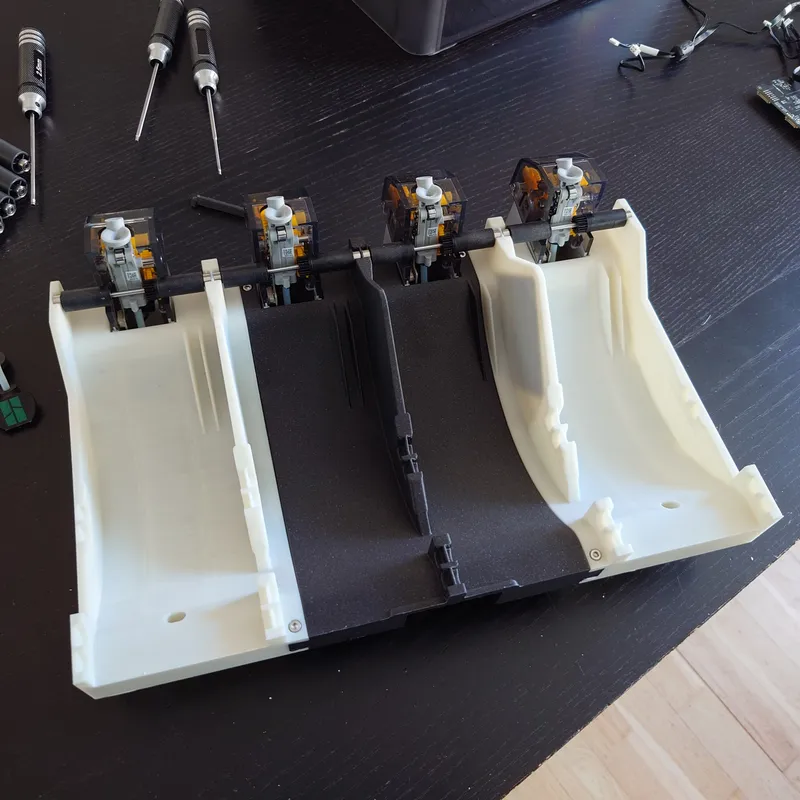
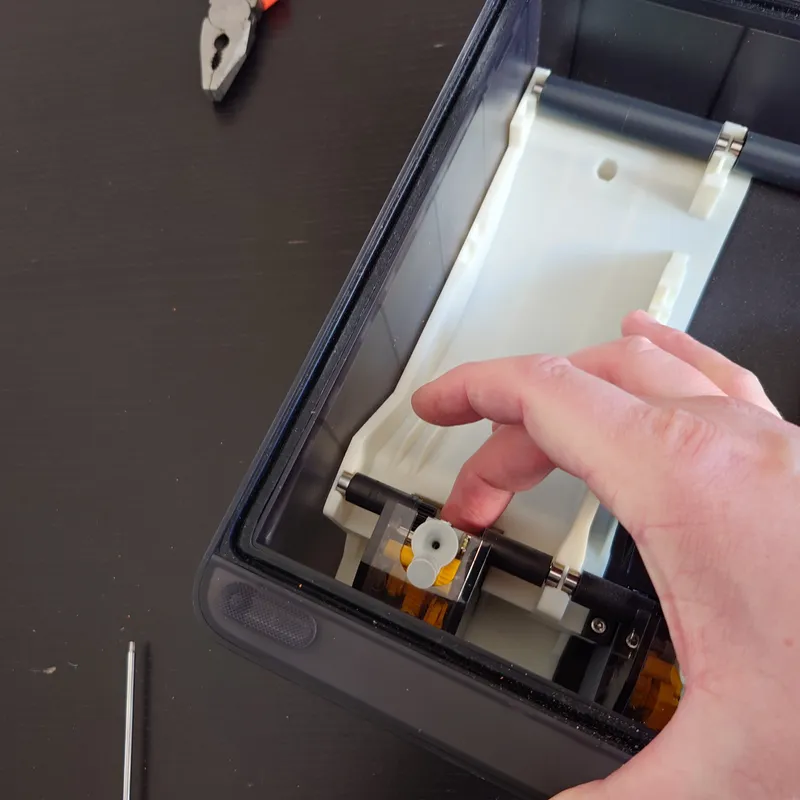
Sort the front feeder motors. The ones place in the middle of the AMS have a shorter piece of PTFE so keep that in mind. If you accidently place them wrong you can just switch of the tubing.
Insert the PTFE tube in the middle and the connector and cable in the left slot then push it all the way down to align with the screw holes. Secure the four small screws with the 1.5 mm hex tool. Tighten fully but do not overtighten, you should see the screws peek out just above the top (last pic)

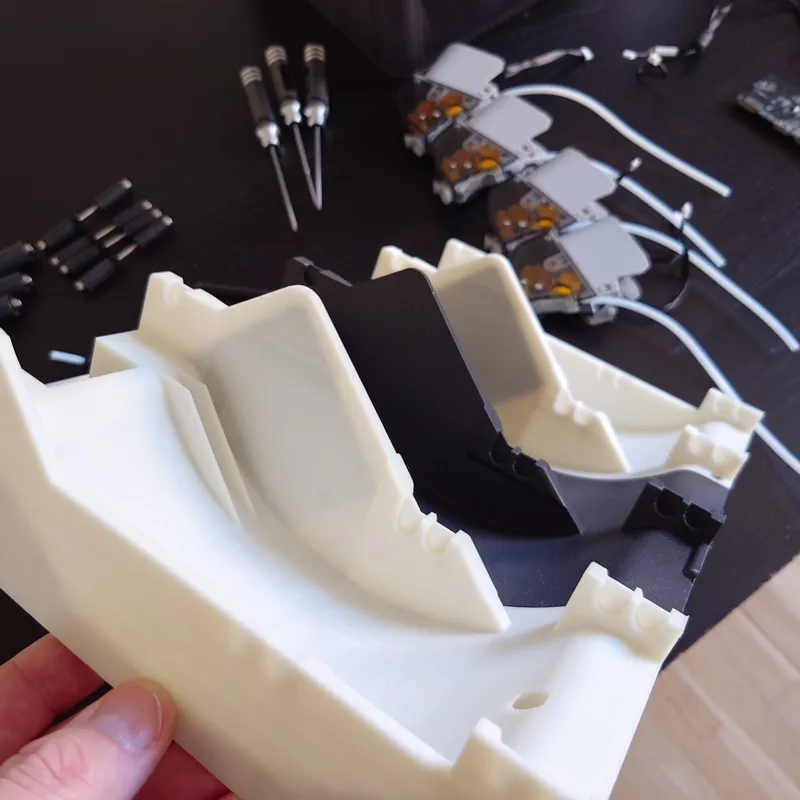
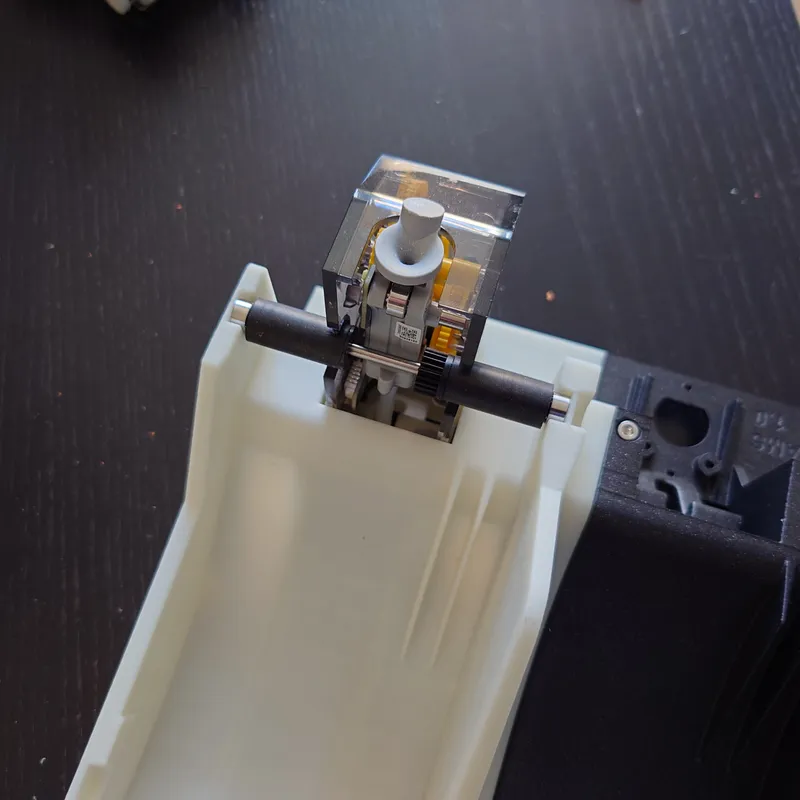
Install the front roller and confirm it rotates freely and easily. If it doesn't, ensure the screws are properly tightened and that the front feeder sits in place. Don't worry if one of the rollers pushes up ever so slightly, this sorts itself once a spool is installed.
Proceed to install the other three front feeders and rollers, make sure they all move smoothly.
Half way there! Go grab a drink.
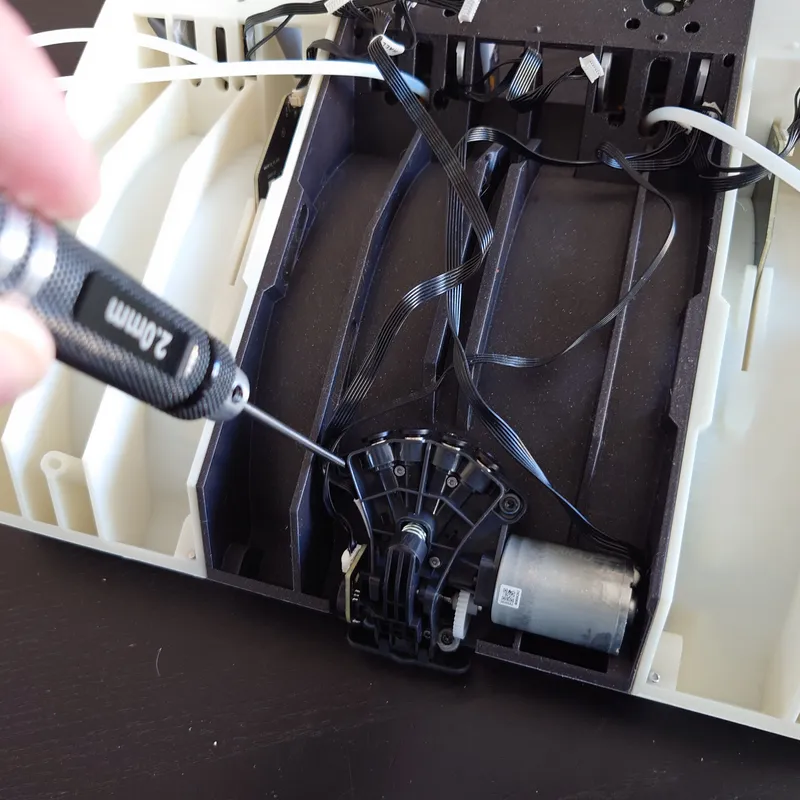
Next, we flip the assembly over and move the PTFE tubing out of the way because it's time to install the rear motor (Filaments Hub, Bambu Lab's naming).

Here you use the 2.0 mm hex tool to install the four screws in each corner of the motor assembly (Filaments Hub). Press the flat PTFE release button (very bottom of this picture) and ensure it engages / disengages.
For the bottom two screws (closest to the rear of the AMS), make sure you don't tighten them too much else they will peek out and can obstruct the rear rollers. The screws are tightened on a silicone pillar and does not require full tension.
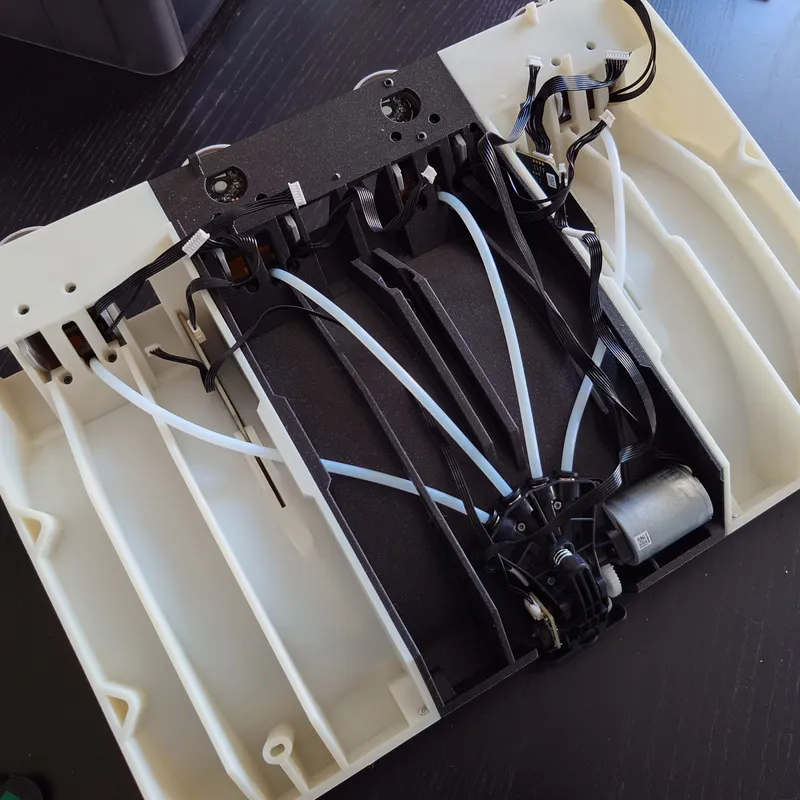
Next, connect the PTFE tubes from the front feeders to the motor assembly. The outer feeder PTFE tubes are routed through the Hydra printed parts, there is a cutout, it should become clear once your install them.
Make sure the PTFE locks properly so pull a little on each one once installed.
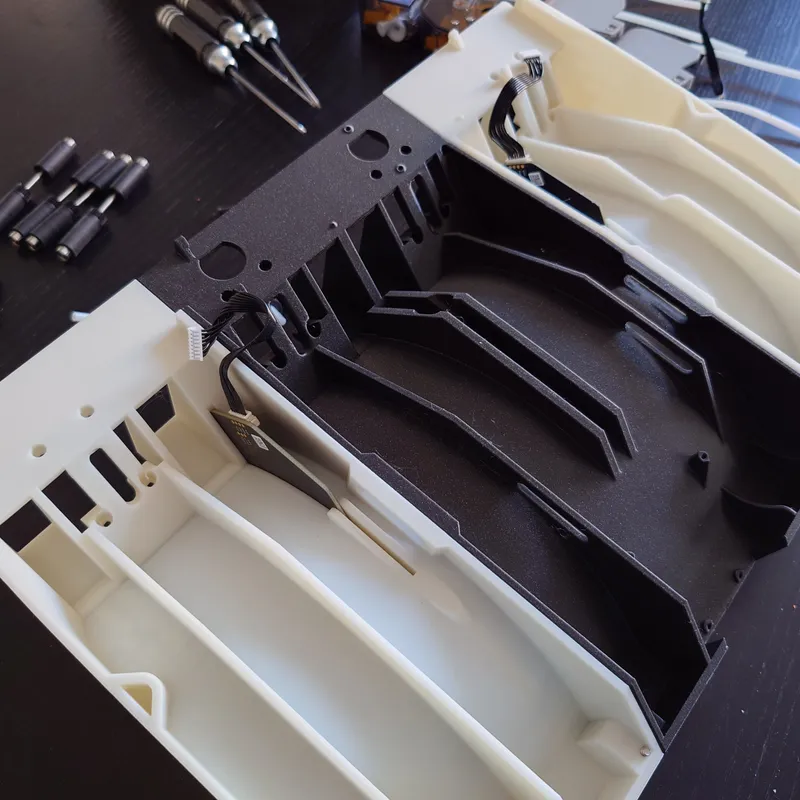
Almost done. Now we install the AMS main board. There are two tabs on each side it goes under and it is fastened with two small screws in the middle (use 1.5 mm hex tool)
Be careful with the capacitors on the board, they are located on the other side of the board in the pic below, these are guided through the holes in the printed part (see the picture just above).
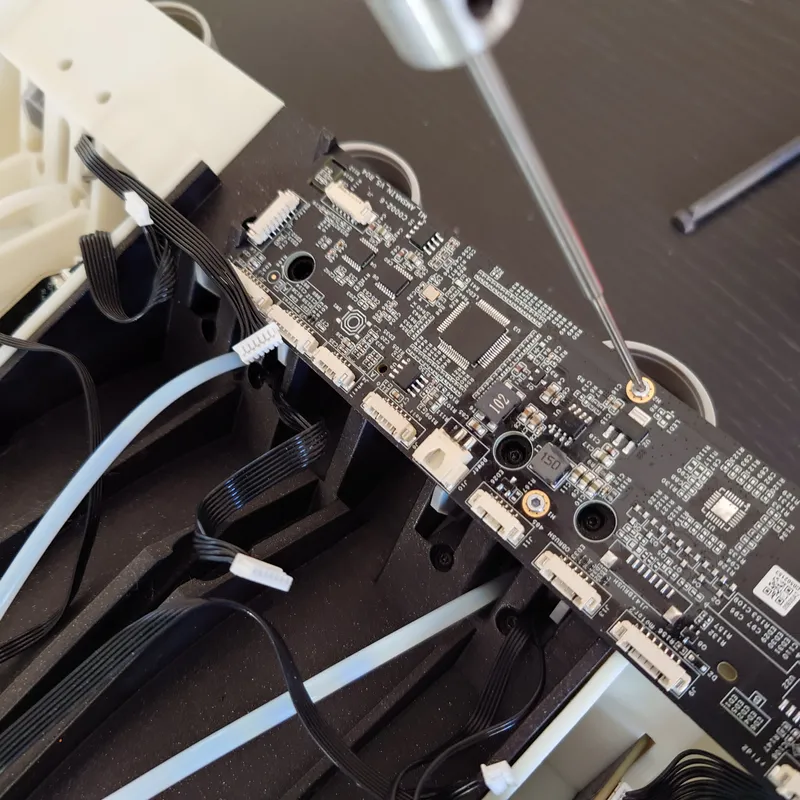
Connect all the cables to the main board. Check the third picture if you forgot where everything was connected. The ferrite core with the cables between the main board and the small rear PCB sits in the middle slot, it's just friction fit (not pictured here) so slide it in.

Picture Source: Bambu Lab Wiki
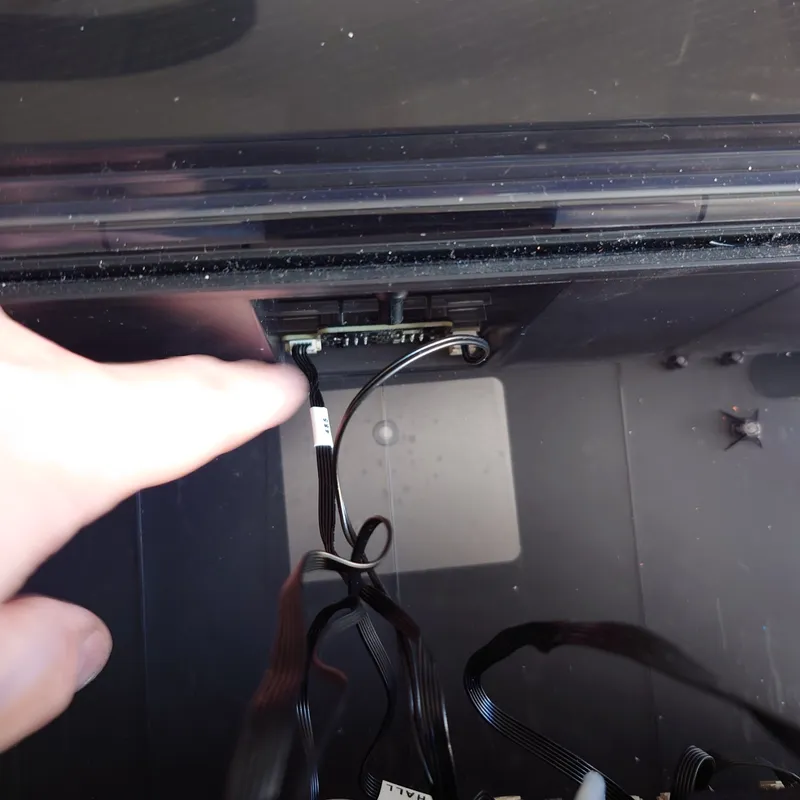
Time to install Hydra in the Bambu Lab AMS enclosure. Lean it towards you then fold it backwards.
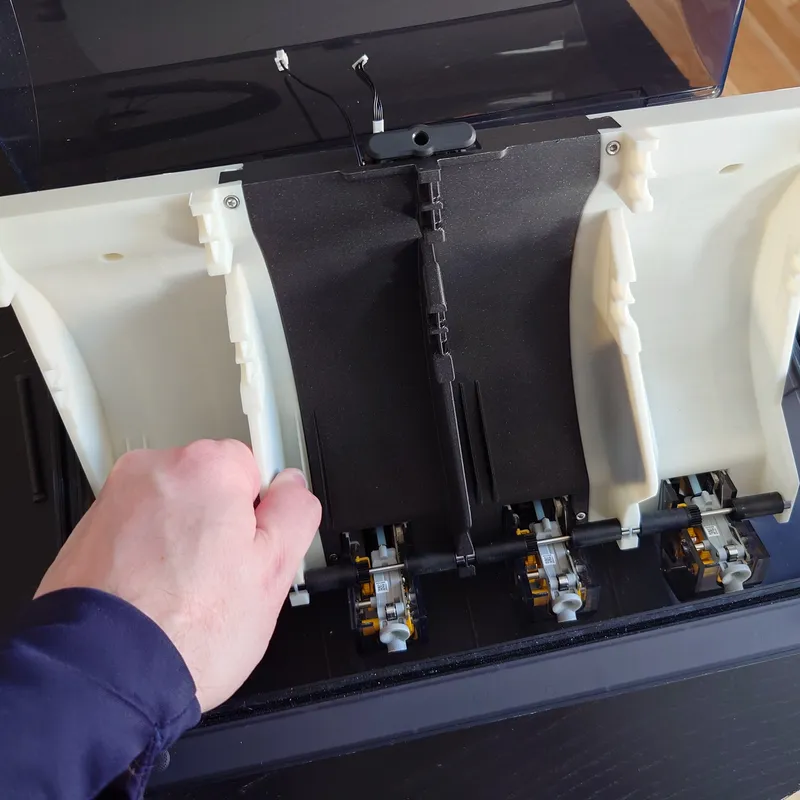
With the assembly still angled towards you, install the two cables, you can then fold down the assembly into the box.
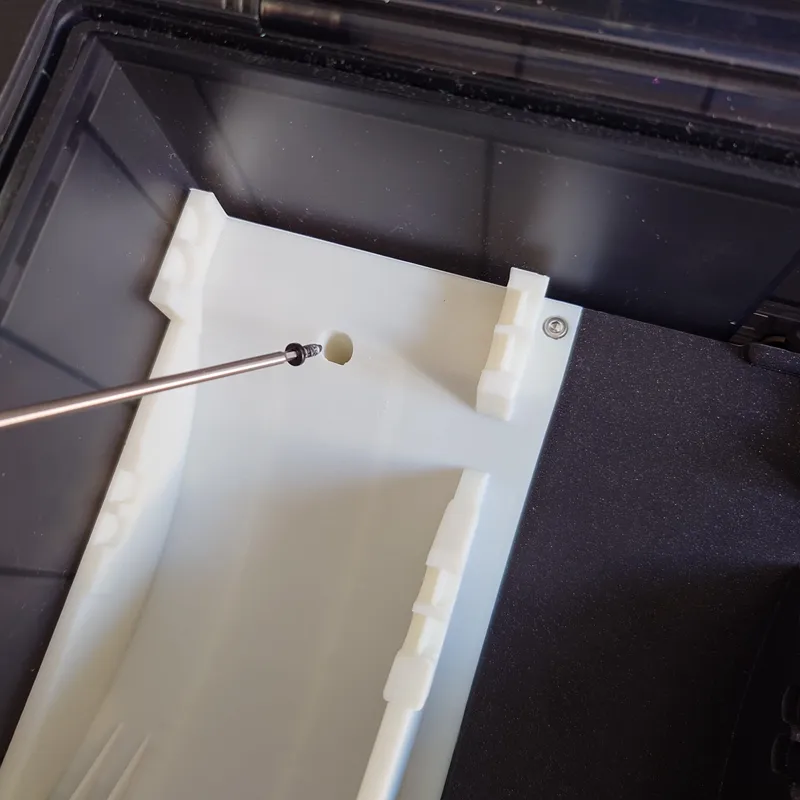
Fasten it with the two main frame screws. 2.0 mm hex tool is used.
Notice! If the screw doesn't reach it's possible you downloaded an early update of version 1.03, unfortunately there was an error but it has been corrected. If so, use a longer screw or just drill the part a it a little deeper. Sorry!
If you want to use the optional but recommended PTFE button feeders to both save the funnels and improve ergonomics, press the bottom of the feeder and at the same time install the button. Once done, press down the PTFE tube a little.
You must install the buttons after the main Hydra AMS is in place in the box, not before (there is not enough space otherwise).
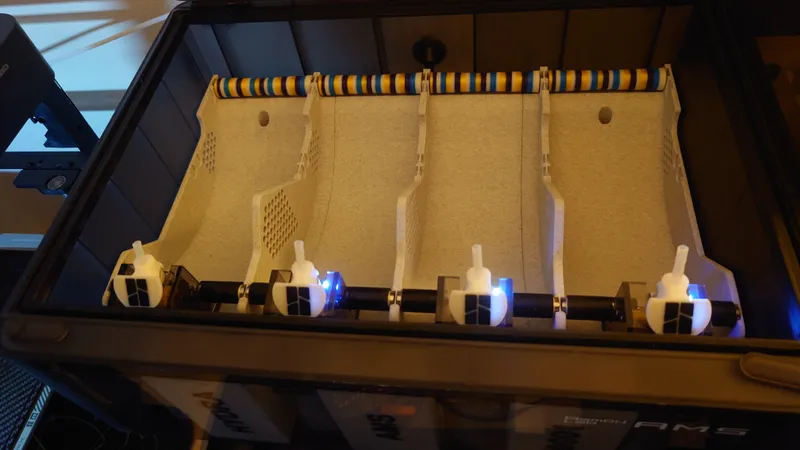
Connect the PTFE tube at the rear as well as the connector. Load up your spools.
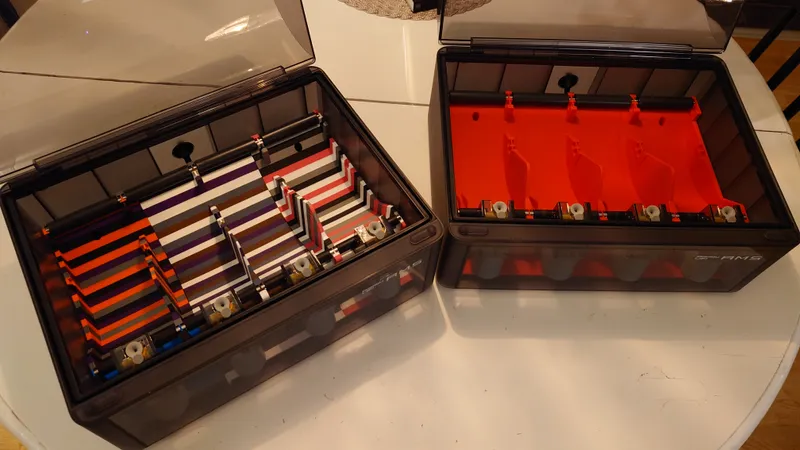
All done!
Left: Hydra AMS without spool guides (see remix).
Right: Normal Hydra AMS.
Prelude, Precaution and some more tips
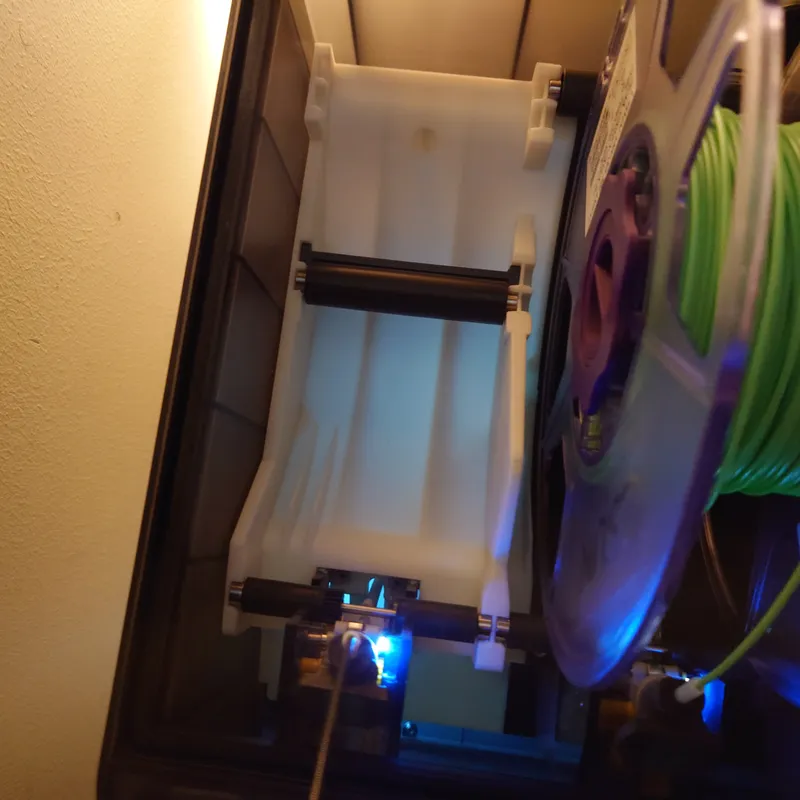
Make sure the front feeders are fully inserted and tightened. Also make sure the bearings on the rollers are fully inserted over the shaft. Finally, 75.0 mm wide spools is the absolute max, else the spools will not turn like they are supposed to. If you use cardboard spools, add some electrical tape to the lip to get better grip.
If you use the the middle position of the rear rollers and your printed Hydra parts were ever so slightly warped at the side walls and/or dividers, for example if they were printed in ABS with too much cooling, they could prevent the rollers from rolling perfectly smooth and instead with some restriction. We don't want that.
If so don't worry, just print the optional roller support bars to ensure perfect alignment of the roller slots and the rollers will spin perfectly again.
These are not required for the rear and second to rear positions of the rollers (normal position for large spools).
To use, just press in the roller support in the slot behind the roller. It should also fit in the slot in front of the roller unless the spool is too small. If so, move the roller to the front most position instead and place the support bar behind. Install it upside down compared to how it was printed so with the rounded side down in the roller slot.
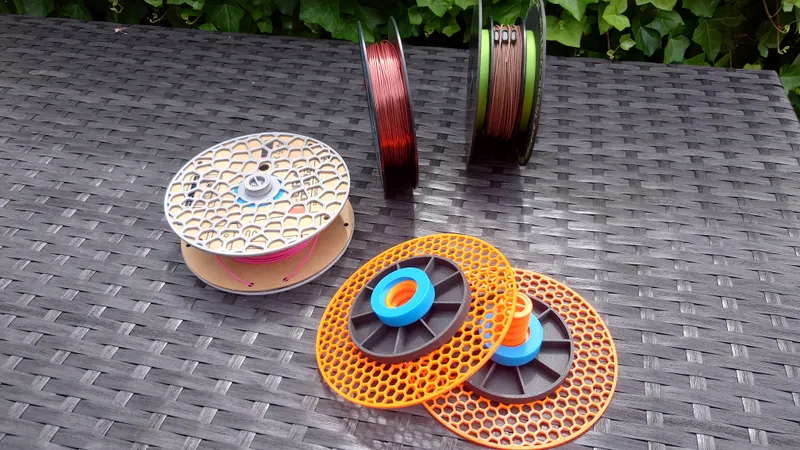
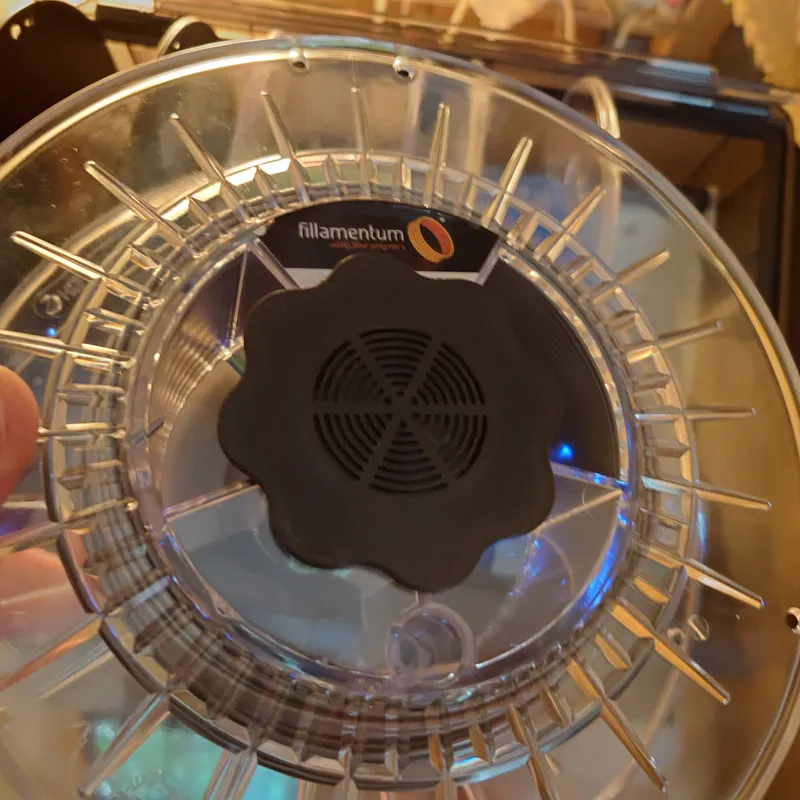
Another good idea is to use my Adjustable Spool Holder for Silica Gel / Spool Weight that's compatible with both Hydra AMS and Bambu Lab AMS.
This keeps the spools dry and adds some weight to them, preventing near empty spools to jump up and jam. It can still happen but is less likely.
That's it! Thanks for your support.
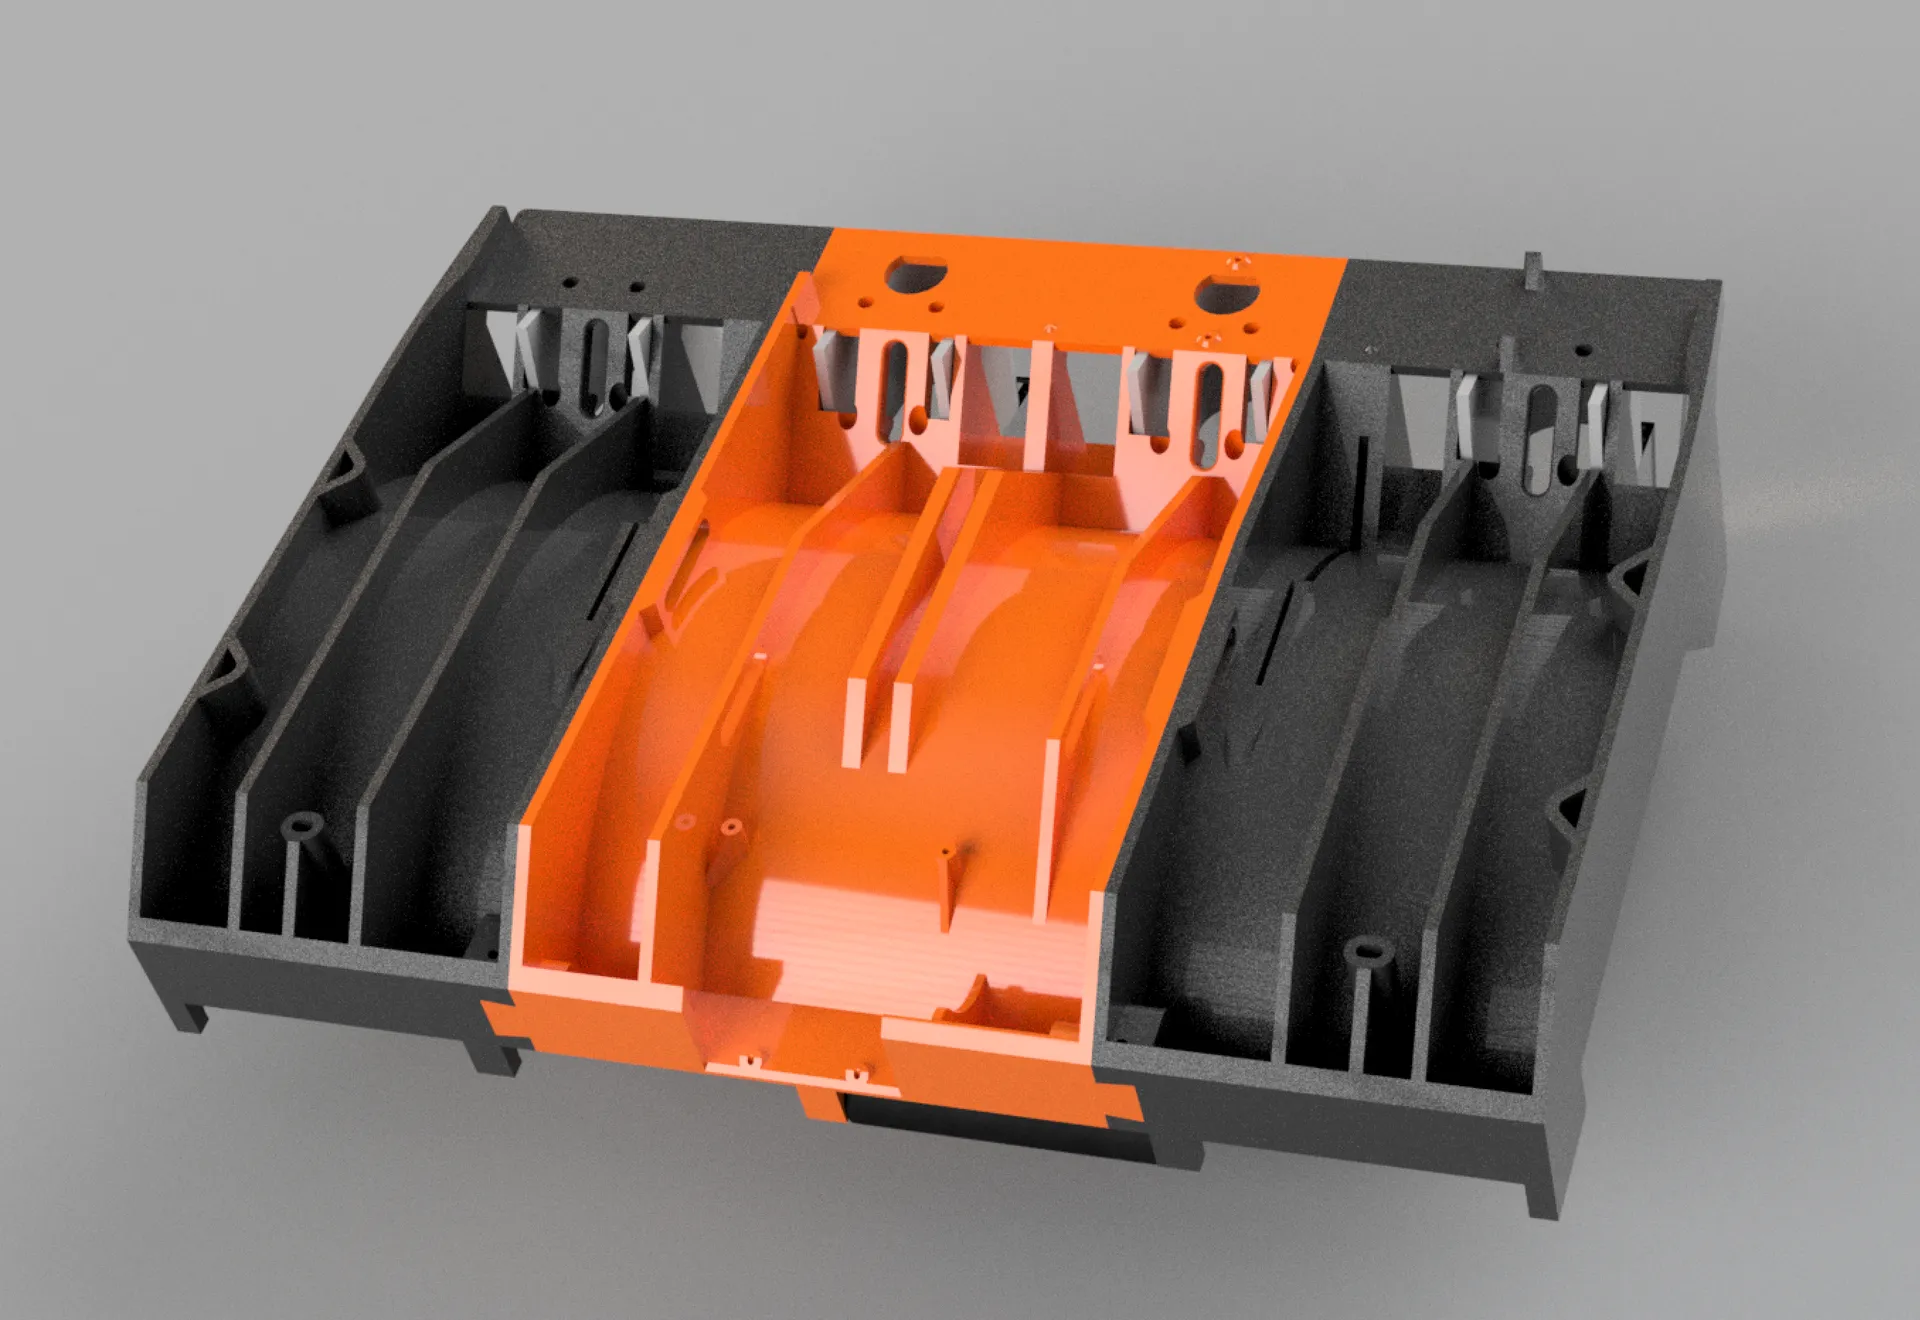
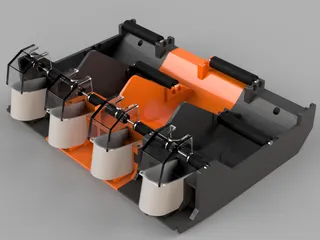
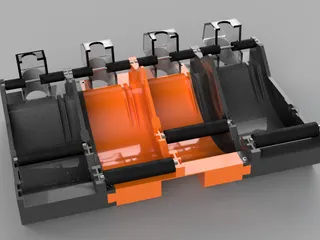
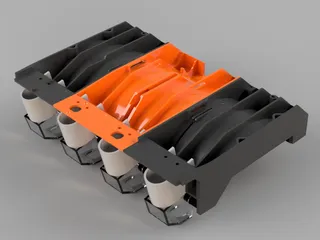
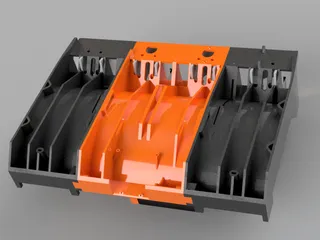
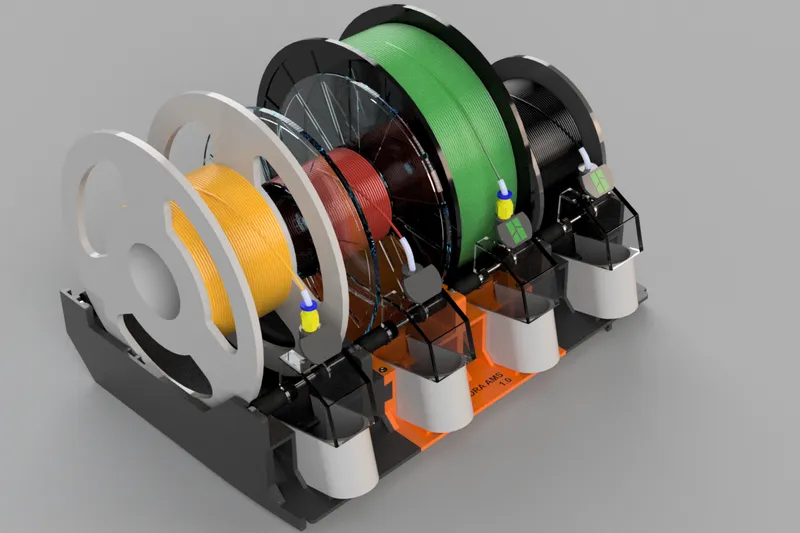
Renders
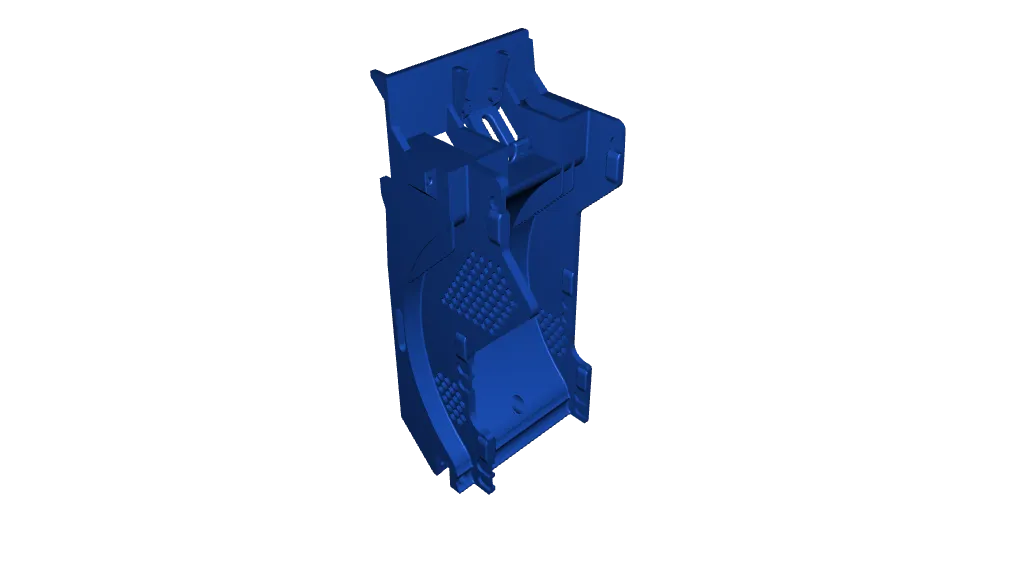
Middle part rendered in orange just to highlight the joints.


Tags
Model origin
The author marked this model as their own original creation.


