Toy Car or CO2 Dragster - Multipurpose Model - Automobile- Functional- Display Piece

Description
PDFToy Car (Option #1) & CO2 Dragster Model (Option #2) :
(Contains (x1) STL 3D Print File)
PLEASE read all of the directions before printing to see the level of detail this project takes. It is easy but I give details to help you ensure you make the best product with all of the engineering and aesthetics considered taken into consideration for my design. Enjoy.
This is designed to be an easy print with minimal support and materials and an easy-to-follow cheap assembly. Print one piece then follow the directions for assembly for a toy model finish or a raceable co2 dragster finish!
I used Cura as a slicer. Load the STL file into the slicer and then print with some of the following parameters based on what type of finish you want either Toy Model (Option #1) or Functional CO2 Dragster Racer (Option #2). Sanding and Painting are Optional but recommended for Dragster Finish (Option #2).
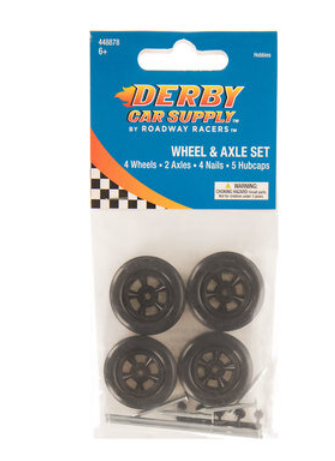
Heres an example of a kit you can buy that has the co2 cartridge, the axle. and wheels!
---------------------------------------------------------------------------------
---------------------------------------------------------------------------------
---------------------------------------------------------------------------------
PRINT PARAMETERS (For Toy Model -Option #1):
Print Orientation:
- Lay the Flat side of the Car Body onto the flat bed of the printer for best print results.
Material:
- Regular PLA filament has a density of 1.25 grams per cubic centimeter on average. I used a wood infused filament because it was easy to sand and looks and feels like wood. But you can use the cheapest material you need to!
Layer Height:
- 0.2mm
Infill:
- 20%
Wall Thickness:
- 3 layers
Support:
- No Support Needed
Adhesion:
- Brim: 10 layers
Finishes:
- Sand the Surface 120 grit, Paint as Desired.
----------------------------------------------------------------------------------------------------------------
PRINT PARAMETERS (For CO2 Dragster- Option #2)
Print Orientation:
- Lay the Flat side of the Car Body onto the flat bed of the printer for best print results.
Material:
- Regular PLA filament has a density of 1.2 grams per cubic centimeter on average.
- The lowest density 3D printing material is Polypropylene, with a density of 0.9 grams per cubic centimeter.
- Another option is a material called “LW-PLA Low-Density Active Foaming 3D Printer Filament” with a density 0.54 grams per cubic centimeter. It is available: ColorFabb Black LW-PLA Filament - 1.75mm (0.75kg) | MatterHackers
Layer Height:
- 0.3mm
Infill:
- 10%
Wall Thickness:
- 2 layers
Support:
- No Support Needed
Adhesion:
- Brim: 10 layers
Finishes:
- Sand the Surface 80, 120, then 200+ Grit. A smooth surface finish is essential for decreasing boundary layer roughness factor. Decreased Friction Increases Speed. Remove all Imperfections on the surfaces.
Paint Job:
- Paint with a conservative amount of paint to reduce overall weight. This is essential. Only apply a thin layer of enamel paint to smooth the surface for the sake of decreasing the skin friction on the dragster.
-----------------------------GOOD JOB HALFWAY DONE! -------------------------
ASSEMBLY PARAMETERS
This car is designed to have minimal parts and materials used for a fun project even for kids!
Purchase a WHEEL and AXLE SET: This is important to get both
Official Pinewood Derby® Wheel and Axle Kit, Black | Boy Scouts Of ... (scoutshop.org)
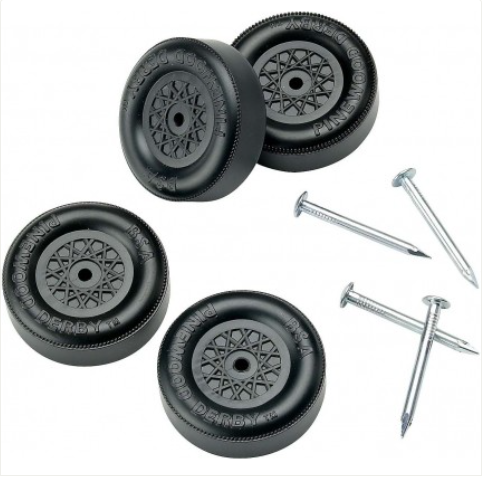
- 4 - Wheels
- 2 - Axles
- 4 - Nails
- 4- Hubcaps
Axle Installation Rear Axle First:
- Ensure The axle is installed carefully and slide one wheel onto the shaft.
- Add a small washer to fit over the axle.
- Add a straw to reduce axle sway.
- Insert this assembly into the hole of the print.
- Add the components listed in reverse order starting with the straw.
- Add the washer on the shaft,
- Add the Wheel and this completes the front or back.
- See reference pictures.
Repeat all the steps for the front wheel axle installation.
----------------------------------------------------------------------------------------------------------------
EXTRA ASSEMBLY PARAMETERS (For CO2 Dragster-Option #2):
This model is designed with weight and aerodynamics in mind. Follow the Material, Print Process, Sanding, and Finishing Closely to ensure best chance of winning the Co2 Dragster Competition. I Won First place at my CO2 Dragster competition.
- Add Graphite to the axles and wheels.
- Adjust assemblies as needed to ensure that the wheels touch down evenly.
- Spin thoroughly to get the lubricant into small crevasses.
- Insert the 2 Hook Screws into the bottom so that they don't touch the ground.
- Make sure the fishing wire can get into the hook screws and everything fits right.
- Ensure the CO2 Canister can fit in the rear without a lot of friction. It simply propels the car forward so if it slides out easily that is perfectly okay.
Tags
Model origin
The author marked this model as their own original creation.