Purge calibration tool for all MMU MMU2S MMU3 on MK3 MK4


Description
PDFUpdate 16-Jun-2024 : With the amazing contribution of @poelstra_2112725 on MK4 with MMU3, we have achieved more than one color changes per test print, to a maximum of four. Amazing idea to print the numbers before the purge block so that we can test the first color change!
Update 20-May-2024 : Following user reports that the tool does not perform the same loading and unloading routine without a wipe tower, a new version was added that uses the wipe tower for the MK4 MMU3. A big thank you to @KrisasMan and @jseyfert3_662045 for their time and filament.
Update 21-Apr-2024 : Added support for MK4 with MMU3 and changed the purge model a bit so that removal from the build plate is easier. A big thank you to @JustinD for his time and filament during our troubleshooting on his MK4.
Update 05-Sep-2023 : Rearranged the models so that it can be sliced with newer PrusaSlicer versions. Before, it was outputting an error about collisions.
With this tool, you can easily calculate the purge volume needed between a color change. There are 4 versions of the tool with all the possible combinations between the colors and color multitude.
When sliced correctly, the color changes will be made by the MMU. The color changes are not manual !
This tool was tested on my MK3S+ with the MMU2S. The printer is stock, with the stock e3d v6 heat break and nozzle size of 0.4. If you have a different setup with different filament path length, please check the note at the bottom of this description.
If you want to use this tool with different types of filaments, change the default selection of PLA to any other type of filament i.e. PETG and click transfer on the dialog box.
This project does not use any custom gcode or weird modifications to the slicer profile. The results are a product of correctly positioning the models.
In case you need to test more than 5 colors, you can produce the correct order for color changes using the excellent tool developed by @Ro3Deee on his GitHub account https://github.com/petrubecheru/MMU-Purge-Calibration---Block-color-order , then make the appropriate changes in the project files so that you move from one color to another as generated by the app.
MK4 owners :
Some MK4 owners reported that it uses a different sequence for unloading and loading filament when using a wipe tower and a different one without the wipe tower. I can confirm that different gcode is generated from PrusaSlicer when using the wipe tower, so I developed a new version of this tool that uses the wipe tower. The measurement process is the same. As this tool relies on sequential printing for the color changes, it is impossible to create files with more than four color changes per print until PrusaSlicer supports wipe tower on sequential prints. There is also a version for the MK4 without a wipe tower, in case someone needs it.
Prerequisites :
- Dry your filament, even if it is PLA.
- Make sure your first layer is perfect, this tool relies on a perfect first layer calibration
Printing process :
Use the project files to slice the tool. Only the print settings on the uploaded project files are tested, feel free to change the printer and filament settings as they will not interfere (within reason).
- Press “Load to nozzle” and load the first color
- Purge the first color 3 times, by selecting that the color is not correct
- Press unload filament
- Press print
- Wait for the print to finish
NOTE : For the 5 color version, print the “part-1” first, and immediately after that print the “part-2”.
Measurement process :
- Observe each color transitions and decide at what height the color is clean
- Take note of the number on the right
- Take the calibration tool off the build plate
- Observe the color transition from the back side of the printed object
- Decide where the color is clean again
- In total, we have now 2 numbers, one for each side of the printed object
- Compare the numbers and keep the bigger one
NOTE : After the print is finished, look at the print from multiple angles and use your phone's flashlight, so that you are sure that the color is clean.
Below is a video of the measurement process for the color change from red to brown.
At first, you may not understand why I chose the 200mm³, but if you look closely at the edges, you will see that the color is not clean until the number 200.
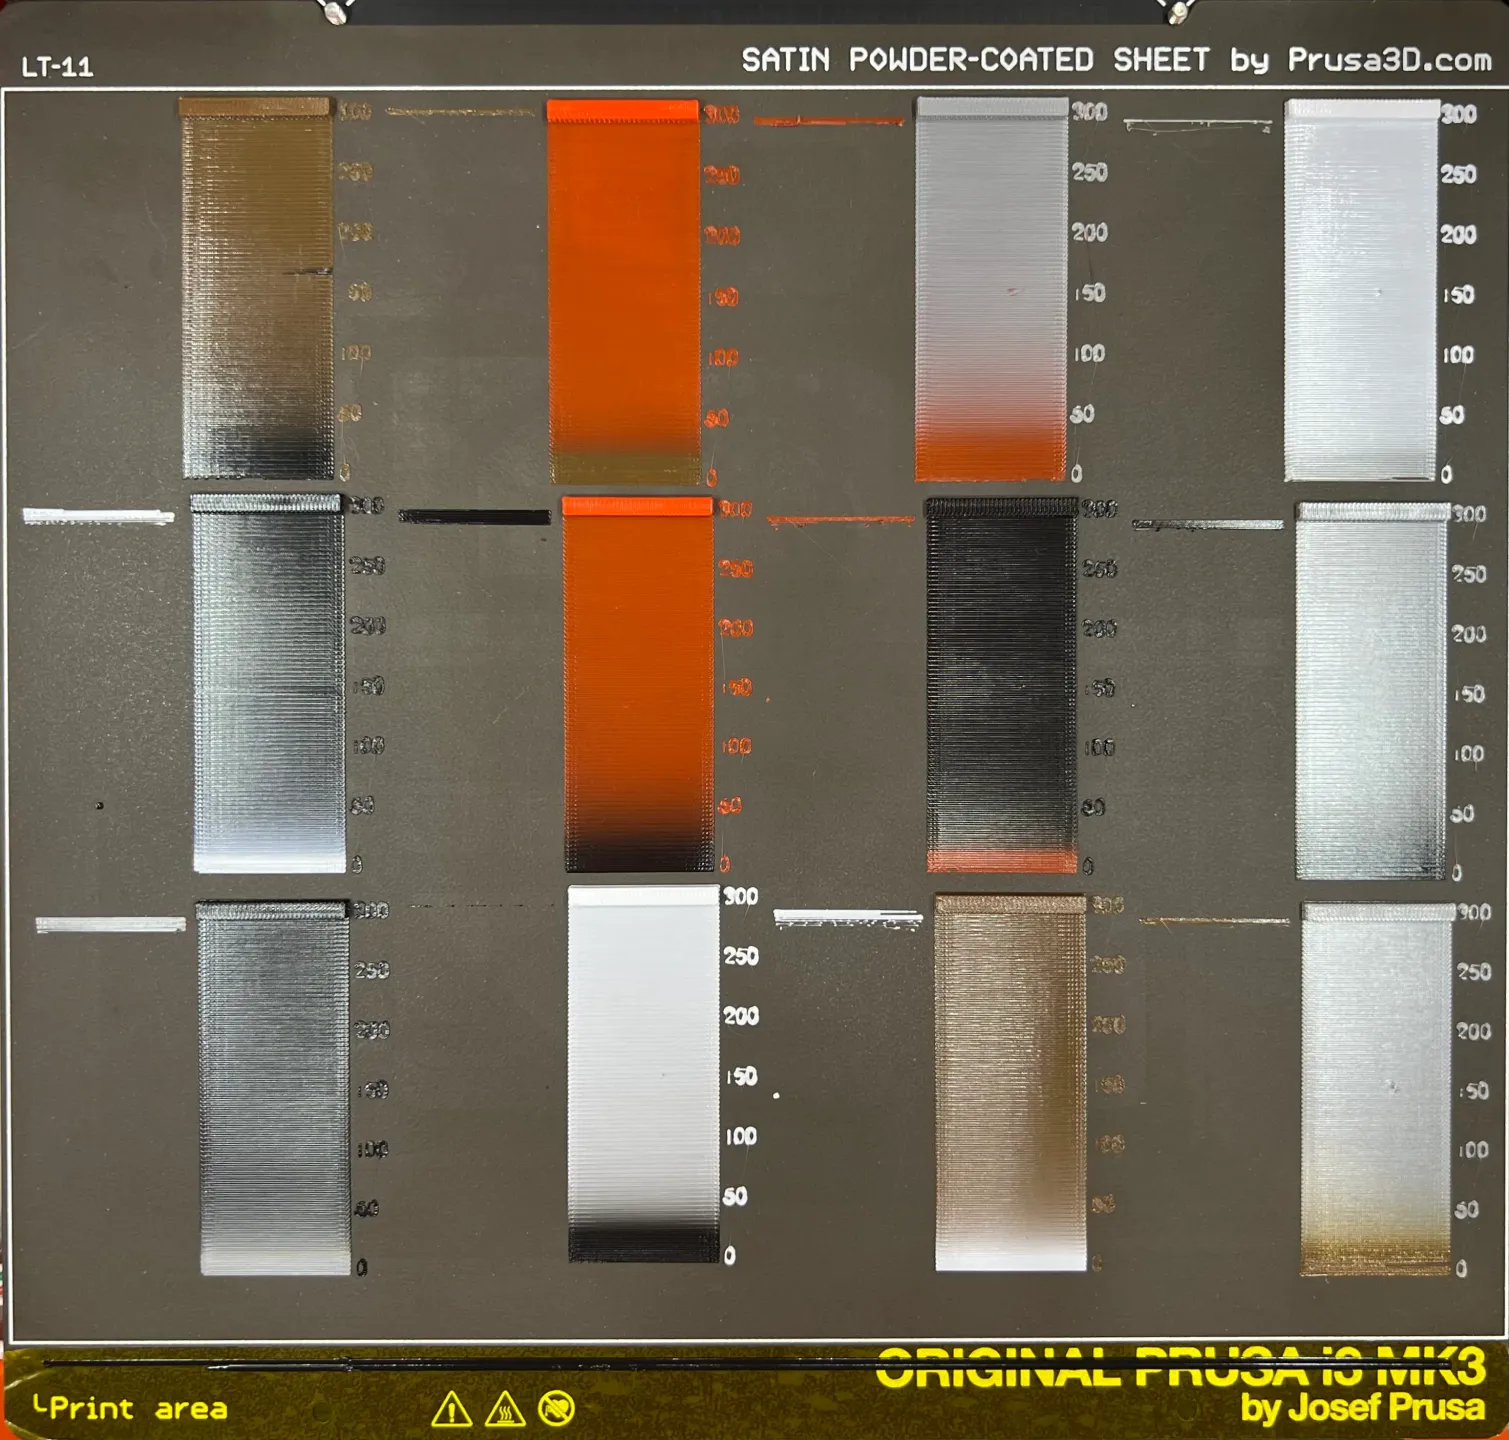
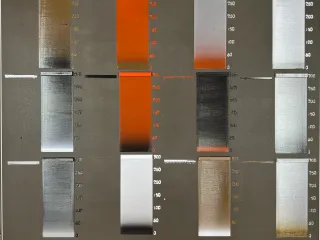
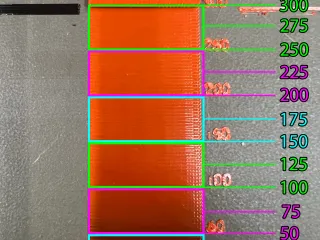
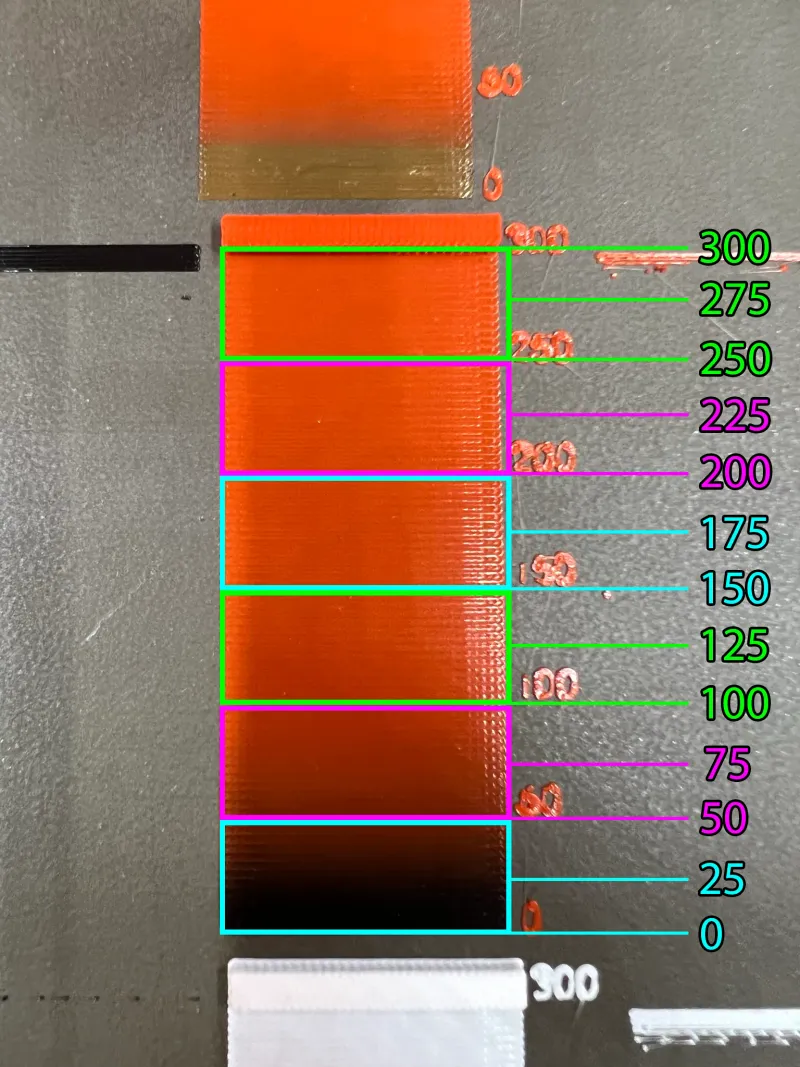
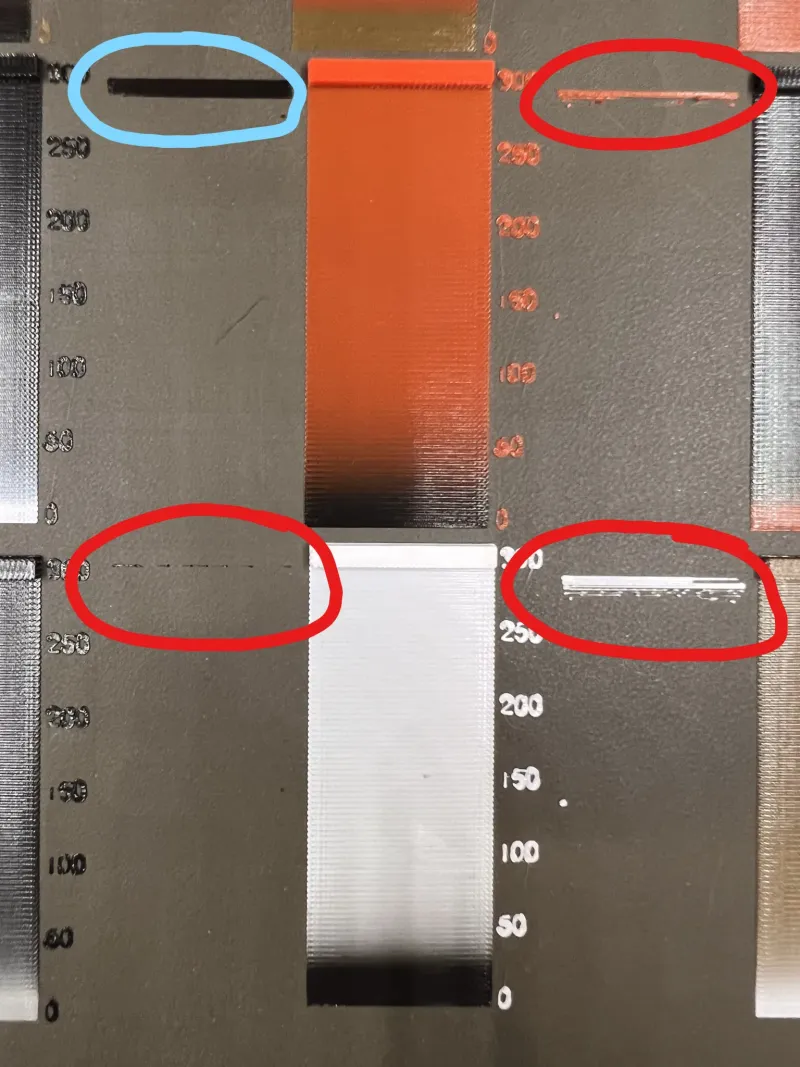
Measurement map :
In the image below, it is clearer to identify the boundaries of each number. Each number corresponds to the line, that ends near him. The numbers are exact values and not ranges, for example if our color is clean between 250mm³ and 275mm³, your number is 263mm³ (rounded).
The numbers on the build plate indicate the mm³, i.e. if the color is clean at the number 250, your purge volume in the slicer should be set to 250.
Post measurement notes :
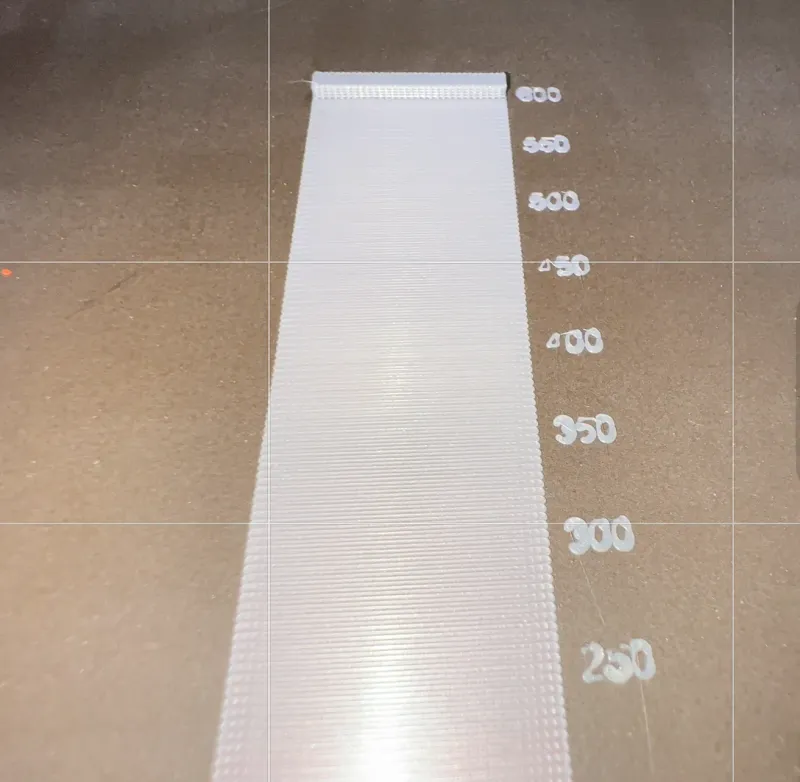
The first measurement results will be pretty good, with acceptable print results, although lighter colors may need fine-tuning. For this process, I have a 600mm³ model that will definitely clear the color and allow you to exactly match the correct value.
In the picture below, you can observe that the transition from red to white needs more than 300mm³ to be cleaned.
Data analysis
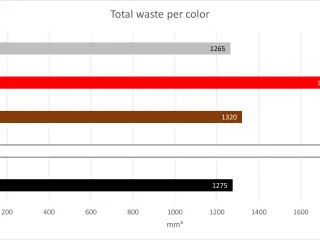
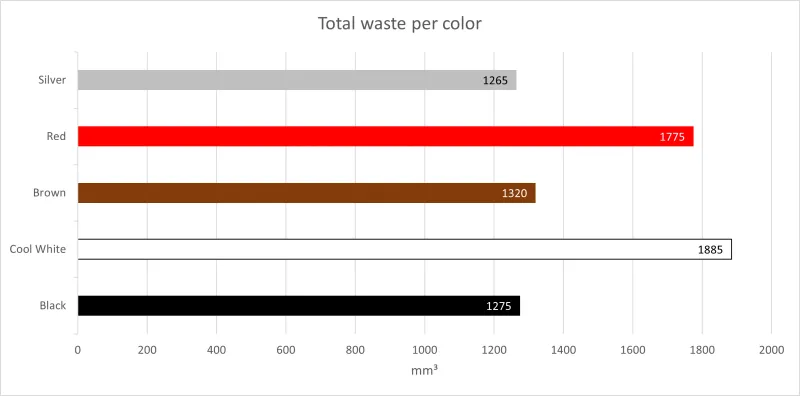
In the "Other files" section, I have included the Excel file that I used to generate the "Waste per color" chart you see in the model pictures. This file is useful to keep your measurements stored in a single place, so that you don't need to repeat them again, and to perform data analysis. This comes handy to know which filament you are going to run out first.
Final results :

For HotEnds other than the E3D V6 :
This tool will work for you, only if the filaments starts extruding just before the 0 (zero) line. Look at the lines on the left of the calibration tool below, if your print looks similar, you are good to go. Otherwise, send me a DM so that we can troubleshoot a new tool for your extruder together.
Tags
Model origin
The author marked this model as their own original creation.