Print In Place Acorn Fidget
Description
PDFLesson Plan & Constraints:
You will create a layered fidget device using a sketch, its offsets, drafted extrusions and cuts.
You and your partner will be “accountabillbuddies” (person you worked with). This means you will provide feedback on initial designs and plans, as well as help each other solve problems and troubleshoot errors as they happen. You are NOT REQUIRED to have identical designs, but it will certainly make the process easier.
- The sketch must begin with a constraint box, (center-rectangle created from the origin)
- Your outermost outline must fit within an 8cm x 8cm box or equivalent area of 64 squared cm
- Dimensions/Relations should be efficient.
- It is not required to fully define your entire sketch, but it will help.
- The sketch must contain zero error messages.
- Demonstrate efficient use of “Offset Entities”
Summary & General Advice:
The object I chose was an acorn. I created a sketch of this acorn and offset it 24 times. I chose an acorn because the time as I am making this it is autumn and acorns are everywhere to be found.
For anyone else making an acorn, a very specific but useful piece of advice is using the trim tool on the stem of the acorn because lines start overlapping as you start to offset the sketch of the acorn inwards. Other than the stem the shape of the acorn is simple and square-like meaning there will be no lines other lines overlapping inside
Design Choices:
For my offsets, I consistently made sure it was 25 degrees for all the BossExtrudes and ExtrudeCuts, it worked perfectly fine the first time it was printed.
I decided to create my sketch on a 8 x 8 cm square base because an acorn is fairly square and it would not leave tons of space when cut out from the extruded square base. I ended up importing this image on to the square base:

I chose an acorn because at the time of making this it would be autumn season, and acorns are simple and cute shapes. A perfect and appropriate fit for this project.
I also fortunately got the luxury of printing in two different filaments and it did actually produce different results even thought it was the same 3mf file. My advice would be to carefully select the filament
The only issue I ran into throughout the whole process of creating this figure was when I started making reverse offsets of my original sketch. At first, after the creation of 3 offsets, it wouldn't let me create any more reverse offsets. The solution to this was making sure there is NO sharp corners in your sketch. These sharp corners can be fixed with the use of the Tangent tool and the Sketch fillet tool. These fillets should also be super tiny (0.01cm) as shown in the picture below.
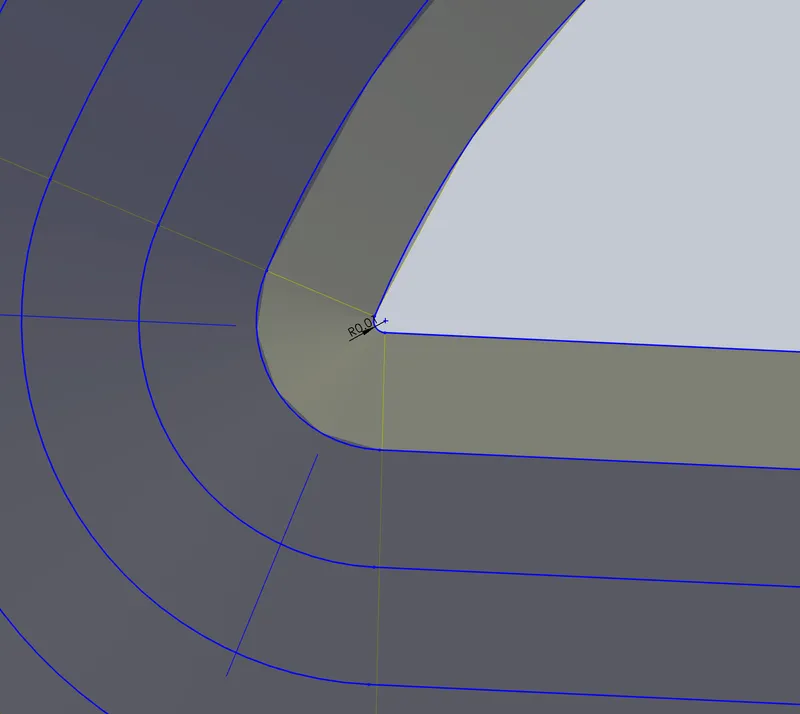
You want to use the Fillet tool on corners that are sharp and acute, and the Tangent line tool on corners that are more flat and obtuse as shown below.

Make sure to delete any redundant lines that are left over after applying the Tangent relation. If you deleted the wrong line, the shape will not be greyed out anymore which means you are doing something wrong.
Instructions:
First, you want to create an 8 by 8 cm square and extrude it to 1 centimeter. Import the image of the acorn provided, or you have selected on your own, on to the face of the extruded square you made.
After, you create a sketch outline of this acorn, don't worry about any patterns or shape inside of the shape. This is what the sketch should look like (focus only on the blue line):
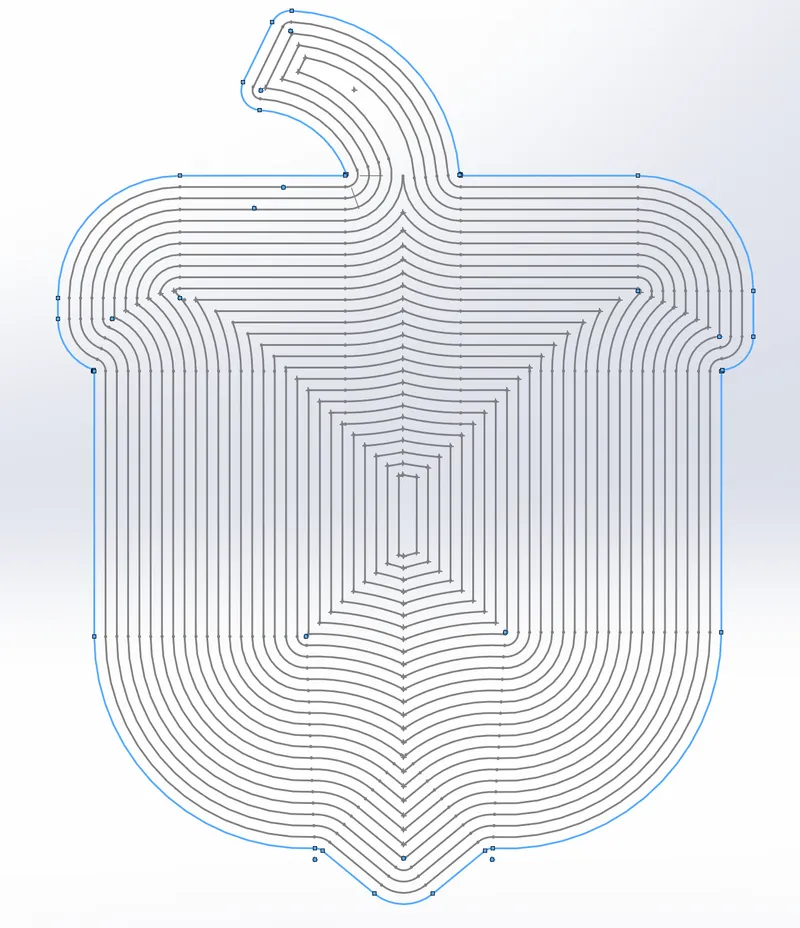
The next step would be to create a reverse offset of that sketch and keep reverse offsetting the process 24 times (the end result should look like this):

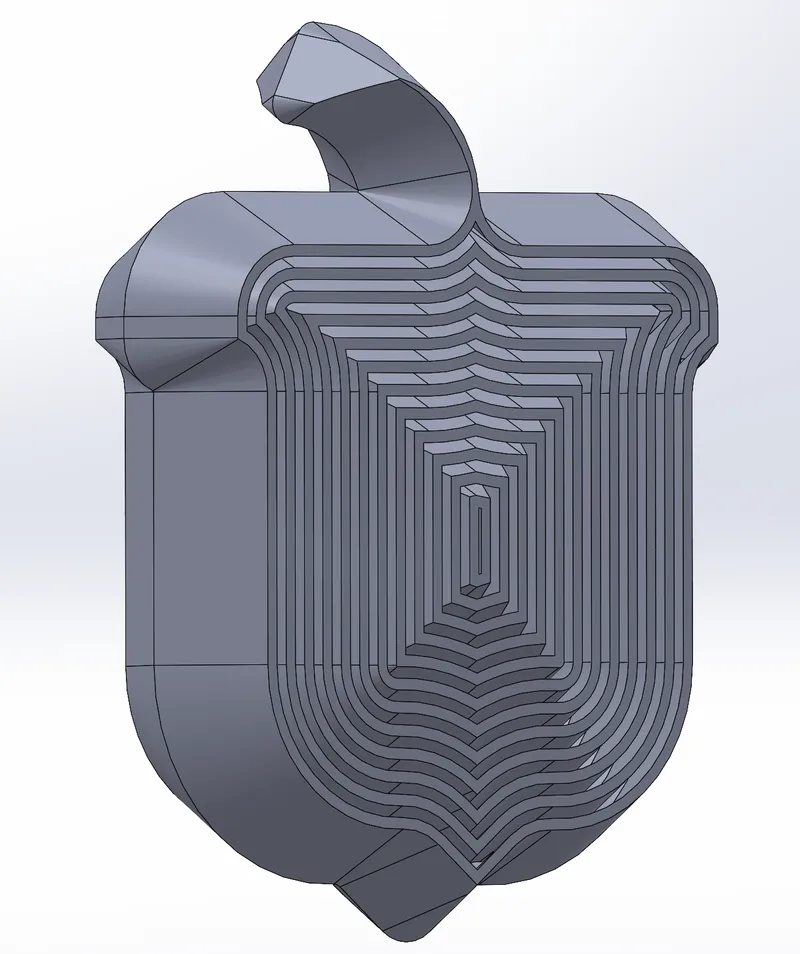
Use the BossExtrude tool on the outermost line of the sketch for 1 cm and 25 degrees. On the second outermost line, use the ExtrudeCut tool with surface-cut on the same BossExtrude we just made. Make sure that the angle you use ExtrudeCut at is also 25 degrees. Do another BossExtrude on the third outermost line with extrude-surface lined up with the extrude face of the first layer. Repeat these steps until you reach the middle or can't cut through fully. After, you mirror the bodies and extrusions you made across the against the sketch plane. The end result should look like this:
Model origin
The author marked this model as their own original creation.


