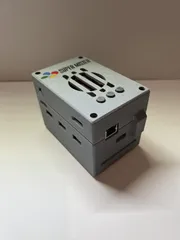
TapTo Card Reader With Spring Loaded Ejection Button (All Printed Parts)
Description
PDFv1.1 - added step files, go nuts
Miss loading physical media into some kind of slot to launch a game? And then pressing an eject button to swap to another game? The solution is here!
Using the TapTo project, this case can be paired with an easily sourced USB-C PN532 NFC reader commonly sold on AliExpress, and standard NFC cards, to create an experience similar to launching games from floppy disks on all platforms that TapTo supports. It even has a satisfying “click” when you insert and eject cards!
The reader is designed to work either with a bare NFC reader just stuck in place with some 3M style tape, or using this case by Wizzo.
My main printing and testing has been done with standard (Matte) PLA, however the mechanical components should work with PETG as well. I cannot speak for other materials.
To account for different tolerances in printers, and different materials, there are three different “Strength” springs included, with different levels of retention before they release. I recommend printing all three and seeing which one works best for your final setup. The Max strength one requires a lot of force, but also has a tendency to launch cards out of the slot. If you want that kind of thing!
Print Settings:
- 0.2mm minimum layer height
- Supports needed on the overhang of the Rod, and on the main slot overhangs of the Bottom piece. You may want to put a support on the main button hole on the bottom section too, depending on how good your printer is at overhangs etc.
- 2 Walls
- Adaptive Cubic Infill used, 15% on the springs, as much as you want on everything else. Grid has a tendency to knock the springs off, unless your adhesion is very very good. Worth printing the springs slightly slower too tbh for this reason. Don't use a brim on them unless you absolutely have to, the clean up will be annoying.
- Print orientations should be obvious. Print the biggest flattest surfaces down.
Build Instructions:
- Carefully push fit the button into the rod. If it's too tight, give it a quick file or carefully scrape some of the rod with craft knife, don't force it and snap your rod! Nobody wants that.
- Drop your chosen spring into it's holding location with the short bit on the left, long bit on the right. (See photos. It's slightly non symmetrically keyed so it should be hard to mess up.)
- Place the hammer down onto it's pivot
- Lower the rod into place, overhang on the left side facing downwards, and slide it forwards into the button hole.
- Either insert your NFC card in it's case (Link above), or just stick it to the top section of the case. The further back you place it, the more realistic the activation distance is for the NFC cards, relative to when the mechanism “clicks”.
- Snap fit the top and bottom together
- Play video games.
Credits:
- The majority of this model was originally designed by EntirelyTom on the TapTo discord. Uploaded with his permission to get it out to the community. The mechanism and overall design was entirely his.
- I then tweaked a few bits here and there to make it more print friendly, adjust the mechanism to reduce jamming and make some tweaks to overall dimensions etc to allow for different install methods, and make things a bit more robust and less reliant on very tight tolerances.
Tags
Model origin
The author marked this model as their own original creation.

