iPad Pro drawing frame and stand: THE FRAME

Description
PDFINTRODUCING: THE FRAME
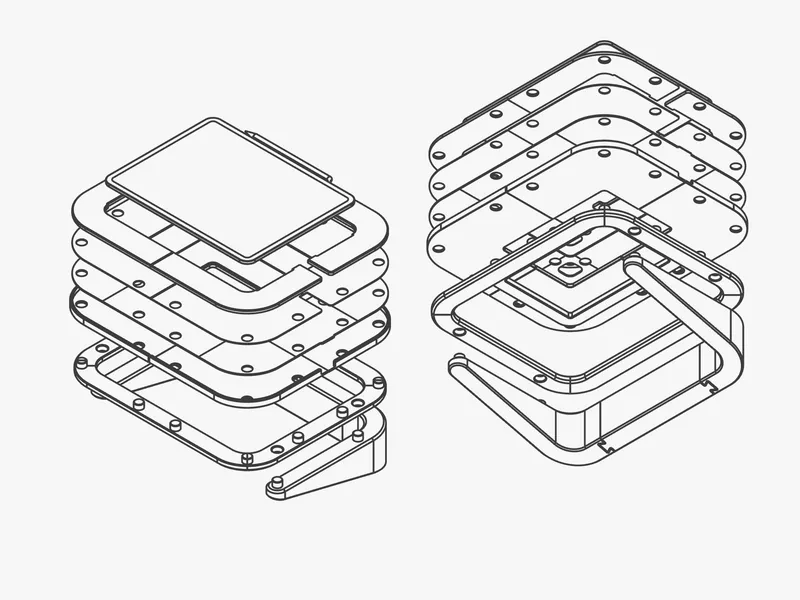
This over engineered frame and stand fits like a glove on the iPad Pro M4 (13 inch). A remix for the M1 and M2 12.9 is available: https://www.printables.com/model/999845-the-frame-for-129-ipad-pro
Everything is designed to make working on your iPad Pro a breeze. The stand has a perfect 14 degree angle, making it very ergonomic to draw and 3D design on your iPad. The frame can be taken off in a second so you can enjoy the same feel on the couch, because of the beefy handles at the bottom.
The large bezel around the iPad makes drawing to the edges so much more comfortable and precise. There are small cutouts for the speakers, the pencil can charge, the iPad can be charged and all buttons are accessible. The iPad isn’t locked in place, just gravity and a near perfect fit holds it there, but you can’t hold the frame vertical because your iPad will fall out. And you can easily lift out the iPad or pencil. It’s similar to a Sketchboard Pro, but less bulky.
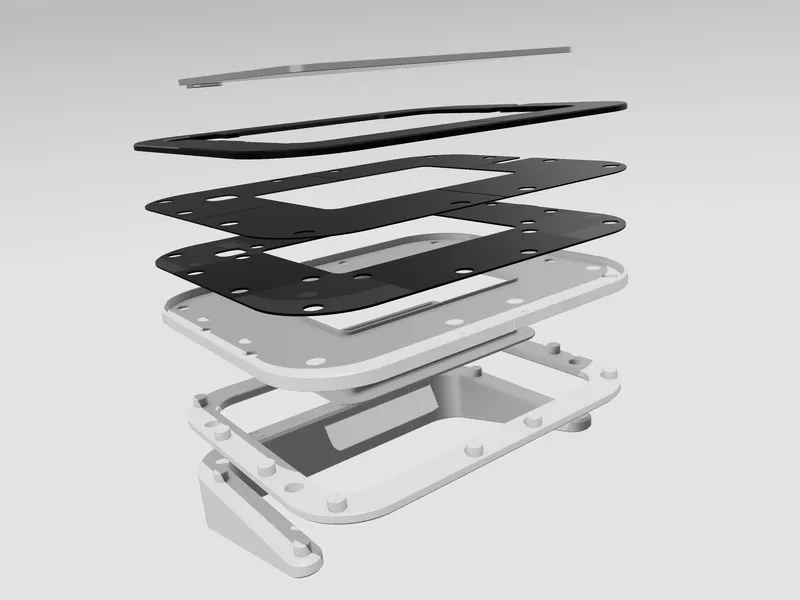
The design is based around the principle that surfaces that are very visible and are touched a lot are all printed on the bed to get a nice and consistent surface. All parts have dowels/holes to fit together (glue is needed for the final assembly). Printable on all standard 256x256 build plates. There are no fillets, all chamfers, so no overhangs.
PRINTING INSTRUCTIONS
- No supports
- Shouldn’t need a brim
- All parts individually fit a standard print bed of 256x256mm. Of most parts you can fit multiple on one plate.
- 15 - 20% infill (gyroid is my preference)
- Print files are all oriented as they should be printed (except the base).
- Advised is a textured PEI or mildly textured build plate for a uniform look. Or go crazy and use a carbon fiber plate.
- Base setting is a 0.2 layer height, but on some parts adaptive layer heights will print faster with better results.
- Do a test print first to see if your printer is dialed in.
- Do at least 3 walls on anything structural, the more the better.
- 3 to 4 bottom layers on all inlay parts for a tough top of the frame.
- I printed in PLA. Maybe PETG is a better option for heat resistance.
- You’ll need about 900 to 950 grams of filament for the frame and 300 to 350 grams for the stand (Depending on the amount of walls and infill).
- Keep in mind: it’s a long print, but it’s worth it.
ASSEMBLY INSTRUCTIONS
- You’ll need some type of glue. I used superglue. But don’t use much and spread it out, because too much glue will hamper assembly later on and could mean your iPad isn’t flush with the frame.
- Test fit everything first! The whole thing can be put together without glue first to see if everything fits. When you start assembling it might feel flimsy, but once put together you’ll feel how sturdy it becomes. After glueing it’s pretty solid.
- Start with the outer window, inner window and frame parts. These can be fitted together and if they fit can be glued together.
- From there you start with the inlay layers (they’re numbered in the file names).
- For fitting the inlays: first insert the inside near the inner window and then work in the outside (the other way around will snap a lip off).
- The stand consists of three parts that slot together with a dovetail and need to be glued.
- Check the PDF, assembled STEP file and the exploded STEP file for a better overview of the parts and how they fit together.
REMIXES, OTHER MODEL IPADS AND COMMERCIAL SELLING
- Please feel free to make a remix for another model of iPad Pro (12.9). Only the inlays and the outer window (for height of the lips) should be adjusted, the rest could remain the same. Please link my original design. Edit 08/09/2024: a remix is available for M1/M2 12.9. See link above.
- Don’t sell the design or printed models of my design without my permission.
Tags
Model origin
The author marked this model as their own original creation.


