CREALITY K1+K1C LID RISER V2 [LED VERSION] [35mm height]
![LEOTE [approach]](https://media.printables.com/media/auth/avatars/be/thumbs/cover/80x80/png/be928eaf-4e49-4937-8115-943a8d1a5994.webp)
Description
PDF*If you have any issues with printing or assembly, feel free to message me, and I'll do my best to assist you 😉.
/////UPDATE 0.8 | 20-12-24
New Non Vents Walls
/////UPDATE 0.7 | 05-07-24
New Corners for 10mm BOLTS.
In this new version, the bolts for attaching to the frame have been changed from 20mm to 10mm.
NEW FILES:
LID_RISER_K1C_CORNER_V2_35mm_10mmBOLT.STL
LID_RISER_K1C_CORNER_V2_35mm_LED_WIRE_10mmBOLT.STL
/////UPDATE 0.2 | 26-06-24
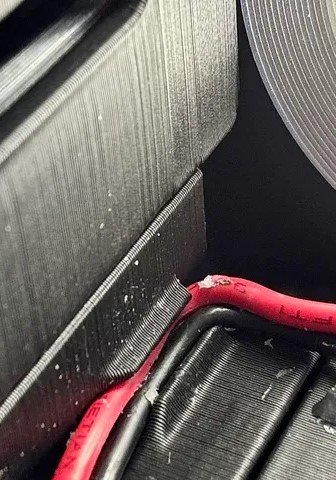
///New Corner with Opening for Securing LED Wires
This corner piece is specifically designed for the front right corner, eliminating the need to glue the LED wire. Thanks to Tom G for suggesting a solution that securely holds the wire in place. The 1.8mm opening accommodates various wire thicknesses without requiring glue or additional fasteners.
*Photo courtesy of Tom G. Thank you for allowing me to use your photo.
FILE NAME: LID_RISER_K1C_CORNER_V2_35mm_LED_WIRE.STL
///New Version of the Back Wall

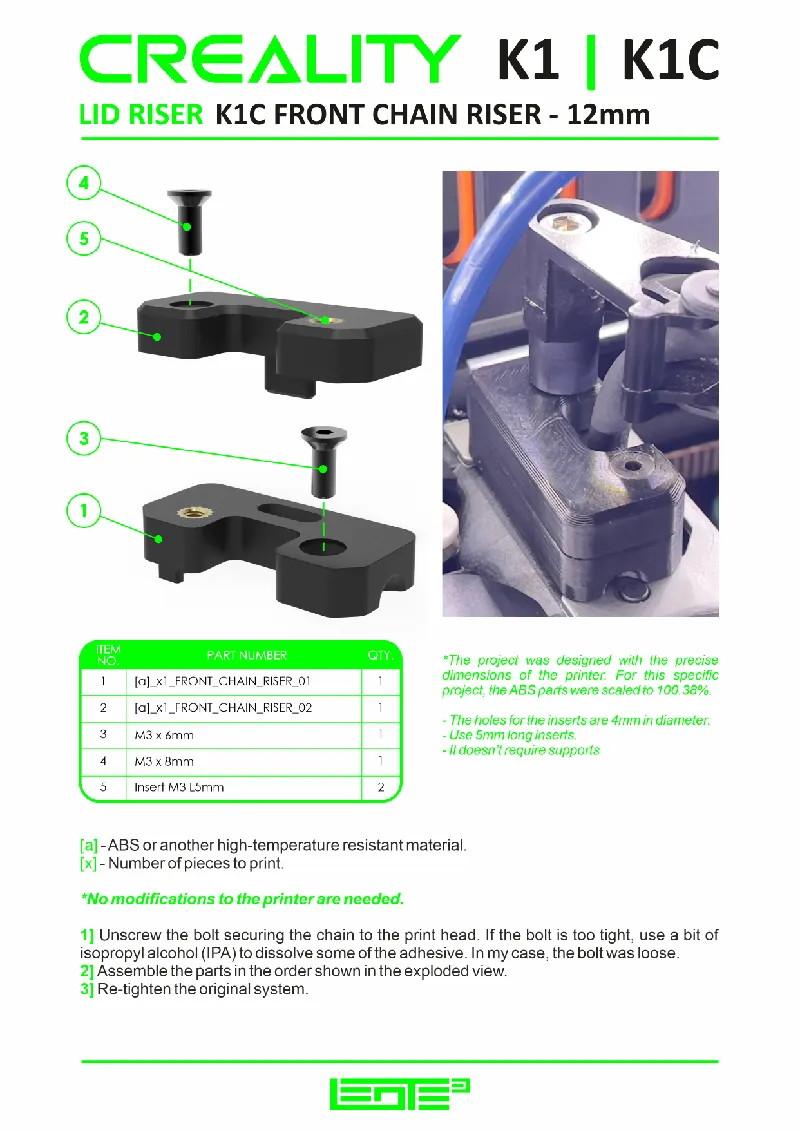
///New Front Chain Riser (12mm) | LINK
/////UPDATE 0.1 | 14-06-24
New version of the LED mount.
The LED angle has been adjusted from 90° to 45° and extended the overhang above the LEDs. This change improves the illumination of the print area and prevents the light from shining directly into your eyes when looking at the printer. The corners transition smoothly from 45° to 90° to allow for a continuous loop.
NEW FILES:
- LED_STRIP_CORNER_V2-1
- LED_STRIP_V2-1
Thanks to PurpleR0b0t for the suggestion.
/////ATTENTION
Make sure the bolts aren't too long. They shouldn't go past the frame's thickness to avoid damaging any internal components.
- Before starting the print of the riser, I recommend printing this tool https://www.printables.com/model/899470-xyz-accuracy-test-calibration-tool to test the dimensional accuracy of your printers.
- Use this tool https://www.printables.com/model/480907-shrinkage-calculator-dimensional-calibration-tool to determine the correct scale based on the filament shrinkage you’ll be using.
- The riser pieces were developed with very tight tolerances (0.2mm) to ensure proper alignment and functionality of the assembly, so it’s important to make sure everything is well-calibrated or that you understand what is needed for everything to work correctly.
/////It is advisable to leave a 0.5mm gap in the test pieces to ensure the riser will fit the printer frame. It is also recommended to print all sides for a final test. It’s better to use a little filament on testing than to spend much more reprinting the parts.
When screwing in the second corner, it's preferable to pull the piece a bit to screw it in without the pieces coming apart. This allows for some flexibility to compensate for any alignment issues.
*The PDF available in the downloads section is based on the 50mm version, but it can also be applied to this version, except for the differences noted previously.
*You can download the ZIP file, which includes everything you need to build the riser.
Tags
Model origin
The author marked this model as their own original creation.


