Rivian R1S Window Templates
Description
PDF🎁 If you're in the market for a Rivian, use my referral code: TODD11893313 🛒
- we both get $500 worth of Gear Shop/R1 Shop points
Window Templates
I've been wanting to camp in my R1S for a while now and slept overnight in it a couple of times as a test. One thing I needed was a way to block out the sun/street lights. There are window shades you can order for your R1S, but those just seemed unnecessarily costly. I decided to draw up some templates that I could use to cut out my own shades and am putting the templates up here for anyone else who wants to do that same.
I'm planning on buying collapsible shades for the windshield and sunroof (or maybe just put something on the roof when I camp), so I didn't create templates for those.
These are only for the R1S, as I don't have access to an R1T, but the first-row windows should be identical between the two.
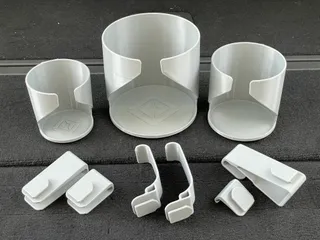
Printables won't let me publish a page without a model of some sort, so I've also included a model for a clip that can be used to hold the shades in place. This is especially useful on the trunk shade on the bottom where the gap is too small for the shade to fit. While not a requirement, it does seem to help.
Materials
As for materials, I managed to get a 6'x9' indoor/outdoor carpet for $18 at Costco that I'm using. Its' 100% polyester and looks a lot like wool. It's about 6mm thick because of the raised grooved texture, but easily compresses down to about 3mm. This is thin enough to wedge into some of the gaps in the trim to hold things in place (especially the trunk – it stays in place even with the trunk open). Unfortunately, the polyester fibers tend to “shed”, but I'm hoping that's just a result of cutting them and this will eventually stop. I've also considered using 2mm EVA foam (like what James did for https://www.printables.com/model/551407-rivian-r1s-sleeping-platform ), which would probably be nicer, but it's also more expensive to get sheets large enough. I was also told about Reflectix window insulation used a lot for RVs, which is basically bubble wrap lined with aluminum on both sides. I might try something like this soon and make additional templates for the windshield and sunroof…
Since I'm using outdoor carpet with textured lines/grooves to it, I made sure to cut out each shade so the textured side is on the inside of the car and all the lines are vertical. I think this ended up turning out pretty nice.
If you're trying to use rolls of EVA foam or something like that, here are the outside dimensions needed for each template:
| First row (x2) | 925 x 430mm | 36.5" x 17" |
| Second row (x2) | 856 x 430mm | 33.7" x 17" |
| Third row (x2) | 715 x 355mm | 28.15" x 14" |
| Trunk | 1090 x 325mm | 43" x 12.8" |
How I Created the Templates
The templates are just .png pictures of my Fusion 360 sketch, scaled appropriately so if they're printed at 100% scale they are dimensionally accurate. I then used https://posterazor.sourceforge.io/online/ to split that up into multiple pages of a .pdf that makes it easy to print. Just make sure when you print that it doesn't scale the pages at all.
An example of the process I followed for each window:
- I used butcher paper on the inside of each window and folded all of the edges to where I thought it needed to be.
- I taped the butcher paper to a table so the left/bottom edges were flush with the table.
- I then measured from the left/bottom to get coordinates for every point on the perimeter that marked a change in direction.
- I then transferred each of these measurements into a Fusion 360 sketch and drew the lines to match the perimeter the best I could.
- When a sketch was ready, I would then use F6 to fit the overall sketch on the screen so it was zoomed as much as possible.
- I then used File → Capture Image → Current Document Window Size to get a capture of my entire window and saved that .png.
- I then opened the .png with Preview (I'm on MacOS) and resized the image so that the overall width matched the number of millimeters on screen. For instance, the first-row template was resized to 980mm width using Tools → Adjust Size → Width: 980 mm and then saving the changes.
- I then loaded this .png in https://posterazor.sourceforge.io/online/ with the following settings: Letter; Landscape; 0.50 cm borders; 1.25 cm overlap bottom right; image size 100%; middle alignment
- Saved the resulting .pdf
I would then print the .pdf, tape the pages all together, cut out the template and do a test fit on the window. I'd make any adjustments necessary to the model and repeat steps 4-9 above until I thought the template was pretty good. It definitely felt like a waste of paper, as each template spans 6-12 sheets of paper, but hopefully it was worth it.
Printing
When printing the pdf, I used the following settings:
- Color: Off
- Double-sided: Off
- Paper Size: US Letter
- Orientation: Landscape
- Auto Rotate: Disabled
- Scale: 100%
If you have a way to print large scale photos or have something that can natively print “poster” sized things, you can access the properly scaled .png files (those used to produce the pdfs) in the zip file.
Printing the clip:
- I used standard 0.4mm nozzle, 0.2mm layer height.
- Print on side for best strength
- I used “classic” instead of “arachne” to get cleaner perimeters.
Installation Notes
When installing these into the windows, here are some notes that might help:
- First and second rows:
- open the window a bit so you can stick the top through the window, then tuck the left/right edges into the corners, then finally close the window to hold the top.
- Third row:
- You should be able to tuck behind most of the trim and get it to fit, but I couldn't get behind the trim on the front-facing edge where the second-row seat belts are.
- Trunk:
- I can tuck the shade into the trim on the left/top/right, but not the bottom where the wiper controls are. It just sits there, but with it tucked everywhere else I was able to open the trunk and it wouldn't fall out.
Support
If you like my designs and want to make my day, you can buy me a ☕!
Tags
Model origin
The author marked this model as their own original creation.


