Kubic - An ITX PC Case that looks like a cube
Description
PDFIntroducing Kubic, an ITX PC Case designed for your SFF (Small Form Factor) build, that can take a pretty beefy system for intense gaming sessions and taking cues from the GameCube and the old Power Mac G4 Cube. (Mine also looks like a NES. Lovely isn't it ?)
You can use a discreet GPU anywhere from 2 slots up to 3.5 slots thick and 214 mm long, and up to four separate SATA drives for extra storage.
It is designed to be printed on a smaller printer such as the Prusa MINI or The Bambu A1. The largest pieces are the panels that are 170*170 mm, so it's gonna make no fuss.
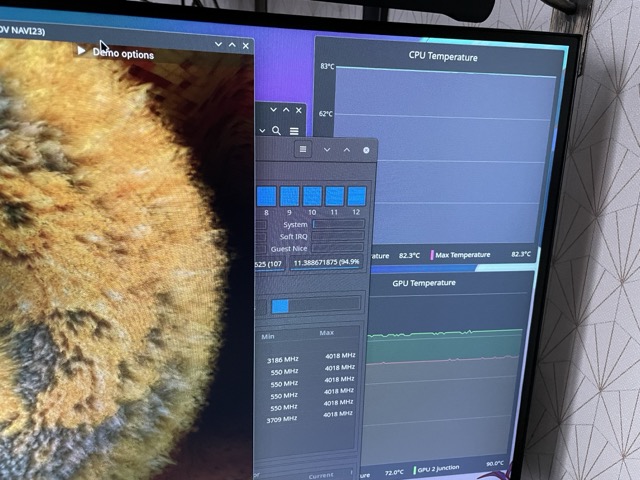
The case uses a single 140 mm chassis fan for cooling, mounted on top. The idea is to take cool air from the bottom and drive it up to the top, collecting the heat of the whole system in the process. It gave great results in my tests, stabilizing at 70° C for the CPU and 75° C for the GPU in standard gaming conditions with a Noctua NH-L12S. Under an absolute worst case scenario (maxing the CPU AND the GPU for 2 hours) I'm stabilizing under 83° C for the CPU and 72° C for the GPU.
I made all of my prints in PLA with absolutely no problem, even thermal wise. PETG is a good solution if you're worried about durability.
And it has a handle, too !
Edit : Added 3 extra faceplates for the front panel to choose from (with or without front USB, with or without audio jack). Simply print the one that you like.
See my Instructables page for full build instructions (it's not that hard, really)
The case has been created on Onshape. Feel free to fork and edit the project should want to do this.
2024/10/19 - Improvement : Added the option for bigger GPUs. For the bottom part, there is 4 configurations available, depending on the thickness of your GPU : standard 2 slots thick, 2.5 slots thick (for cards like the Asus RX7600 DUAL OC V2), 3 slots and event 3.5 slots. Simply print the one you need (The file name is prefixed).
Note that I could only test fitment for the 2 and 2.5 slots configurations, and I'm not even sure there are thicker slots under 215 mm length. But they are here if needed. Feel free to send me feedback if you ever come to use them.
Finally, I added a blank panel in STEP format, that you can use to easily import into your CAD software and edit to create your own custom panels
Printing instructions :
Kubic is designed to be printed on a "MINI" style printer, with print beds as small as 180x180 mm. There is nothing very difficult, but there are quite a few parts, so take your time. Refer to the pictures for my recommended print orientation. Some may seem counter-intuitive, but they usually proved quite reliable even without brim nor support.
Here's some tips and detailed instructions for good results and stronger parts :
- general advice : Make sure that your build surface is clean, oil free and dust free. Some of the parts will require to be printed on a smaller side, so adhesion is critical. You'll also want to try and avoid warping, especially on the frame parts and the feet. The panels are printed flat so they also can be subject to a slight corner warping. While not as critical here, it is aesthetically unpleasant, so if you can prevent that, it is preferable.
Tip : Consider cleaning your plate with some soap and water before starting your prints. I usually get good results with simple hands soap, but dish cleaning liquid is extremely effective for removing any remaining grease from the surface. Once it's done, let drip for a few seconds, then gently dry the plate with a soft cloth or paper towel. After that, be careful not to touch the plate with your fingers to prevent any finger oil to stain the plate. Once again, bed adhesion is critical here and fingers oil is your sworn enemy.
Structure :
The bars composing the frame should be printed on the "smaller" face with supports disabled. It can seem scary, but it proved very reliable and provides great looking parts with excellent strength, since there is very limited risk of layer separation when the case is lifted. If you want some extra grip, you can add a little brim, but it has always been unnecessary in my case.
- Feet : These are the most delicate parts to print, but I think it's important to print them sideways, like on the picture. You can try to print them standing or on the side, but it will be either weaker (risk of layer separation at the junction with the structure) or not too good looking at the feet. My advice : enable a large brim and supports (Tree hybrid gave me good results), clean your surface before starting the print, and, if necessary, lower the printing speed. They're not the longest part to print so you can afford to add half an hour to ensure better printing reliability (and better looking results)
- Top Corners : Simply print them flat, the screw hole against the bed and enable supports. Once again, make sure your bed is clean, but this part is usually quite simple to print.
- Handle : The handle is composed of 3 parts : the handle itself and what I called "Handlers" that ensure a good grip on the side frames under the top panel. Increase the infill for these objects to 40 or 50% and 3 walls. Print them flat with no supports, and you should be good to go.
Panels
There is no special requirements with the panels. Simply print them flat on the side you see fit, whether you want a specific texture to be visible or not. It may be a good idea to clean your plate beforehand, as this usually dramatically reduces warping, that can be quite pronounced on these larger flat parts. I managed to completely eliminate warping on my prints, just by cleaning the plate from time to time. Just a couple of specific recommendations
- Back Panel : While not absolutely necessary, It's a good idea to enable supports for this one, . This allows for cleaner holes for the PSU holding screws
- Front Panel : The decorations can use finer details. Try to use lower slice width, or to enable variable layer width with this one. The latter can give excellent results while not increasing printing time too much.
I'm providing a ".3mf" file for reference (Created with Bambu Studio, not exactly sure it will open correctly with other slicers, but it's still worth a try). If you can use it directly, that's great, you should have excellent results. Otherwise, you can refer to the pictures for placement and plate composition.
Finally, I suggest that you mark each frame part : it makes it quite easier to assemble, since they can be easy to confuse. Do yourself a favor and take five minutes to stick little notes on each part, you will make your live much easier
Tags
Model origin
The author marked this model as their own original creation.


