The Dice Tower of Infinity
Description
PDFTired of endlessly picking up and dropping dice? Meet the Dice Tower of Infinity, your new best friend in gaming. This ingenious tower allows you to load your dice by simply depressing the lever, which then dumps them into the top of the tower. The magic doesn’t stop there – the lever also closes the trap door, holding the dice in suspense. Release the lever, and the trap is sprung; letting the dice tumble down with perfect randomness!
No more fumbling, no more wasted energy. It’s almost like magic, but without burning a spell slot. Just don’t tell your DM.
Printing
Print the quantities shown in the 3mf file. For completeness things which need multiple copies:
- Tower locks x4
- Lower arm x2
- Upper arm x2
- Lower bar x2 (it's for both)
- Lifter pin x4
- Crest pin x2 (if printing the crest version)
- Door lever x2
Choose which tower you want, there is a cut version of the tower that allows you to print the base separately, this is great for adding color if you don't have or want to use color changing. There is also a version which has holes for a crest (note that this customization is adjustable as it is done as multiple parts).
The parts already have their settings, such as supports already set. (Only the handle needs supports). You may want to add brim if you have bad bed-adhesion.
Assembly
Once all the parts are assembled, combine the tower base with the tower (if you printed it as two parts). This should just snap together (and will never come apart afterwards). It may need a small amount of convincing.
Next, you will need to glue the battlement bottom with the battlement top (this is the only glue needed).
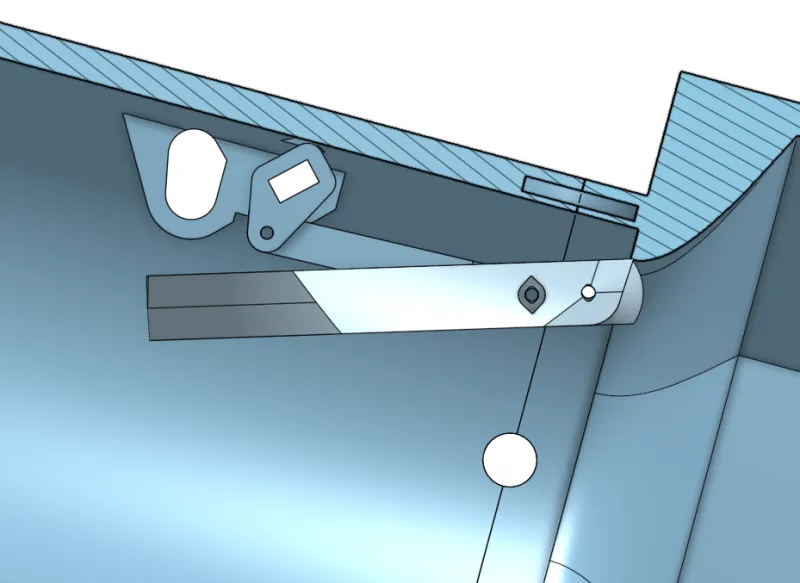
Now assemble the door, see the diagram below. You'll need two pieces of filament, one for attaching the door-lever pair to the root-lever. Please note the correct orientation of the root-lever.

Next, attach the handle to one of the upper arms, as well as one of the bars. Slide this into the top hinge hole of the tower, and slide the root-lever onto the bar as shown below (door is not shown):

Attach the other upper arm to the other side of the bar and the handle. Attach the lower arm to the other bar in the same way. You can now attach the lifter to the arms using the 4 pins.
You're almost done! The last steps: First, place the four tower locks onto the tower, and then place the battlement on top of them, see diagram below for how the locks are placed:

After placing the battlement on top, you can lock it to the tower by rotating each lock. You do not need to rotate them all the way, 45 degrees is sufficient, but they will turn 90.
Second, place the entire assembly upside down. While doing so, manipulate the door so that it it is closed. You will need to make sure the arms and lifter are rotated. (This will happen naturally when the assembly is upside down as the lifter will want to rest on the work surface).
This is the final step! Once the door is in place, add one more bit of filament to that connects the door to the battlement. This last bit of filament needs to be reasonably straight when you attempt to insert it.
Conclusion
Enjoy your new creation. Be careful, your friends will be jealous!
Updates
v10 - lowered the height of the top of the battlement by 4mm, should be just under where the lifter goes (was off due to real-life things like flex)
Tags
Model origin
The author marked this model as their own original creation.


