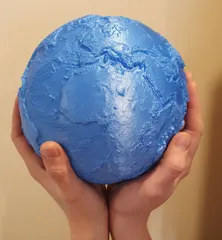
Geophysical Globe: Earth topography with inner and outer core
Description
PDFThis is a great globe for teaching and outreach in earth and planetary sciences. Based on my original "Earth topography with coastlines" (https://www.thingiverse.com/thing:2237721) I took inspiration from the excellent tutorials provided by Joel, the 3D Printing Nerd and Angus from Maker's Muse (link below) to embed magnets so that the globe can be opened to reveal the core and inner core.
You will need 10 5x2 mm neodymium magnets such as these: https://www.amazon.co.uk/dp/B00TACMMP0/ref=cm_sw_em_r_mt_dp_U_qbJSCb6NFKJ46 per print
Print Settings
Printer Brand:
Prusa
Printer:
i3 MK3
Rafts:
No
Resolution:
0.15 or lower
Infill:
15%
Filament: PLA
Notes:
Quick instructions:
* Slice in whatever slicer you prefer. Supports optional - will print fine without but will improve inner surfaces * Modify Gcode to pause printer to insert magnets * Print in 3 batches - Surface topography, outer core, inner core * Inner core does not open and should be glued with surperglue
These parts have hidden voids in which fit 5x2 mm neodymium magnets such as these: https://www.amazon.co.uk/dp/B00TACMMP0/ref=cm_sw_em_r_mt_dp_U_qbJSCb6NFKJ46 which should be inserted mid print.
To insert the magnets while printing requires a bit of manual tweaking of the sliced gcode - the trick is to find the location where the printer is about to cover the holes and insert some gcode to make the machine pause and move the nozzle away from the print while you pop the magnets in mid print. The exact method by which you do this is pretty manual - I heartily recommend following the tutorial by Joel the 3D printing nerd to get this right.
Make sure you get the polarity right so that the magnets will stick to each other! You do not want repelling hemispheres... I used a marker pen to colour north and south poles of the magnets so that I should tell. In one half of each layer use north facing up, in the other south facing up. Then when brought together they should stick just fine.
When slicing, these are high detail models and benefit from going down to a 0.1mm layer height, but 0.15 also looks good. Make sure you go nice and slow for the perimeters too - avoiding ghosting / ringing is really important for a nice finish!
How I Designed This
See https://www.thingiverse.com/thing:2237721 for details on how the outer globe was designed.
I made the hollows and created simple voids for the magnets in meshmixer using the cylinder primitive with a little bit of tolerance for the 5x2mm magnets following the tutorial by Joel the 3D printing nerd (linked in the instructions above). He credits Angus from Maker's Muse for the idea - thanks to both of them for the inspiration!
Category: Physics & Astronomy
Tags
Model origin
The author marked this model as their own original creation. Imported from Thingiverse.


