BTT SFS 1.0 Sidemount for the Creality K1/K1C

Description
PDFIntroduction
This is a sidemount for the BTT SFS 1.0 that works for the Creality K1/K1C and moves the sensor to a more accessible position to the side of the printer.
With the new smart filament sensor you can detect clogs and prevent them from destroying your hotend.
Warning: You will have to root your K1/K1C for this to work properly!
This mod works the best in combination with my or any other sidemounted spoolholder design: https://www.printables.com/model/910692-creality-k1k1c-sidemount-spoolholder
Print materials and settings:
- PLA - not recommended, but works fine as long as chamber temps don't get above 50° C
- PETG - suitable as long as chamber temps don't get above 70° C
- ABS - the best choice, perfect for heated chambers
- Infill - 15-20%
- Supports - Necessary
- Walls - 3-4
- Top and Bottom Layers - 3-4
Other materials:
- Longer bowden tube for the printhead
- Short piece of bowden tube for the insertion point
- 2X M3x8mm machine screws
Assembly
Remove the 6 screws from the back of the filament sensor, then remove the backplate and screw in the new printed backplate with the same screws. Plug in the cable before you mount it and rout it through the cablechannel in the print. Remove the 2 upper corner screws from the sidepanel, then use the two M3x8mm screws to bolt the mount onto the sidepanel. Done!
Connecting the sensor to the motherboard:
Please be careful to not short anything when working inside the machine and check the pins carefully! Unplug the printer before opening it up!
The connector for the BTT SFS 1.0 is not the same as the orginal creality runout sensor!
You have a few options here:
- cut the original connector wires and the new ones and solder them together
- crimp your own adapter cable
- make a custom PCB that both plug into
The BTT SFS 1.0 also has an unconnected pin, keep that in mind when making a custom cable. Check the photo I provided or the offical documentation from BTT for the pin info.
If you have the skills I would advise you to check the connections with a multimeter just to make sure everything is wired up correctly!
Klipper config
If you have any trouble or error codes please look at the Klipper docs:
https://www.klipper3d.org/Overview.html
You will have to comment out this section in the printer.cfg file:
[filament_switch_sensor filament_sensor]
pause_on_runout: True
switch_pin: !PC15
runout_gcode:
{% if printer.extruder.can_extrude|lower == 'true' %}
G91
G0 E30 F600
G90
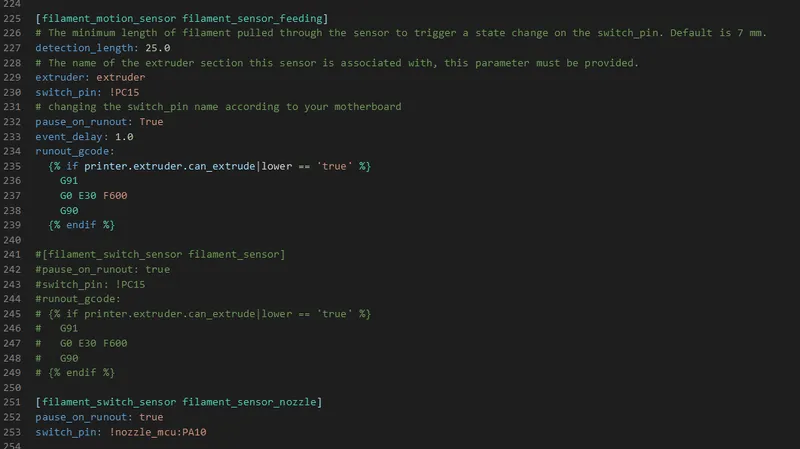
{% endif %}Then insert this piece of text into the config file:
[filament_motion_sensor filament_sensor_feeding]
# The minimum length of filament pulled through the sensor to trigger a state change on the switch_pin. Default is 7 mm.
detection_length: 25.0
extruder: extruder # parameter must be provided.
switch_pin: !PC15
pause_on_runout: True
runout_gcode:
 {% if printer.extruder.can_extrude|lower == 'true' %}
   G91
   G0 E30 F600
   G90
 {% endif %}
The pin is already set corretly for the K1C if you own a K1 or K1 Max please check again if this is the correct pin, as I don't own these printers!
Check the photo for how it should look inside the printer.cfg file!
The detection length you need may vary, as things like lots of retractions can trigger false positives.
Tags
Model origin
The author marked this model as their own original creation.

