AnyBox Parametric Slide and Lock box

Description
PDFTOC
└ Release Notes
└ What
└ How to print
└ How to use the CAD
Release Notes
Version 1
- Initial release
What
A parametric slide and lock box based on ExtremeElementz amazing pill box. This version was recreated in Fusion 360 using the original design as heavy inspiration but resizable to any resonable size. Parameters include:
- Width of the insert
- Length of the insert
- Depth of the insert
- Corner radius of the insert (higher corner radius leads to a smoother lock experience)
- Wall thickness (recommended a multiple of your line width)
- Tolerance (the fit of the inside parts of the box)
- Lid tolerance (the fit of the lid)
- Width, length, and depth of the button
- Layer Height and Line Width of your printer to optimise (Heavily recommend 0.2 with 0.4 nozzle and 0.3 with 0.6 nozzle, other nozzle and line widths may behave less smooth)
Note: I have not printed every variation with both nozzle sizes that are included. They should all work in theory assuming your printer is calibrated well enough and not over extruding but I can't guarentee. As you can see though I have printed a few different sizes and they have turned out great.
Some ideas
- Pill box
- Screws box
- Nozzle storage
- Anything you need to put inside a box really
How to print
- Any hard(ish) material (PLA, ABS, PETG, TPU 95A probably(?), etc.)
- Recommended 0.4 or 0.6 nozzle with 0.2 or 0.3 layer heights respectively
- Lid prints on its top!
Personal recommendations
0.4mm nozzle
- 3 walls min
- 15% infill min
0.6mm nozzle
- 2 walls min
- 15% infill min
Recommend printing a small box first to test fit and tolerances of your printer!
How to use the CAD
Setup
You will need Fusion 360 (personal version is fine, that's what it was built in) to use the parametric CAD files. Double click the f3d file to launch Fusion and open the file.
In the CAD folder there are a range of starting points you can use to customise based on size and nozzle.
Edit parameters
- Under the modify panel at the top you will find the option to change parameters
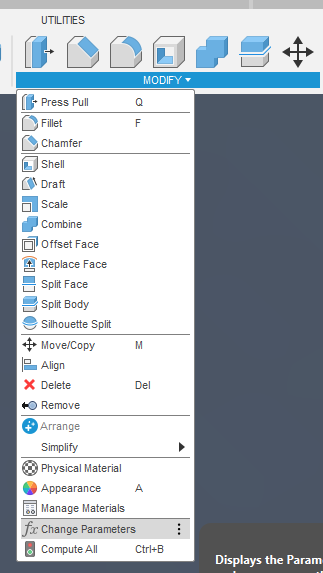
- In the window that appears you can change each of the parameters by editing the number under the “Expression” column
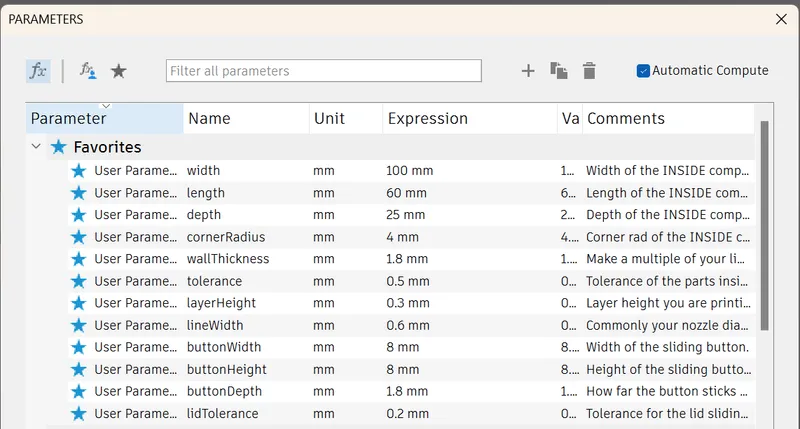
- As you edit the values the model will update in the background
Note some parameters don't work with each other, if you try putting in extreme values the model will break in very fun and interesting ways. If that happens just undo to go back.
Note: Only edit the values in the favourites. The other parameters are used in various calculations and changing them WILL break things very quickly.
Export
STEP
I recommend STEP if your Slicer supports it (e.g. Orca, Prusa, and other derivitives)
- Under the browser section on the left, right click the different partsand choose the “Export” option
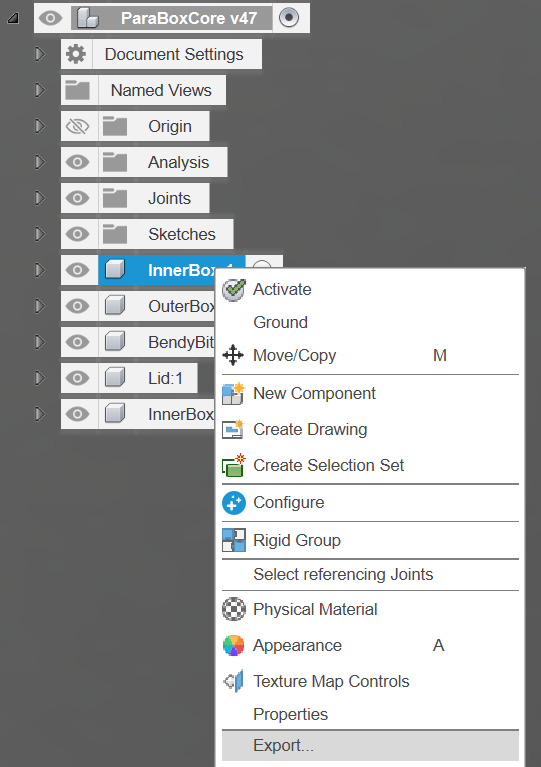
- Select STEP from the options and click Export
STL/3MF
- Under the browser section on the left, right click the different partsand choose the "Save As Mesh”
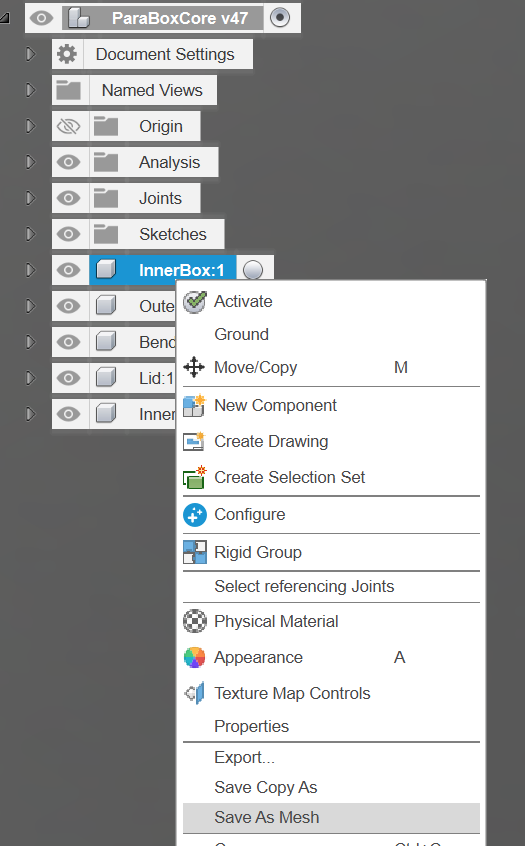
- In the panel on the right hand side use either 3MF or STL, and make sure to set the refinement quality to High
- Choose where you'd like to save and hit Save
Tags
Model origin
The author remixed this model.

Grab and Go Pill Box ft. Slide-n-Lock
Differences of the remix compared to the original
Model is rebuilt in Fusion 360 to be completely parametric.


