Sword of Once and Future (MTG)

Description
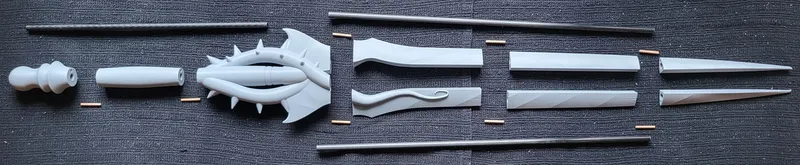
PDFAt full size the sword measure 865mm from tip to pommel. It is held together by three 8mm dowels, and eight 3mm pins. The model is pre-sectioned into nine parts but, an uncut version it also available.
This is the first of my swords printed on my larger printer, as a result there are fewer but larger parts then my other sword designs. this will make it harder to print for those with small printers. I also experimented with a wrapping the handle with fake leather after painting. But I created a second version of the handle and pommel with the wrap modeled in for those who may not want to do that extra step.
Additional parts
- 1x 8mm diameter 311mm long dowel
- 2x 8mm diameter 441mm long dowels
- 8x 3mm diameter 25mm long pins
For the dowels I used carbon fiber tubes, as they are straighter and lighter than wood.
Note: This model has the blue blade labeled as the Future and the black blade labeled as Once. The difference in modeling between these two blades is subtle. So, to keep them from being assembled incorrectly the alignment pins are offset differently on each side. However, due to space limitations this difference is only .3mm so make sure your alignment pins fit well.
Assembly
Clean up all the parts before assembly and test fit all parts before gluing.
Use the 311mm dowel and two 3mm pins to glue Center, Handle, and Pommel together using super glue then set that assembly aside to dry. Using one of the 441mm dowels and two 3mm pins glue together Future 1, Future 2, and Future 3 again set this aside to dry. Do the same with the three parts of Once. When all three of these subassemblies are dry use the remaining two 3mm dowels to complete the full assembly of the sword. This method will make it easier to keep the blades parallel.
Finishing

I filled in the seams between parts using superglue, then smooth when out with 180 grit sand paper. Next, I used 2 coats of automotive filler primmer over the whole sword, and carefully sanded it smooth with 320 grit sand paper.
Painting

First, I masked off the handle and Future blade and painted the Once blade black. Once dry I removed the masking and repeated the process to paint the Future blade blue. Next, I carefully masked off both blades and painted the center section, and handle using metallic bronze. Once the base coats were dry, I highlighted the ridges of the Future blade using light blue acrylic paints and feathered the edges of the lines. I did the same for the Once blade using silver. I then did several weathering passes with black and brown, then clear coated the whole sword in gloss enamel. Finally, I ruffed up the paint on the handle and used artificial leather to wrap it. I found in my testing that a rubber contact adhesive worked well for this.
Tags
Model origin
The author marked this model as their own original creation.


