Heptagon Flower Pot in Various Sizes

Description
PDFDive into the mystical allure of the number seven with my Heptagon Flower Pot. Celebrated across cultures and histories for its significance, the number seven brings a touch of magic to your garden or indoor spaces. This flower pot, with its geometric heptagon shape, not only pays homage to the "lucky number seven" but also introduces a new dimension of aesthetic and functional design to your planting endeavors.
Designed with simplicity and elegance at its core, the pot features plain sides set at a slight 6º angle, mimicking the precision of geometric perfection. The wide and flat rim, reminiscent of classic terracotta styles, ensures stability and adds a touch of sophistication with its flawless geometries at each corner. Below, you'll find thoughtfully placed drainage holes and stabilization ribs, guaranteeing your plants' health and the pot's durability. I have kept the sides intentionally plain, inviting you to add your personal touch with patterns or modifications.
Update 2024-06-05: Added a showcase folder.
Pair With the Perfect Saucer
Achieve a harmonious look by pairing this pot with the Heptagon Plant Saucer, designed to match perfectly, ensuring your gardening setup remains as tidy as it is stylish.
Explore the Comprehensive PDF Catalog
Finding the perfect model amidst the large number of variants has never been easier! Take a look at the detailed PDF catalog in the "Other Files" section in the “Files” tab. This catalog provides a visual overview of all the models in this project, complete with dimensions, to help you quickly find exactly what you need.
But it's more than just a visual treat; the catalog includes organized tables that let you easily compare models based on specific parameters. Once you've spotted the model that meets your criteria, just search for its filename on the project page to easily download the right file.
Printing the Pot
In the files section, you'll find PrusaSlicer example projects, offering basic settings as a starting point for your prints. For more detailed information, please refer to the table below:
| Parameter | Description |
|---|---|
| Orientation | Refer to the example project. |
| Nozzle Size | 0.4mm, 0.6mm, 0.8mm (see below) |
| Layer Height | Adjust according to nozzle size |
| Filament Materials | Recommended: PETG, ASA |
| Perimeters | 2 to 3, based on wall thickness |
| Infill | 15% (check slicer settings) |
Nozzle Size and Layer Height
The pot is designed to print effectively with 0.4mm, 0.6mm, and 0.8mm nozzles, accommodating all wall thicknesses. Select a layer height appropriate for your nozzle size, and always review the sliced result before printing. Aim for the walls to be printed solely with perimeter lines, free of infill. For prints using a 0.4mm nozzle, consider increasing the number of perimeters to three or more for optimal results.
Choosing the Right Side Thickness
The models not only have different sizes, but also three side thicknesses.
S17(1.68mm): The thinnest variant is best suited for rigid filament. It is ok for smaller pots, but definitely too weak for pots that are equal or greater than 200mm in height.S20(2.0mm): The medium thickness gives more stability and works well for soft materials like PETG. A good compromise, for medium sized indoor pots.S25(2.5mm): My recommendation. This thickness provides excellent structural support for the sides of the pot, even for very large prints. These prints withstand outdoor conditions, even when moved filled with heavy wet soil.
Dimensions
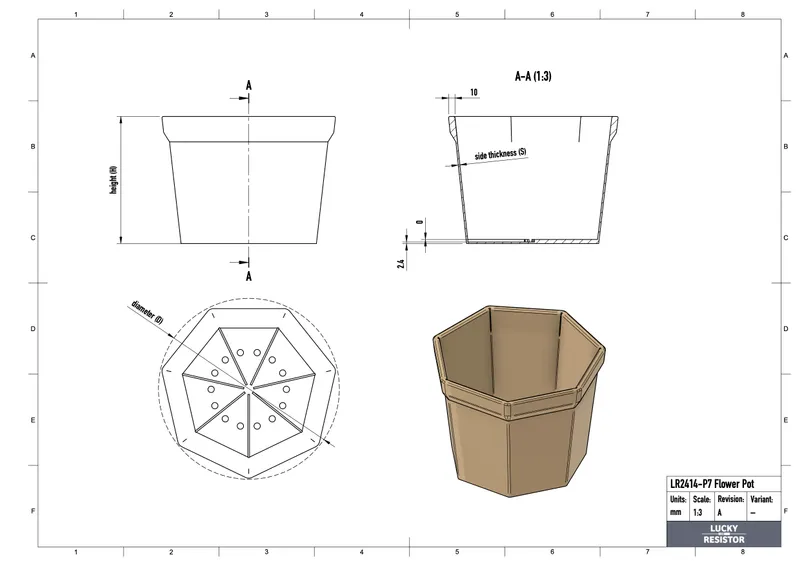
An example filename like LR2414-P7-S25-H200-D260.3mf decodes the pot's dimensions and characteristics as follows:
P7denotes a heptagon shape, with seven sides.S25indicates a side thickness of 2.5mm for robustness.H200represents the pot's height at 200mm.D260refers to the diameter, measuring 260mm at the pot's widest.
This range of dimensions ensures that there's a perfect heptagon flower pot for every plant and space, allowing you to customize your green haven with precision and style.
Locating the Model Files
All the 3D models for the saucer can be found in the “Files” tab, nestled under the “Other Files” category. To streamline your experience, I've organized them into separate ZIP files based on file format—choose from STL, 3MF, or STEP files according to your needs. Simply download the ZIP file that corresponds with the format you require.
In the Store: Fusion 360 Design
I sell the Fusion 360 design for this and other plant saucers in the Printables store. By buying this design, you are supporting future designs and make all the free downloadable content possible.
Printables Store: Flower Pots - Fusion 360 Designs
Explore More from Meti·kumi
Interested in my designs? Browse through my collection of 3D models:
👉 https://metikumi.com/3d-models/
Stay connected on social media for the latest updates and work-in-progress insights:
Conclusion
The Heptagon Flower Pot is more than just a container for your plants; it's a statement piece that brings the mystique and beauty of the number seven into your home or garden. With its unique design and customizable features, it's sure to be a conversation starter. Dive into the world of geometric gardening and let the lucky number seven inspire your green thumb.
Happy planting!
FAQ
Are there models with a thinner bottom?
No. Either the bottom thickness depends on the side thickness, or it is fixed for all models. In most slicer software, you can easily change this dimension.
Move the model into the printer bed, by changing the Z position to a negative value. The slicer will then cut that section off. So, if the bottom is 2.4mm thick, you can move the model to negative 0.6mm, what gives you a new bottom thickness of 1.8mm.
Make sure to check the sliced result for any side effects before printing!
What is the best looking saucer diameter for this pot?
For the best look, choose a saucer that has a gap between 10-20mm between the pot and the rim. As the matching saucer has the same rim with that the pot, you can simply look at the difference from the top to the bottom side.
The following contains the rounded values, how many millimetres the bottom is inset at the side. It is a theoretical line, which does not include the rim.
| Height (mm) | 6º Inset (mm) | 8º Inset (mm) |
|---|---|---|
| 100 | 10 | 14 |
| 125 | 13 | 17 |
| 150 | 16 | 21 |
| 175 | 18 | 24 |
| 200 | 21 | 28 |
| 250 | 26 | 35 |
| 300 | 31 | 42 |
| 350 | 37 | 49 |
If you have a pot with a diameter of 260mm and a height of 200mm, that has a 6º angle at the side, the inset is about 21mm. That would compare to a diameter of 218 at the bottom.
So, if you print a saucer with 240mm diameter, 22mm larger than this imaginary diameter, it adds about 11mm to each side, which looks neat.
To verify your choice, load the pot and saucer into the same slicer project so that they overlap in the centre of the printer bed. That way you can visually confirm if your choice looks good.
Tags
Model origin
The author marked this model as their own original creation.