Customizable Window Rotary Handle Adapter for ZigBee Sensors

Description
PDFAdapter for ZigBee Door/Window Sensors to use as a window or door handle.
This adapter is inspired by the eq3/HomeMatic HM-Sec-RHS [1] and the thing:4735627 [2].
Advantage/Disadvantage over HM-Sec-RHS [1]:
- (+) uses ZigBee
- (+) the window handle can be mounted tight and still works
- (+) very clean design
- (-) with 8.9 mm height it might need longer screws and a longer pin
(HM-Sec-RHS adds only 2.5 mm) - (-) needs unmounting to change the battery
- (-) only the locked and unlock position are detected
(HM-Sec-RHS detect lock/open/tilted)
Since version 1.1 a two sensor solution is available.
Advantage/Disadvantage over thing:4735627 [2]:
- (+) printing needs no support
- (+) cleaner design
- (+) better cable ways
- (+) better support for the ZigBee module
- (-) with 8.9 mm height it might need longer screws and a longer pin
(thing:4735627 adds only ~4 mm)
Customizable Design
This adpater is designed with OpenSCAD. It also supports the OpenSCAD customizer to make it fit to your needs.
You can customize:
- General Parameters
- thickness of the adapter case
- slackness of the parts to compensate tolerances/print shrinking/…
- inplace to control wether the ring is printed in-place or beside
- gap to control multiple part distance
- generate_adapter controls if the adapter case is generated
- generate_ring controls if the pin ring with magnet is generated
- generate_spacer controls if the spacer is generated. See the description about the spacer below.
- Sensors
- sensor_type controls which of the supported sensors should be used (Aqara or Sonoff)
- sensors controls if the one or two-sensor design should be generated
- Handle Dimensions
- handle_width is the width of the handle
- handle_length is the length of the handle
- handle_radius is the corner radius of the handle
- handle_pin is the dimension of the sqare pin to drive the window mechanics
- handle_screw_hole_diameter is the diameter to let the mounting guides of the handle fit into the adapter case
- handle_screw_hole_distance controls the distance of the mounting screws (center to center)
- handle_screw_diameter selects the diameter of the mounting screws
- handle_screw_hole_guide_height is the height or length of the mounting guides going into the window frame (the handles have the same on their backside)
- handle_ring_spacer_height controls the height of the spacer. See the description about the spacer below.
- Magnet Dimensions
- magnet_diameter is the diameter of the (round) magnets to use
- magnet_height is the height of the (round) magnets to use
- magnet_flip rotates the magnets by 90°. This might be necessary depending on the polarization of the magnets
Ready to print STL files can be found on the linked models.
Variants for different ZigBee Sensors
As the Aqara and Sonoff ZigBee window/door contacts have a very similar PCB layout and components, the design can be customized for your favorite sensor.
The design supports the ZigBee modules from Aqare and Sonoff including the LED window (the surface of the adapter at the LED position is thinner to let the LED shine thru) and the hole on the bottom to reach the config/pairing button.
You will find ready to print STL files for the following versions:
- Aqara, one sensor ZigBee module
https://www.printables.com/de/model/739812-rotary-handle-with-aqara-zigbee-sensor - Sonoff, one sensor ZigBee module
https://www.printables.com/de/model/748699-rotary-handle-with-sonoff-zigbee-sensor
Two-sensor Design
As described above, only the states locked and unlocked can be distinguished.
If you want to distinguish open from tilted, a second sensor can be used.
The two-sensor design works for both supported ZigBee modules.
You will find ready to print STL files for the following versions:
- Aqara, two sensors ZigBee module
https://www.printables.com/de/model/749118-rotary-handle-with-two-aqara-zigbee-sensors - Sonoff, two sensors ZigBee module
https://www.printables.com/de/model/749131-rotary-handle-with-two-sonoff-zigbee-sensors
In your HomeAutomation you will have to aggregate these two sensors as follows:
| Lower Sensor | Upper Sensor | Aggregated Window State |
| closed | closed | illegal state |
| closed | open | locked |
| open | closed | tilted |
| open | open | open |
Spacer
The spacer is only necessary if the hole in the window frame around the pin has a larger diameter than the pin ring. The spacer prevents the ring from moving into the window frame (and out of sight for the sensor).
You will find STL files for different spacer heights here:
https://www.printables.com/de/model/753508-spacer-for-zigbee-rotary-handle-adapter
Printing Instructions
You can chose if you want the ring in the middle to be printed inplace or beside. Beside may give better print results as the borders are more accurate. You will find STL files for both variants.
The printing doesn't need print support structures, except for the hole on the lower end to reach the configuration button on the ZigBee module.
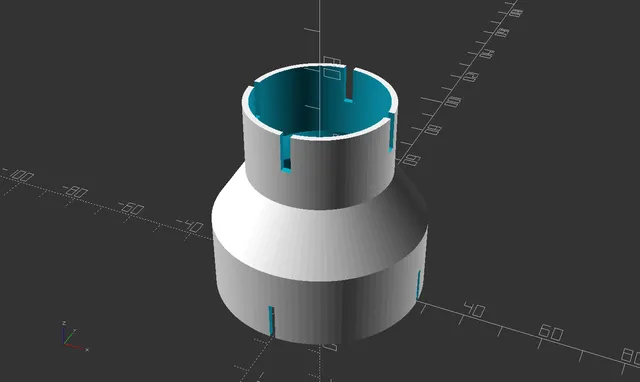
The print is oriented as in the preview (the case front side is placed on the printing bed down face).
Select your favorite filement so that the adapter matches your window frame or handle color. I prefer white PETG filament which is very robust so that the handle can be fasten tight.
Assemby Instructions
To prepare the ZigBee sensor for the use in the adapter, follow these steps:
- open the original ZigBee sensor cases
- remove the battery
- unsolder the reed contact
- solder a cable of ~65 mm to the lower side solder pad (lower side is where the battery is)
- solder a cable of ~30 mm to the uper side solder pad (upper side is where the antenna is)
- solder the two cables to the original reed contact
- place the ZigBee module into the adapter so that the battery is still accessable
- if necessary us a little hot glue to fix it.
- Place a magnet of 2 mm height and a 4 mm diameter in the ring and fix it with a little bit of glue or hot-glue. Ensure to remove excess glue from the ring.
Mounting Instructions
To mount the adapter to your window, follow these steps:
- bring the window handle into the horizontal position.
- unscrew the handle
- put the ring over the handles pin, so that the open side shows to the window frame (away from the handle)
NOTE: the magnet should point into the direction where the handle bar points. - if the hole for the pin in the window frame has a larger diameter than the ring, the spacer should be added to the pin (it prevents that the ring moves inside the window frame).
- put the adapter over the handle so that the open side shows to the window frame (away from the handle)
- Put the screws back into the handle
- Put everything onto the window frame and tighten the screws.
- Ensure that the pin still drives the window mechanics again.
The adapter is 8.9 mm thick. To mount it under the handle it might be necessary to use longer screws (in my case only 2 out of 22).
It might also be necesary to use a longer pin (in my case only 3 out of 22). Some handles allow the change the pin, but on some handles the pin can't be changed, so a new handle might be necessary.
Pairing Instructions
The adapter case has a small hole on the bottom where the ZigBee sensor button can be reached. Pair the device by pressing this button. The sensor will give you feedback over the LED which shines thru the adapter case.
Versions
| Version | Date | Changes |
| 1.0 | 27.01.2024 | first release for the Aqara window/door sensor |
| 1.1 | 28.01.2024 | added LED window and button hole added optional second sensor to detect the tilt position |
| 1.2 | 01.02.2024 | added support for the SONOFF SNZB-04 sensor |
| 1.3 | 05.02.2024 | added mounting guides; added the handle corner radius; added the spacer; added controls to generate the adapater, the pin ring and the spacer separatly |
External Links
[1] https://www.eq-3.de/produkte/homematic/detail/hm-sec-rhs.html
[2] https://www.thingiverse.com/thing:4735627
Tags
Model origin
The author marked this model as their own original creation.