Washing Machine Piggy Bank

Description
PDFTwo versions of piggy bank in the shape of washing machine - simple and “advanced”.
Simple version is just a box with slot on top and access screw at the bottom. It's simple, easy to print, easy to assemble and has great capacity.
Advanced version has more parts - a drum that rotates and access door at the front. It has smaller capacity and the assembly is a bit more involved.
IMPORTANT!!! Take a close look at scaling instructions!
Simple Version Printing
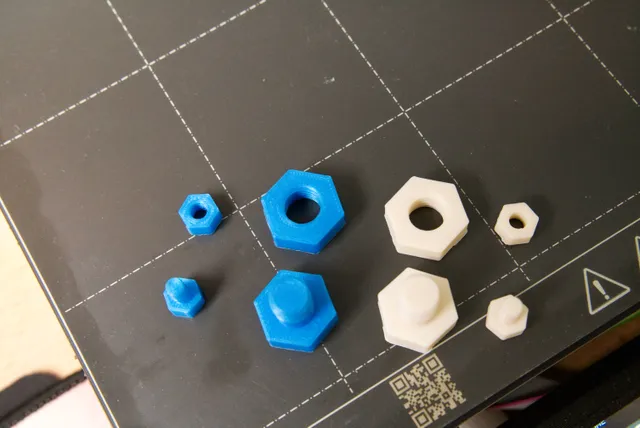
Case - print in the default orientation, 15% infill is enough, full supports are advised, but you may remove supports from the thread at the bottom (removal after print is a pain). 100% scale.
Flange - print two of them laying flat, 20% infill to give them a bit more stiffness, no supports. 99-98% scale (X and Y axis ONLY), depending on the deformation of the openings in the case.
Flange Nut - print two of them laying flat, 20% infill (or more for more stiffness), no supports. Scale should be 1% greater than the flange scale (also only X and Y axis).
Bottom Screw - print laying flat on the top surface, 15%infill is enough. 99% scale (X and Y axis ONLY).
Top Cover - print laying flat on the top surface, 15% infill is enough, no supports. 100% scale.
Assembly
Push in the flanges and orient them as you like. Use the nuts to secure them in place. Push the top cover in, quite a lot of force is required, it should fit nice and flat. Use the bottom screw to close the access from the bottom. Enjoy!
Advanced Version Printing
Case - print laying flat on the top surface, 15% infill is enough, full supports. 100% scale.
Front Flange - print laying flat, 20% infill, no supports. 99-98% scale (X and Y axis only), depending on the deformation of the openings in the case.
Front Door - print laying flat, 20% infill, no supports. Scale should be 1% smaller than the front flange scale (also only X and Y axis).
Back Flange - print laying flat, 20% infill, no supports. 99-98% scale (X and Y axis only), depending on the deformation of the openings in the case.
Flange Nut - print two of them laying flat, 20% infill (or more for more stiffness), no supports. Scale should be 1% greater than the flange scale (also only X and Y axis).
Drum - print lying flat, 20% infill, add supports only for the slot (optional, may print fine without). Scale should be 1% smaller than the back flange scale (also only X and Y axis).
Drum Nut - print lying flat, 20% infill, no supports. Scale should be 1% greater than the drum scale (also only X and Y axis).
Handle - print standing with the broader end at the bottom, 100% infill, no supports, add brim. Scale should be the same as drum.
Assembly - push the front flange in and secure it with a nut. Don't tighten yet. Screw in front door and orient it to your liking, then tighten the nut. The flange should not move when you rotate the door to open or close it. Push the back flange in and secure it with a nut. Tighten it all the way. Insert the handle inside the small hole on the drum, please take note of the correct orientation. Quite a lot of force is required, it should be a tight fit. Insert the drum nut inside the case and push the drum from the back, so the nut goes on the drum. Secure the drum using the nut, but don't tighten it all the way, the drum should rotate. The slot in the drum should align with the slot in the case when the handle is positioned by the indicator on the case. Enjoy!
Hope you enjoy the models!!!
Tags
Model origin
The author marked this model as their own original creation.