Pyramid Reed Oil Diffuser

Description
PDFPyramid Reed Diffuser
The ancient oil scent diffuser... reimagined for the 3D-printing era !
This decorative and compact piece makes a pleasant, interesting addition to any room.
Using a wick to raise the oil makes possible this new configuration.
Bought & scavenged items
- Sainsbury's brand Spice Jar :
https://www.sainsburys.co.uk/gol-ui/product/sainsburys-hot-chilli-powder-44g
If you live in the UK then you'll almost certainly know someone who's squirreled these away, believing they “looked too useful” to throw out… and they were right! Prepare to upcycle!
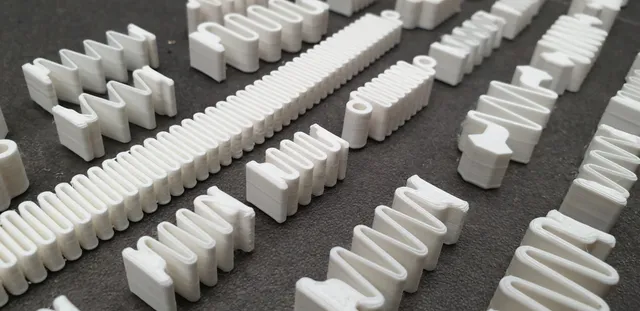
For the rest of the world, I hope you can find this jar type. I measured it for this project and you can see the image gives the dimensions and thread detail.
Or FreeCAD users could remix from the provided source model, using a locally available jar that's popular in your region. [see below for note about source model]
- Diffuser Reeds Ø4 mm
Good quality soft reed ones, not bamboo.
https://www.ebay.co.uk/itm/395060230978
You'll need to cut 150 mm lengths, 3 pcs
- Wick Ø4 mm (advertised diameter, it looks a bit thicker)
https://www.ebay.co.uk/sch/i.html?_nkw=orimerc+4mm&_sacat=0
These are the type often used for plant irrigation
Cut to 155 mm length
- Base Oil, non-flammable, suitable for diffusers
https://www.ebay.co.uk/itm/134763364861?var=434261715524
- Scent : your choice of essential oils or room fragrance concentrate.
I recommend about 5 ml of essential oil in about half a jar of base oil
Assembly
(see images; firstly also refer to the section below about siphoning)
- Insert the wick string into the upper stem part.
Use a stick to prod it all the way to the end. This is important for conduction of the scented oil. When it cannot go further it'll get more difficult to push, but ensure there's still some wick sticking out.
- Insert the reeds into the upper part.
The final push into the socket can sometimes require a little force, so hold both the plastic part, and the reed, close to the insertion point in order to prevent buckling.
- Gently pull on the string : you should now find the end of it is trapped by the reeds. If it comes loose easily then disassemble and repeat steps 1-2.
- Fit the triangular base.
Again it can take some force, especially if you've sealed this end of the reed (see below) and it's less soft. So be careful and maybe sit the base on a table, gripping the reed as low down as you can to prevent bending.
- Insert the jar.
You can try first with an empty jar, especially if you're going to transport or gift the item.
Best to stand the jar on a table, and gently push / wiggle the triangular base downwards onto it.
Then use fingertips to twist the jar and engage the thread.
Don't overtighten: just “finger tight” is ok.
- Filling.
I'd recommend not to fill the jar more than half full. The fuller it is then the more likely it is to siphon-out or to spill.
Add essential oils or concentrated scents to the base oil in accordance with their instructions. With essential oils I tend to put about 5 ml into half a jar of base oil. But it depends on the oil type and quality. When blending more than one scent, add the sublte one first and then the stronger one just a few drops at a time. Mix and sniff until ready.
Allow a day or two for the scent to emerge fully
Siphoning issue
A drawback of this design is that, because the lower end of the reeds are below the oil level of the container, a little oil can seep out gradually over time.
- Don't place the filled diffuser over anything that might be damaged by oil.
You could stand it on a small plate.
- You can attempt to seal just the lower ends of the reeds using glue or varnish (see image). Allow this to dry before assembly. Remember which end is which!
The dried glue may harden the end of the reed and make it more difficult to insert. Therefore I have reduced the interference fit of the lower sockets. Still it can take a bit of force to push them in - see assembly step 4 above.
Don't attempt to seal oily used reeds.
Cautions
- Keep away from animals and young children
- Carry upright or unfilled
- Place where it's not likely to be knocked over
- Use non-flammable base oil
- Avoid skin and eye contact with essential oils & fragrances
FreeCAD source model
Exporting STL
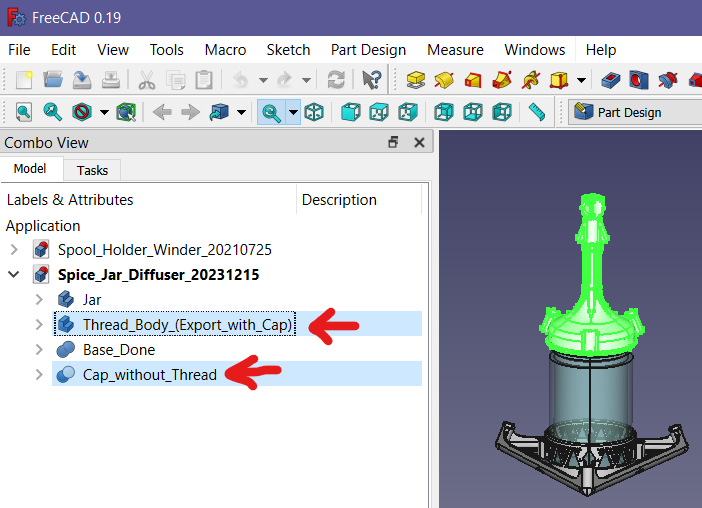
The upper part of the diffuser has a printed thread to accept the jar.
In FreeCAD I was unable to unify the thread helix with the main part, without causing a defect in the resulting 3D body.
Therefore the thread is modelled as a separate body: Please select the two bodies before hitting the Export command for STL. That way the unification is done by the STL builder.
Tags
Model origin
The author marked this model as their own original creation.