RetroTINK 4k Fan Mod
Description
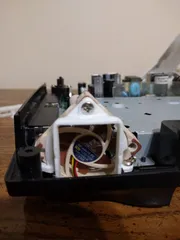
In addition to the printed part you will need 4x M2x6mm screws and a Noctua NF-4Ax10 5v fan.
You can also get any 40x10mm pc fan that can run on 5v and use a fan adapter to solder to the internal header pictured above.
The hardest part of this mod is taking the RetroTINK 4k apart.
This is not for the feint of heart, you will likely damage rear port labels in the process.
Step 1:
Remove the SD Card,
Step 2:
Remove the cover over the SD Card Slot, this takes considerable force to remove. I used a pressure clamp to grab the edge of the cover and gently force the cover off. There is a tool to aid in this process in the printable files, you will want to print it with at least 3 walls and 4 top and bottom layers.
Step 3:
Slide off the cover for the front AV port
Step 4:
Remove the bottom screws
Step 5:
Gently lift the top shell and angle it towards the SCART connector, and pull the label off the back keeping it attached to either top or bottom shell.
Congrats you now have the RetroTINK 4k open.
The suggested Noctua NF-A4x10 5v comes with an adapter with two wires hanging off of it. We will use this to attach the fan to the inside of the 4k
You will need to solder the fan connector to the JTAG connector see the attached picture for the spots.
Once this is soldered into the 4k you can plug the fan in and reassemble
You can get this kit from Laser Bear
Tags
Model origin
The author marked this model as their own original creation.


