drill-o-meter - digital drill depth display (v1.1)

Description
PDFThis is a working concept of a digital drilling depth measuring device. It can be mounted to a drilling machine with “euro neck”.
I was a bit in a hurry to get it finished for the drilling tools contest, so it is not flawless. Mainly I constructed it with things I had around. The ultrasonic sensor is a bit outdated, mainly HC-SR04 is available today but I think this sensor won't fit. I will get the sensor later and make a V2 with this sensor.
If you have all the parts and want to build it, please be patient with the assembly. The grove connector barely fits in the bottom hole and if you choose the “nullify button” version then putting in the tiny button is a bit of a nightmare.
For programming the ESP, you will find my arduino sketch in the download section. I won't cover the how to get the f'ing display work topic here. Please look at the lilygo TFT_espi github repo.
UPDATE 20.11.2023: update firmware (battery state, less flicker, optional use of nullify button ), add version without nullify button
A word about using the device:
In general…
- install the drill-o-meter
- insert your drill bit
- put drill against the wall
- switch drill-o-meter on (it will automatically nullify the distance )
- version with nullify button: press the button (the yellow thingy in my case) to nullify (if neccessary)
- start drilling until desired depth is reached
- repeat as long as you change nothing with the drill bit - it is not necessary to nullify again
version without nullify button: to redo the initial measurement you have to switch it off-on again
Due to the sensor has “only” cm precision, please keep in mind a shown depth of e.g. 5cm means more or less 4.5cm - 5.5cm.
Print Instructions
- nothing special, I printed it in Polymaker polyTerra dark green
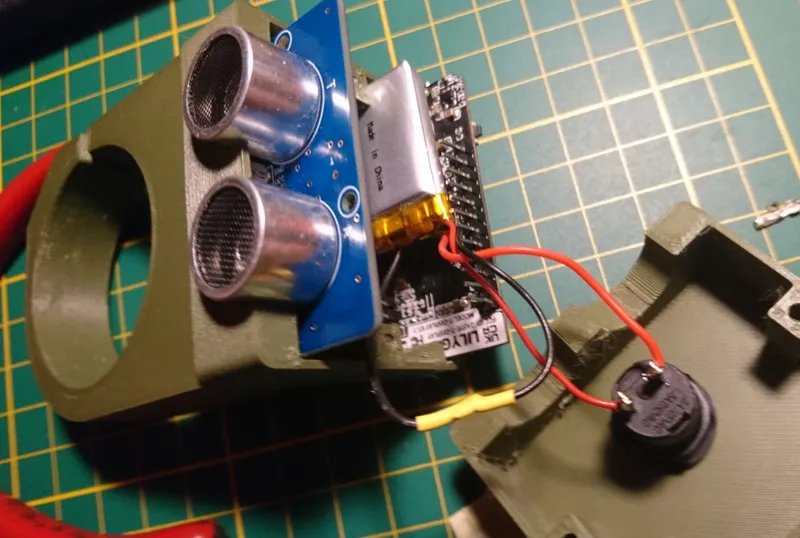
Hardware parts
- LILYGO ESP32 T-Display
- Grove Ultrasonic Ranger
- push switch, round, screwable 12mm diameter
- LiPo battery 250mAh
- tiny plug for battery connection with the ESP32
- 2x M3 15mm hex screw
- 2x M3 10mm hex screw
- 1x M3 20mm hex screw
- 1x M3 square nut (optional, but nicer if you have)
- optional: Mini Bubble Level thingies
Assembly
following steps are for the button version, for the model without button, please ignore all things regarding the button.
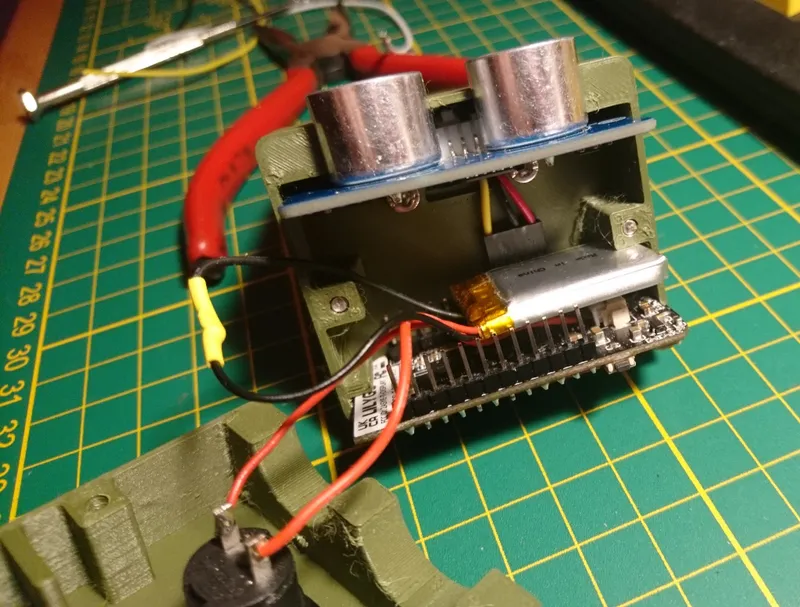
- make a test fit of the sensor and the esp32 in the bottom enclosure part, remove printing debris if necessary. Perhaps test the button thingy
- shorten the grove cable so it is fitting inside the enclosure
- make connection of the grove cables to esp32
red to 3V, black to GND, yellow to pin 12, remove white cable
(I used dupont pins. If you do not have the pins soldered to the esp32 solder it directly to the ESP … use what ever method you prefere) - screw the button into the top part
- make battery connection, the + line must got through the switch
- program the esp to check if all things work as planed. (modify source code if you are bored of my to simple code)
- screw enclosure bottom to the clamp part, use the short screws
- use long screw for the clamp
- put the button in
- put the electronics in. best way is to put the sensor in first. The clip of the grove connector can be annoying, but it will fit. After that the esp and then the battery. Keep attention to the button, it can fall of easily.
- close the whole device with the top enclosure part.
- hold it tight, turn it around and use the 2 left over screws to finish it.
- optional: put mini Bubble Level thingies on it - nice for straight holes ;-)
Future plans
- exchange the sensor with something more accurate
- more source code extension like cm/inch selection
- more modular mounting system
- mount adapters also for cordless drills
- possibly more ;-) stay tuned
If you are interested, then see other electronic projects to:
https://www.printables.com/@Antimaterie/collections/611762
See also my other workshop stuff: https://www.printables.com/@Antimaterie/collections/1000059
Additional notes
I'm interested in your feedback to improve my stuff! So give me likes, post makes, comment and rate the print to show others and me how well it goes.
If you post a make, let me know which filament you use.
If you want to support me by donating a coffee go to https://ko-fi.com/antimaterie I would really happy about it. The money will be invested in all stuff regarding 3d printing to give more and better quality models.
In general my Prints are not for commercial use, but if you are a print farm owner and want to sell some of my stuff, please contact me.
Hope you enjoy my models.
Tags
Model origin
The author marked this model as their own original creation.