Hydration Tracker for LTT Water Bottle
Description
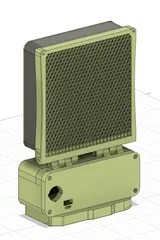
PDFThis is a hydration tracker for the LTT Water Bottle in the form of a two bit binary counter, implemented as two bistable compliant switch mechanisms.
This hydration tracker is meant to be glued in the small cup on top of the Spout Lid for the LTT Water Bottle and does not interfere with the normal operation of the lid.
Recommended Usage:
- each morning, fill the water bottle and reset the switches to the off position
- throughout the day, each time you refill the water bottle, increment the counter by one
For convenience, if you're not used to counting in binary, the table below is provided:
| left switch | right switch | refill count |
| off | off | 0 |
| off | on | 1 |
| on | off | 2 |
| on | on | 3 |
Materials Needed:
- about 2g of filament for printing the parts
- CA glue (super glue)
- about 4cm of 1.75mm filament
- (optional) masking tape
- an LTT water bottle with the Spout Lid
Printing:
Because of the size of the parts, it's recommended to use a small nozzle (0.2mm or 0.4mm) and slice this with 100% infill at 0.05mm layer height.
Optionally print the switch parts in a different color from the cap so that the on/off values of the binary switches can more easily be read from a distance.
The two halves of the cap section can be glued together using sections of 1.75mm filament as alignment pins.
Assembly procedure:
- Orient the bottom section of the tracker cap so that the fillet is pointing down. It should sit flush inside the water bottle cap's depression.
- Insert a section of filament into each of the three alignment pin holes in the bottom section of the cap such that the filament is not protruding from the bottom. Glue should not be needed to hold the filament sections in place.
- Trim each section of filament so that it's no more than a few millimeters long, enough so that the top section of the cap part can easily slide onto the pins.
- Lay the bottom section of the cap and the switches in place so that they are sitting in the LTT water bottle cap's depression.
- Optional: cover the sides of the water bottle's cap, leaving the top section exposed. This will decrease the risk of getting glue squeeze out all over the cap.
- Orient the upper section of the cap, identifying the convex portion of the rim, which indicates the top side—the rounded side should be facing up.
- Apply a thin ring of glue to the bottom outer edge of the upper section of cap. It's important to only apply glue to the outer 1mm of this ring, or the switches might get glued in place.
- Using the alignment pins as reference points, set the upper section of the cap down in place onto the cap of the water bottle, enclosing the other components and making sure that the glued surface makes contact with the water bottle's cap.
- Hold, clamp, or weight the hydration tracker against the water bottle's cap while the glue dries.
- Remove the masking tape from the water bottle cap.
- Once the glue has dried, trim the 3 sections of filament so that they are flush with the top of the cap. This can be done using flush cut snips or (carefully) with a sharp razor blade.
Design Considerations:
The cap part was printed in two parts to improve print quality. While this adds to the overall complexity and difficulty in assembly, this allows for the most low profile and stealthy appearance when fully assembled and mounted to the water bottle's cap.
The compliant mechanism was selected for the counter because of its low part count and ability to replace a component if it breaks. An added bonus is that because the switches are their own part, they can easily be printed in their own color.
The binary counter was chosen as the counting device because with only two switches, the refill count can be easily updated and read while also having the ability to count to four, which, when used with the 21oz or 40oz bottles, is enough to keep track of your daily hydration.
Tags
Model origin
The author marked this model as their own original creation.


