Painter's Prism - A Rewarding 3D Print Challenge

Description
PDFPainter's pyramids, or tetrahedrons, are incredibly handy. However, when tasked with painting long, rectangular objects, managing three or more can be cumbersome. To streamline this process, I designed the Painter's Prism, which introduces minimal contact points along a line, ensuring stability and ease of use.
With just two prisms, a painted bar can be effortlessly elevated from the surface, aligning perfectly on a level plane.
My design of the Painter's Prism can be printed either horizontally or vertically without requiring supports. Additionally, I've designed a custom supporting rim for horizontal prints that addresses bed adhesion issues of the small contact points. This rim is optional and can be removed or customized as per your needs.
Printing this prism horizontally is a gratifying challenge, demanding a well-calibrated printer, quality filament, and some experience. Observing the print transform from tiny islands into its final form is truly rewarding.
While printing vertically is slightly less challenging, it's not recommended for longer prisms on printers with moving beds.
Printing the Prisms
In the file section, you'll find two PrusaSlicer example projects named Print Horizontal LR2374-L100-H050.3mf and Print Vertical LR2374-L100-H050.3mf. These projects include all my recommended settings for a seamless print. Use these as a starting point or refer to the table below for specific parameters:
| Parameter | Description |
|---|---|
| Orientation: | See instructions below |
| Nozzle Size: | 0.4mm or 0.6mm (0.8mm) |
| Layer Height: | See instructions below |
| Filament Materials: | PLA, PETG, etc. |
| Perimeters: | 3 |
| Elephant Foot Compensation: | Set to zero |
| Infill: | 0% for speed |
| Prusa Slicer Profile: | "Quality" or "Speed" |
Orientation
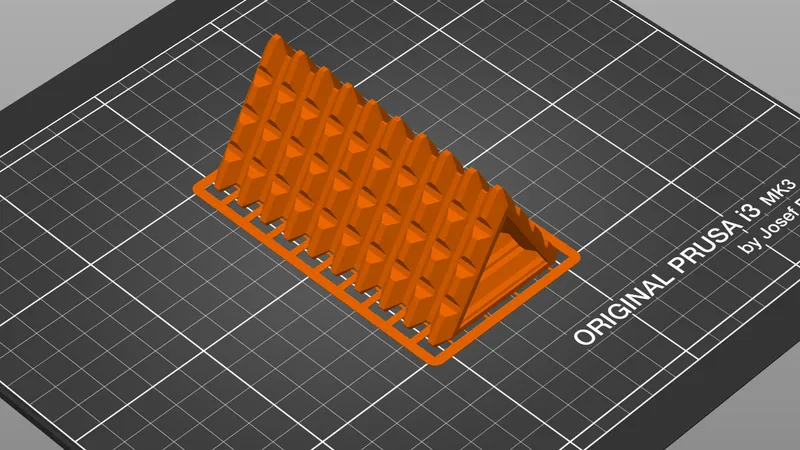
This prism can be printed either horizontally or vertically. For a horizontal print, position the object as shown in the following image:
For a vertical print, align the object as depicted in the next image and remove the supporting rim object from the print.

Challenges
Executing a horizontal print demands close observation, particularly during the initial layers where various issues may surface.
Firstly, it's essential to ensure that the first layer adheres perfectly to the printer bed, as demonstrated in the following photo. Any loose lines or raised edges at this stage will almost certainly result in a failed print.

The next challenge involves the first bridging operation that consolidates the small islands into bars. The type of filament used plays a role here: some filaments may cause the corners of these islands to warp upwards.
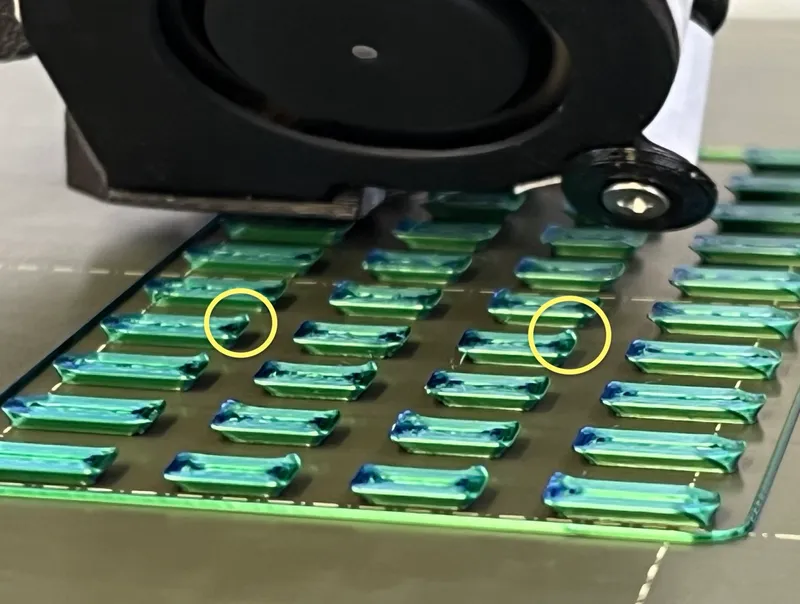
In instances where the object would continue at this angle, the issue typically resolves itself over time without causing any complications. However, in this case, a bridging operation commences and the raised edges risk being snagged by the printer nozzle, potentially tearing the fragment from the printer bed – exactly what happened to the print in the photo.
To mitigate this, I recommend using the supporting rim, which increases bed adhesion and ensures the fragments remain securely attached.
Nozzle Size
I tested the design with a 0.4mm nozzle and a 0.2mm layer height. However, it should also work with a 0.6mm nozzle at 0.2mm layer height. If using a different nozzle or layer height, ensure there are no gaps in the print.
Elephant Foot Compensation
For horizontal prints, it's crucial to set the "elephant foot compensation" to zero. The surface area on the printer bed is minimal, and the compensation would further reduce it.
Infill
Given the object's lack of large volumes, 0% infill should suffice. For added security, 15% infill can be used.
Dimensions
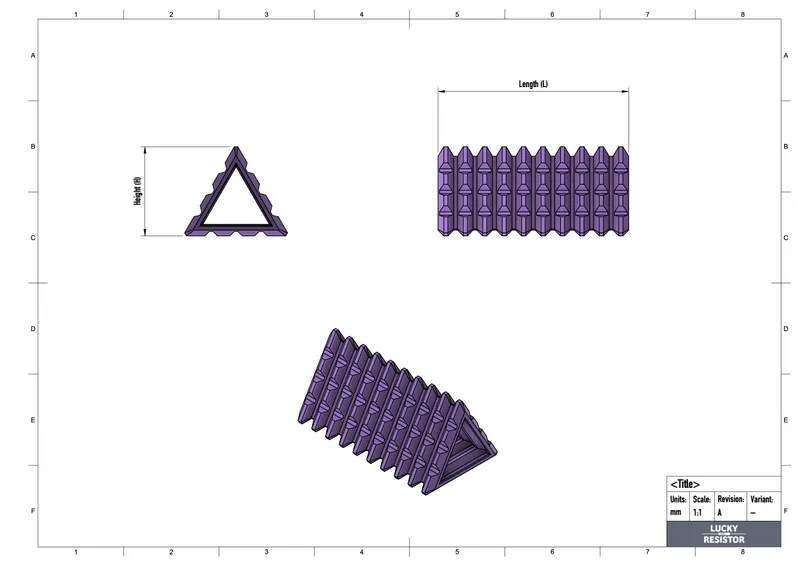
The filename format for the model files is LR2372-L<length>-H<height>.3mf, where <length> specifies the prism's length and <height> its height in millimeters.
About the Fusion 360 Design
The Fusion 360 design for this object is available in the file section, yet only suitable for experienced Fusion 360 users.
Two parameters, "length" and "height", can be adjusted. However, Fusion 360 lacks certain operations for a fully automated parametric design, so after adjusting the parameters, you have to step through the design history and fix all problems.
Explore More from Meti·kumi
Interested in my designs? Browse through my collection of 3D models:
👉 https://metikumi.com/3d-models/
Stay connected on social media for the latest updates and work-in-progress insights:
Conclusion
I've found the Painter's Prism to be incredibly useful in my own projects. If you find it beneficial too, I'd appreciate photos of your prints and feedback on this project.
Happy printing!
Tags
Model origin
The author marked this model as their own original creation.