Frosthaven display organizer and storage for overlay tiles

Description
PDFOverview
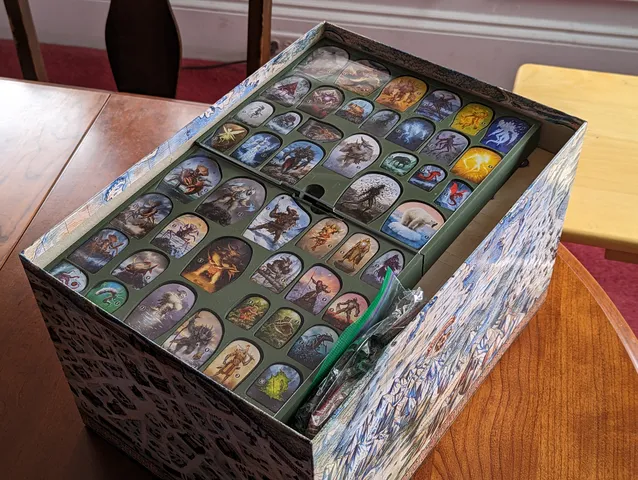
The model is meant for storage and organization of Frosthaven's overlay tiles. The organizer replaces one of the stock inserts that come in the box.
The value of the organizer is that each set of overlay tiles is displayed in its own well, and you can instantly lay hands on the ones you want. (The stock insert stores them in a way that makes it hard to find individual tiles, and many of the tiles are simply jumbled together loosely in a compartment.) To make it easy to remove tiles, each well has a finger hole; to take the tiles, just push up from underneath.
This model replaces one of the stock inserts one for one, and it uses the same clear plastic cover that the stock insert uses. The stock insert that is to be replaced holds overlay tiles in bins of various shapes and sizes, and then over the tiles is a till that holds the condition tokens, number and letter tokens, loot tokens, and the like. The till has a clear plastic cover, and then once the till is nested inside the insert, the whole thing has a larger plastic cover of its own.
You will continue to use the till and the overall cover, but you will replace the stock insert by a stack of three trays:
- The lower tray holds all the overlay tiles that come in groups of five or more.
- The middle tray holds only overlay tiles that come in groups of four or fewer.
- The upper tray holds only the stock till.
The three trays stack to form the same shape is the original insert, so that the original clear plastic cover fits over it all. The stack is 1.1mm higher than the original insert, so depending on how you pack your box, there may be a tiny amount of lid lift.
Slicing, printing, and postprocessing
I recommend slicing the bottom two trays with Lightning infill; I used the default 15%. Lightning infill will keep the weight and cost down, and there are plenty of interior walls that add stiffness. I sliced the top tray with 5% grid infill. That's just enough to put a bit of connection between the walls. (Lightning infill leaves those walls completely unconnected and I was afraid it would flex too much.)
The trays are too big to print in one piece on a MK3 or MK4. I include versions that I have sliced using PrusaSlicer, in case you want to just print. The connectors are sized to work decently well with Prusament PLA on my MK4. I also provide the whole models, as you may wish instead to cut them using connectors that you size to work well with your own printer. The cut pieces can be glued together with medium-viscosity CA glue.
The cut version of upper tray includes two narrow dowel connectors. The model includes pins, but the first layer tends to spread, and to get the pins to fit you will likely need to sand down the corners of the first layer. I got good results with an emery board.
If you do have to cut the models to fit your printer, you may be well advised to scale them down by 0.5% or even 1%. I printed them without scaling down, and the fit of the lid is rather tight.
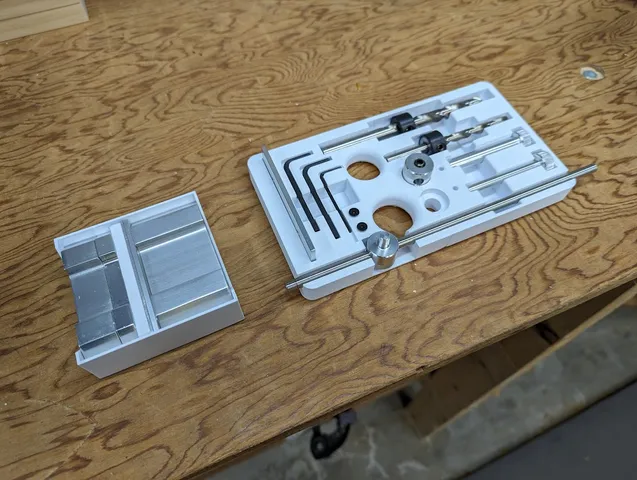
The models include features meant to keep the trays together while they are in the box. Each tray has three pockets each surface where it meets another tray. These pockets are sizes for 8mm×2mm magnets; the pocks are 8.2mm in diameter and 2.3mm deep. I affixed the magnets with CA glue. Three magnets on each tray are sufficient to hold things together. Some care is required to ensure that the magnets attract and do not repel one another (see below).
If you do decide to use magnets, the pockets on the top sides of the trays will come out clean, but on the middle and upper trays, you will probably have to clean out some random bits of filament—otherwise the magnets may not seat flush to the surface. Try a sharp hobby knife.
As an alternative to magnets, each pocket also has a smaller hole modeled in it, deeper than the magnet hold and 6mm in diameter. It ought to be possible to place pins in these holes and use the pins to align the trays. A web site recommended pins with an octagonal cross section inscribed in a 6mm circle, but I have not tried it.
Emplacing magnets
I worked with these small magnets from Amazon. To ensure they are all pointing in the same direction, I worked with a stack, placing a small plate at one end, then using the opposite end to insert into each tray. Once the magnets were glued into the tops, I then placed a second magnet atop each glued magnet, and marked the visible surface with an X. When those magnets are glued into the bottom pockets of the matching tray, the X's must not be visible. Just move the metal plate to the opposite end of the magnet stack, then add the loose magnets with the X's showing on the stack. Once the end of the stack is inserted into a pocket, the X will be properly hidden and the magnets will match.
Fitting the tiles into the organizer
Many of the overlay tiles look like they could fit into their tray in multiple orientations. Examples include Rubble, Debris, some traps, Water, Nest, and Pressure Plate. Only one orientation works. This Printable includes "Storage key" PDFs that show exactly how each tile must be oriented in order to fit into the organizer. Most of the tiles must be oriented exactly as shown in the key image, or they will not fit. (The hexagons and the large corridors are more forgiving.)
If you inspect a tile closely, you will see that it has two sides. The upper side is the side that the cutting tool came through, and you will see that it has slightly rounded edges where the cutting action has compressed the cardboard a little bit. On the bottom side, the edges are square. All the tiles must be inserted with the upper side up, with one exception: out of the five Nest tiles there is one that must be inserted with the bottom side up. Just make sure the orientation of the bones corresponds to the key picture, and you'll be fine.
Finally, there are two forms of sarcophagus, but they both fit into a single well. The closed sarcophagi go on the bottom and the open ones fit on top.
Organizer for monsters
If you like this model, you may also like my custom display storage for the Frosthaven monsters.
Tags
Model origin
The author marked this model as their own original creation.