Cooler Master QUBE 500 - Honeycomb Storage Wall Panels

Description
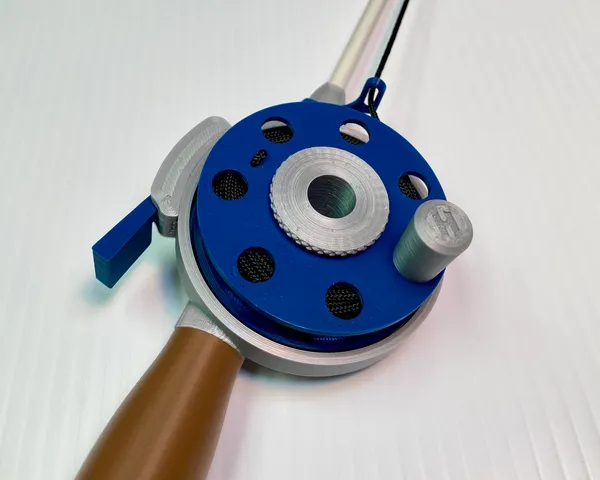
PDFYou like ‘em, you love ‘em, you’ve already printed a ton of ‘em and now they’re all compatible with your new Cooler Master QUBE 500 PC case! This design lets you use all of those Honeycomb Storage Wall hooks & holders that you’ve already printed (and some you haven’t yet) on the sides & top of your new QUBE 500 case!
Print Settings
All parts should be properly oriented & most are designed to be printed without supports. You will need to support the 90° tab overhang on the Front-Top Panel Mount A & Front-Top Panel Mount B parts. For best results, print using a 0.2mm layer height. I recommend using 40% infill, but you can experiment with other infill densities if you’d like.
Side Panel
Bill of Materials
For each side panel you will need:
4 M3x8 socket flat head screws
4 M3 hex nuts
If you don’t already have an assortment of fasteners, I recommend Bolt Depot.
You will also need to print:
1 x Honeycomb Side Panel.stl
4 x Eccentric Side Panel Mount.stl
4 x Insert-Countersunk.stl
4 x Cover-Countersunk.stl (optional)
NOTE — Insert-Countersunk & Cover-Countersunk are unchanged from RostaP’s original design, but have been re-uploaded here for convenience.
Assembly
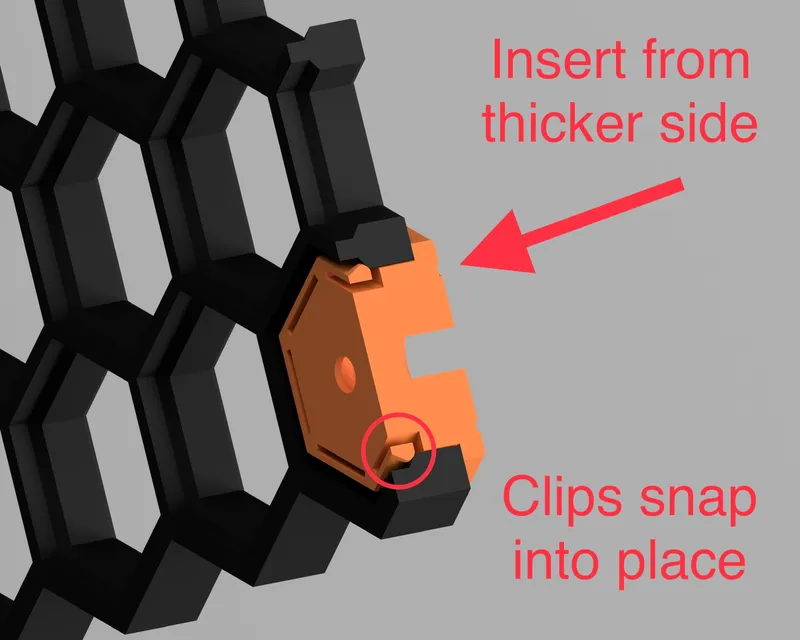
Start by inserting 1 Insert-Countersunk part into each of the 4 corners of the Honeycomb Side Panel. The Insert-Countersunk parts must be inserted from the thicker side of the honeycomb. They should snap into place & be held in place once inserted.
NOTE — See renders at the top of the page for honeycomb orientation & the location of the 4 Insert-Countersunk parts.
Insert an M3x8 socket flat head screw through the front of each Insert-Countersunk part &, using an M3 hex nut, attach 1 Eccentric Side Panel Mount to the back of each. Leave these slightly loose so that the Eccentric Side Panel Mounts can still rotate freely.
Due to the eccentric design of the Side Panel Mounts, as you rotate them, the mounting tabs that are inserted into the side of the QUBE 500 case will change relative to the central pivot (M3 screw). Rotate the Eccentric Side Panel Mounts at all 4 corners of the Honeycomb Side Panel until their mounting tabs line up with the corner holes on the side of the QUBE 500 case & snap them into place.
Tighten all 4 M3 screws, being careful not to over-tighten them & install the Cover-Countersunk parts if you chose to print them.
NOTE — I have also included an optional Center Side Panel Mount for added support. If you choose to print & use it, you will need an additional M3x8 socket flat head screw & M3 hex nut. It is installed the same way as the Eccentric Side Panel Mounts but doesn't need to be rotated since the M3 screw is inserted in the center of the part rather than being offset.
Front/Top Panels
Bill of Materials
For each front or top panel you will need:
4 M3x8 socket flat head screws
4 M3 hex nuts
If you don’t already have an assortment of fasteners, I recommend Bolt Depot.
You will also need to print:
1 x Honeycomb Front-Top Panel.stl
2 x Front-Top Panel Mount A.stl
2 x Front-Top Panel Mount B.stl
4 x Insert-Countersunk.stl
4 x Cover-Countersunk.stl (optional)
NOTE — Insert-Countersunk & Cover-Countersunk are unchanged from RostaP’s original design, but have been re-uploaded here for convenience.
Assembly
Start by inserting 1 Insert-Countersunk part into each of the 4 corners of the Honeycomb Front-Top Panel. The Insert-Countersunk parts must be inserted from the thicker side of the honeycomb. They should snap into place & be held in place once inserted.

NOTE — See renders at the top of the page for the location of the 4 Insert-Countersunk parts.
Using a small drop of glue, affix an M3 hex nut to the bottom of all 4 Front-Top Panel Mount parts. The printed hexagonal recess should be used as a guide. This can be made easier by using an M3 screw, threaded into the M3 hex nut from the other side, holding it in place while the glue sets. Be careful not to get any glue on the threads of the nut or helper screw.
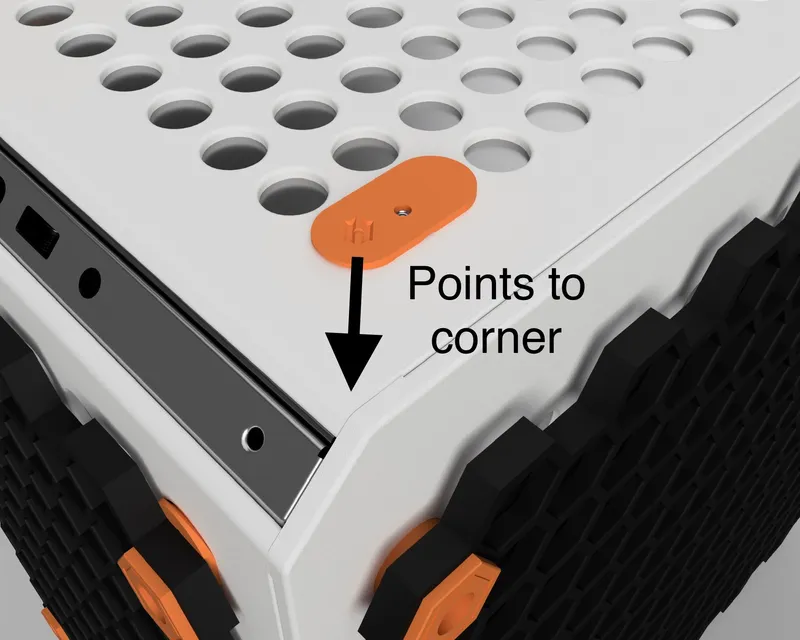
Insert the 4 prepared Front-Top Panel Mount parts into the 4 oblong holes in the corners of the front or top of the QUBE 500 case. The end with the H should be inserted first with the opposite end snapping into place second. For orientation purposes, the top of the H will always point to the corner it is being installed in.
Insert an M3x8 socket flat head screw through the front of each Insert-Countersunk part & into the M3 hex nuts glued to the bottom of each Front-Top Panel Mount. Tighten all 4 M3 screws, being careful not to over-tighten them & install the Cover-Countersunk parts if you chose to print them.
Alternate Assembly Option — For a glue-free installation, remove the front or top panel from the QUBE 500 PC case before installation. You will then have access to the M3 hex nuts during assembly & will not need glue to temporarily hold them in place. Reinstall the front or top panel once the honeycomb panel has been securely attached.
Value4Value
This design is being released under the Value4Value model. If you received any value from my work, please determine what it was worth to you & return that value to me in the form of a donation. Thank you for supporting my work!
“If I have seen further, it is by standing on the shoulders of Giants.” — Isaac Newton
This design was derived from the hugely popular Honeycomb Storage Wall by RostaP. The custom panels were designed in OpenSCAD using Customizable Honeycomb Storage Wall (OpenSCAD) by Xander. All other modeling was done in Fusion 360. A big thank you to Cooler Master for providing the Qube 500 - Full PC Case STEP Model and Design Guide & Qube 500 - Sample Holders files as a foundation on which to build.
Tags
Model origin
The author remixed this model.


Differences of the remix compared to the original
This design was derived from the hugely popular Honeycomb Storage Wall by RostaP. The custom panels were designed in OpenSCAD using Customizable Honeycomb Storage Wall (OpenSCAD) by Xander. All other modeling was done in Fusion 360. A big thank you to Cooler Master for providing the Qube 500 - Full PC Case STEP Model and Design Guide & Qube 500 - Sample Holders files as a foundation on which to build.