Dishwasher Indicator (Dirty/Clean)

Description
PDFDo you ever put the remains of your dinner into the dishwasher, only to realize (after the food drips down) that everything else in there was clean? Then this is the gadget for you!

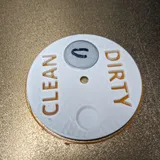
This is a sign to indicate whether a dishwasher is currently full of clean or dirty dishes. It contains three printed parts:
- A base, which is held to the dishwasher by two magnets.
- A “wheel" which is printed in two colors and contains a single magnet
- A “cap” to hold the wheel onto the base
The wheel can be used on it's own if you'd like to avoid having any non-printed parts except for the magnet. The non-printed parts for the full assembly are:
- One 4-40 screw with a length of ~3/8in (must be less than 0.44 in)
- One 4-40 screw insert (I used a McMaster 93365A120, but anything similar may work).
- Three 25mm diameter, 3mm thick magnets (I had spare)
It may be possible to use 3mm screw and inserts instead of 4-40 if you prefer the metric system or don't have the parts lying around.
Printing
In general I tried to size the dimensions to be reasonable for a 0.4mm line width and a 0.2mm layer height. I recommend printing on a steel plate or some sort, otherwise the magnets may pull out and stick to the nozzle.
I also recommend that you make sure that your printer supports the M0 (pause) and M600 (filament change) correctly, or if not that you verify that your slicer is inserting the correct gcode for pause and filament change for your printer.
Cap
Just print it with the wide base side down. You shouldn't need any supports or special modifications.
Base
This one requires a pause in the middle to insert two magnets. With a 0.2mm layer height it should be at layer 20. I've attached a 3MF file for Cura that should include the pause.
When inserting the magnets make sure that they are in the right direction or else the “wheel” won't be able to flip back and forth between two stable positions. This means that the “top” point of the magnets should be the same pole (i.e. they should repel each other).
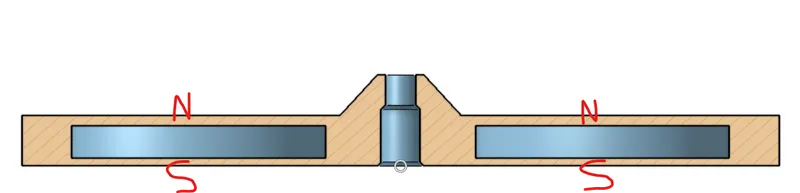
This should also not require any supports, as the magnets will provide all of the support needed in the pockets.
Wheel
This one requires a color change (assuming you want the letters to be high contrast) and a pause to insert a magnet. With a 0.2mm layer height the color change is at layer 6 and the pause should be at layer 21.
You need to make sure that the magnet here is in the same orientation as the ones on the base, otherwise the wheel will be repelled from the base. I made sure it was correct by sticking the magnet to one of the ones in the printed base and then marking the top side with a marker.

No supports should be needed for most materials. The magnet will be enough to support the large open cylinder, and the triangle at the bottom is ~45 degrees.
Assembly
The assembly process is:
- Heat-set the screw insert into the bottom of the base.

- Place a tiny drop of lubricant (mineral oil, triflow, etc.) on the conical section of the base. This is optional but helps keep things rotating smoothly.
- Place the wheel on top of the base.
- Place the cap on top of the assembly with the flat section facing upwards.
- Screw the whole assembly together.

Now pop it on your dishwasher and you're ready to go!
Making Modifications
Source CAD for reference: Onshape Source Document
If you want to change the magnet size, screw size, or anything similar, I tried to label the features with descriptive names. Feel free to remix to your heart's content!
Tags
Model origin
The author marked this model as their own original creation.


