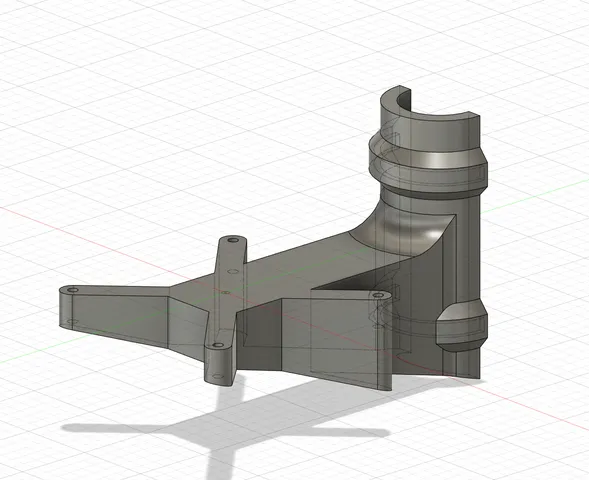
Captive Ping Pong Ball One-Way Valve for 50mm Pipe

Using a captive ping pong ball and correct orientation, this one way valve can prevent mild return pressure of fluids.
10
55
0
571
updated September 29, 2023
Description
PDFUpdate (v25)
- New version reduces likelihood of ball resonating by using vertical poles to reduce horizontal movement of the ball
- Arrows added to indicate which way the part must be oriented to operate (arrow pointing up)
- It must still be printed upside down (as downloaded, arrow pointing down)
- No more viewport
This design aimed to solve a problem where a 50mm PVC pipe oriented vertically delivered fresh air upward into an actively humidified environment. When positive fresh air pressure was not applied, the humidified air returned through the pipe causing condensation.
Features
- Alternative version also provided with no viewport
- Fits inside and in between two sections of 50mm PVC tubing.
- The captive ping pong ball rises when positive pressure is applied from below, and is limited from obstructing the top hold by a small cross bar (see design screenshot)
- When positive pressure ceases, gravity causes the ping pong ball to drop into the bottom of the sphere, preventing backward propagation of airflow and humidity
- Incorporates a viewport, where it is envisaged one could use some clear PET (coke bottle) glued into place over external sphere to provide inspection capability
- The seal created by this design is about 99% effective, but it is not recommended to use this design for mission critical or high pressure applications.
Printing
- Part oriented with cross bar at the bottom
- 100% infill via large vertical wall count
- Arachne
- Organic supports for anything beyond 40° to capture
- Cross bar
- Top of opening
Captive Ball
- Cross bar is at about 29.05mm height
- Ping pong ball is (usually) 40mm tall
- Recommend adding pause command to your sliced GCODE at about 65mm height
- Nozzle clearance accounts for 2mm
- Ball resting with bottom slightly below cross bar height accounts for about 2mm
- Place the ping pong ball inside the sphere and check clearance
- Resume printing
If you are not prepared to do this, you can always slice the model in half and glue it together once printed. If you do this, I recommend adding some connectors between sliced parts such as the frustrum connectors in PrusaSlicer, about 2mm width.
Post-Processing
- Remove the organic supports
- (If printed in parts, glue together)
- Cut out a piece of clear plastic, such as coke bottle PET
- Use silicone sealant or other flexible glue to adhere the clear plastic to the exterior of the viewport
I have attached the Fusion 360 file should you wish to remix this design.
Model origin
The author marked this model as their own original creation.