Gears of War Gnasher
Description
PDFDecided to design the Gears of War Gnasher in a printable form as a personal challenge
No Glue required for assembly, only screws and nuts
Trigger has two pins, one for the trigger itself, one for a rubber band to be slung around to for some slight "force feedback"
Trigger and Rubber Pins are designed with one end tapering to a point slightly more than the other so when they're pulled by the rubber band and stand at an angle, there's still some possibility to assemble (though some guidance with a plier or rod might be required).
The less pointy part should be inserted first as it wobbles less
other material required for assembly:
1 M5 Screw no longer than 15mm
13 M3 Screws at least 20mm long
2 M3 Screws 16 to 18mm long (holes are 18mm deep but I used 16mm ones)
9 M3 Screws 10mm long
12 M3 Nuts
1 or 2 M10 screws, depending on the length of the screws (if it's longer than 80mm threading, one, if it's shorter, two.)
1 or 2 M10 Nuts, depending on the Number of Screws
Print Settings
Printer Brand:
Prusa
Printer:
I3 MK3S
Rafts:
Doesn't Matter
Supports:
Yes
Resolution:
200
Infill:
20
Filament: purefil PETG
After painting it

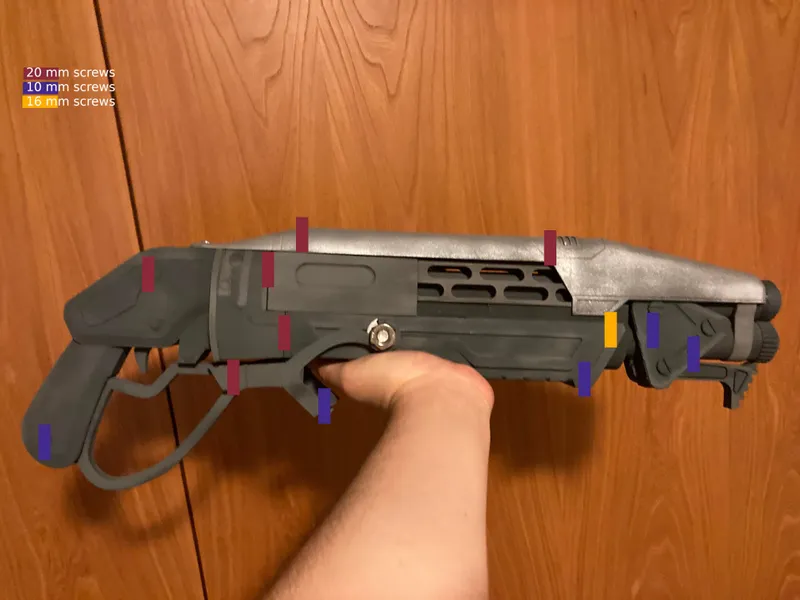
Screw locations and lengths ===========================
The locations of each screw and their lengths ( I hope the M10 is obvious enough by itself)

The M5 screw is used to screw the top cover onto the pistol grip, I didn't specially mark it but it's in the upper left corner between the three 20mm screws
Category: Props
Tags
Model origin
The author marked this model as their own original creation. Imported from Thingiverse.
