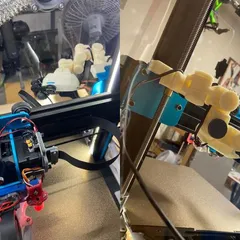
Phecda Endstop / Limit Switch Helpers
Description
PDFDisclaimer: These are provided as is, you tinkering with your machine is your business and is no fault of mine.
Note: This only works if you have the Genmitsu (or clone) limit switch. I had these left over after a 3018 repair so if you have them, congrats. If you use these limit switches validate Power/Signal/Ground, I had to flip my wires to make them work.
Elegoo Phecda laser does not come with limit switches/endstops so after looking a long long time at the frame for some suitable thoughts I tinkered and found my solution.
Two parts. One will go in the front right connected to your frame (for Y). The other will go underneath the gantry on your right mounted through some m3 holes (for X).
The Y piece slips right through the gap of the top of the frame and the motherboard. You can secure it with one m3 screw through an available hole. If you have put your stickers on, its hiding it.
The X piece-- the gantry has two m3 holes on the bottom right side. I took these over as my mount location. It should slip in front of and behind those holes and and 2 m3's will secure it.
You may have to fiddle or press hard to get the m3's to bite into the plastic pieces but once they do they seem to form a very good connection and after a few days of use I don't see any issue.
Print recommendations: None, whatever you have on hand as long as it can do a decent bridge. Unless your laser catches fire PLA will probably suffice. YMMV.
I didn't waste any resources doing F3D for these since they seemed simple enough to just slam in tinkercad:
X Endstop: https://www.tinkercad.com/things/fpMKID6rYDH
Y Endstop: https://www.tinkercad.com/things/aOS3BSyYSYn
Modify to suit your needs and share your work.
update1: Endstop X - 42mm // You may want to have the X stop a little bit farther out. I have ruled out my edge case and realized its the Y endstop w/o the protective acrylic sometimes doesn't tap right. YMMV. I'll make the Y a little bulkier in the future but something as small as a piece of tape on the gantry has made the issue moot for me.
update2: Making this all work took some talking to Lightburn folks: https://forum.lightburnsoftware.com/t/work-offset-issue/108289/
The issue is Elegoo does something weird with their grbl compile at this time. And none of us are wanting to dig in and figure it out. Behaviors get real weird with jogging as you can read about.
How to set this up to work-- care of berainlb:
- $RST=# will remove any work offset
- $3=6 will invert direction of X
- $23=3 will invert homing direction of X to accommodate change in X
- $10=1 will have controller report machine position
- In LightBurn, go to Edit->Device Settings and change Origin position to bottom-right
- Re-Home
At this point Set Pointer with UX will work. Jog buttons both on NumPad keypads and in the Application should work.
The machine is now working under the auspice that 0X,0Y is BOTTOM-RIGHT 400,0 will be BOTTOM-LEFT. It really shouldn't matter unless you drive numerically.
Hope this helps!
Addendum
This method was one of the first made to address a problem with a solution I had on hand. It is not the end all be all solution. I'll link others solutions here as I find them or talk to people.
Driest
- X Axis Cable Chain – makerworld/nl/models/30817#profileId-27381
- Y Axis Cable Chain -- makerworld/nl/models/30797#profileId-27359
- Limit Switches -- makerworld/nl/models/29345#profileId-25787
Tags
Model origin
The author marked this model as their own original creation.


