Scrubbing Head for Power Drill

Description
PDFWhat
This is a cone shaped scrubbing adaptor for use with a power drill and a scouring pad.
Why
I am lazy and decided I needed a scouring pad to clean a surface. I figured I could make an adaptor that I could fix a scouring pad too that I could then drive with a cordless power drill.
The cone has a rounded surface so you can vary the angle/area of the scouring pad in contact with the surface being cleaned.
The cone/scouring pad mating surface has geometric gripping patterns in it so you can use an adhesive to glue the scouring pad securely to the cone.
The bolt being used as the shaft is recessed and set back from the scouring surface and supported.
The cone geometry has a density modifier to improve internal strength and rigidity.
How
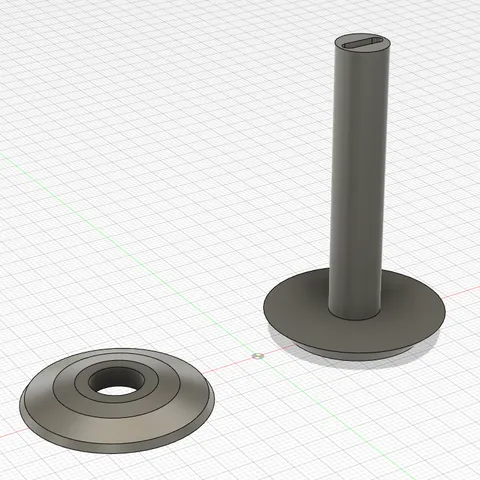
- The model comes in 9 parts
The main cone split into 2 halves with 6 fitting dowels (for ease of printing) and an end cap to cover the bolt you need to pass though the adaptor to drive it with a drill. - You will need an 65mm M8 Stainless Steel (SS) 316 bolt (25mm threaded length), 2x M8 SS316 washers, 2x M10 SS316 washers.
- Strong thick adhesive suitable for use on wet areas.
- Scouring pad at least 100mm at it narrowest and at least 5mm thick.
- A cordless power drill with a 10mm chuck with variable speed and torque.
Which do I print?
- The gcode has been created with PrusaSlicer 2.6, however it should print ok on any firmware version.
- The project file contains all the parts and the included density modifier geometry.
- The raw model files are included also.
Process & Assembly
- Print the end cap and dowels, remove any support material and put them to one side.
- Print the main cone (it's in two halves), remove any support material and put to one side.
- Put a drop (or 3) of super glue into the dowel holes on one half of the cone and fit the dowels as far in as possible.
- Align the cone halves (the dowels are not regularly spaced) to confirm the orientation.
- Put a drop (or 3) of super glue into the dowel holes on the other half of the cone and spread super glue over the flat mating surface where the halves will touch.
- Press the cone halves together firmly until there is not gap between the halves.
- Take your 65mm M8 bolt and place one of the M8, then M10 washers over it. Feed this up through the cone from the bottom up (the threaded portion needs to stick out the top of the cone)
- With your finger holding the bolt and washers against the flat bearing surface, place the M10, then M8 washer over the threaded portion of the bolt.
- Place and tighten the nut finger tight, then tighten using a crescent. Do not over tighten!, you just want the bolt to be secure and provide a good compressive grip on the cone so it doesn't slip when the bolt is being driven by a power drill. (Note: you could also use a nylock nut if you wish)
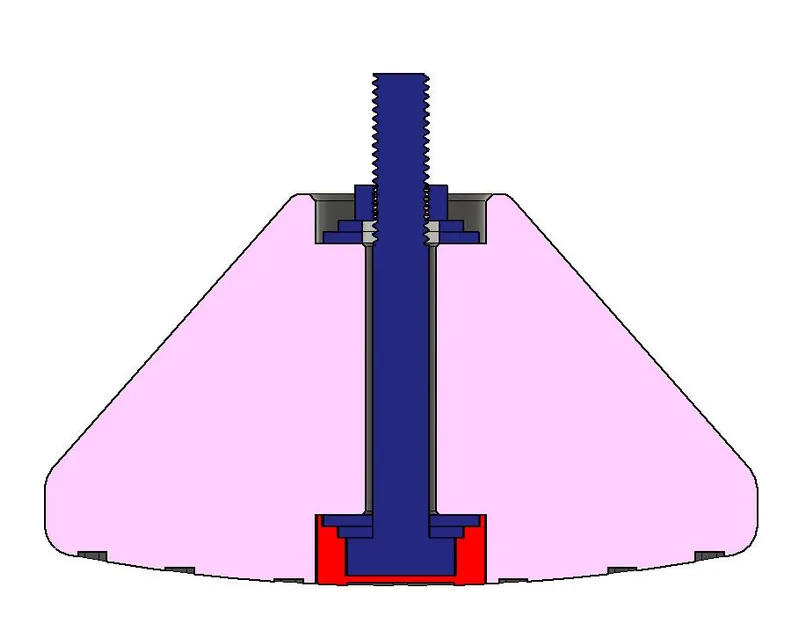
Cross section showing cone (pink), bolt, washers (dark blue) and end cap (red) - Place the cone surface against your scouring pad and use a marker pen to trace out the end of the cone. Using tough shears, cut the scouring pad into a circular shape to match the cone surface.
- Flip the cone over and fit the cap over the bolt head so it sits flush with the bottom of the cone.
- Place a generous blob of adhesive on each divot on the bottom of the cone surface and on the cap cross.
- Position and press the scouring pad you cut out earlier onto the cone. Weight the cone and pad while the glue cures. Wait for the glue to cure!
- Using a cordless power drill with a 10mm chuck, put the free end of the bolt into the chuck and tighten it. Set the drill torque to a soft value e.g. if your drill has a torque setting of 1-10 with 10 being “drill”, set it to 2 or 3 first.
- Use the scrubber cone with cleaning liquid to scrub the target surface. if the cone stalls without catching, either don't press as much or increase the torque setting.
- Do not use the cone on torque = drill as you may damage the surface you are cleaning if the cone if it catches on something.
Cautions:
- Use this only if you are confident in using power tools.
- You use this model at your own risk.
- Always use eye protection.
- Do not wear loose clothing that could be entangled around the chuck while in operation.
- Do not use the cone with an angle grinder or other high rpm device.
As the cone is 3D printed it will not be statically or dynamically balanced and will rupture and send fragments flying due to uneven centripetal forces at high speed.
Tags
Model origin
The author marked this model as their own original creation.