Modular Tool Rail System

Description
PDFThis is modular rail system that allows you to organize small tools for easy access. Tool holders of various types slide into the rail. Choose which holders you want based on your tool needs. I have four of these sprinkled around at various workstations and I choose the tool holders based on what tools I need most in that area.
- Update 2022-08-28: Added a holder for a single set of hex keys - the other variants are for two sets. This is an external model. The link is provided below.
- Update 2022-07-07: Added a Nozzle Holder for up to 9 E3D V6 style nozzles
- Update 2022-06-14:
- Update 2021-03-11: Link added to compatible parts by coaster36
- Update 2020-07-29: Link added to a compatible oil bottle holder
- Update 2020-06-13: I added an endcap for the rail
- Update 2020-03-20: I added a holder for a deburring tool. See the table below.
Mounting the rail system
The rail that can be attached using screws through the provided holes to a wall, cabinet, or other surface. You could also use adhesives depending on how permanent you want it to be. I found at least one case where I wanted to mount the unit to a tube (a metal table leg), so I also made a tubular mounting system. There are many variations that could be needed for that including the diameter of the tube and how far the mount should protrude. I provided the STL that I used, but you will probably need to go into the model and change parameters to suite your need.
The Components
| Category | Name | Description |
| Rail | The rail itself. Choose the length that suits your needs. | |
| Rail-200mm.stl | 200mm Rail | |
| Rail-240mm.stl | … | |
| Rail-280mm.stl | … | |
| Rail-320mm.stl | … | |
| Endcap.stl | Afix to the end of the rail to keep the holders from sliding out. | |
| Holders | Print the ones that are useful to you | |
| Caliper Holder.stl | Holds inexpensive digital calipers such as these. | |
| Driver Holder.stl | Holds a set of 4 Hex Key drivers such as these | |
| Hex Key Holder | Holds a sets of 5 small metric hex keys (like those you might get with a 3d printer). Please download the model here. | |
| Double Hex Key Integrated.stl | Holds two sets of small metric hex keys (like those you might get with a 3d printer). This gives the same result as the magnetic hex key holder referenced below, but is a single pieces and does not detach magnetically. | |
| Magnetic Base.stl | Provides a base for my magnetic hex key holder. To use this, glue metal washers, or some other ferrous material, into the recess. The magnet on the hex key holder will attach to it. See pictures. | |
| Multi Plier.stl | Holds multiple pliers such as needle nose, wire cutters, etc. | |
| Pencil Cup.stl | Holds pencils, pens, and other small items. | |
| TwoPieceCup.stl, TwoPieceCupAttachment.stl | The same pencil cup as above, but printable in 2 parts which are connected with m3 flathead screws (or glue). | |
| BigPencilCup.stl, BigPencilCupAttachment | A larger version of the pencil cup. Prints in two parts which are connected with m3 flathead screws (or glue). | |
| Single Plier Holder.stl | Holds one larger pliers | |
| Spatula Holder.stl | Holds the sort of small spatula that comes with many 3D Printers | |
| Tweezers Holder.stl | Holds one or 2 tweezers | |
| Deburring Tool Holder.stl | Holds a deburring tool such as this one | |
| Tool Tray.stl Tool Tray Attachment.stl | A 140x63 tray to hold miscellaneous items. This prints in two parts which are connected with m3 flathead screws (or glue) | |
| Nozzle Holder.stl | Holds up to 9 E3D V6 style nozzles. | |
| Compatible Designs | ||
| Oil Bottle Holder | A compatible design by @guidomz | |
| Hex Driver Set | A compatible design by @coaster36 | |
| Solder sucker snap mount | A compatible design by @coaster36 | |
| Caliper mount | A compatible design by @coaster36 | |
| Loupe Holder | A compatible design by @TickTock | |
| AFA Deburring Tool Holder | A compatible design by @mortif65 | |
| Glue Stick Holder | A compatible design by liouma | |
| 56cm Rail in 2 parts | A compatible design by liouma | |
| Tape Hanger | A compatible design by asadchaq | |
| Tube Clamp | Optional: Use to mount the rail system to a tube. Two parts that clamp together around a tube such as a table leg. | |
| Rear Hub.stl | ||
| Front Plate-200.stl | Use with the 200mm rail | |
| Front Plate-240.stl | … | |
| Front Plate-280.stl | … | |
| Front Plate-320.stl | … |
Customization and the Model
I have provided a Fusion 360 file with the rail, all the holders, the tube clamp, and various sketches to use as the basis for new components. You can easily add new holders using the components and sketches provided. Also, check the User Parameters (Modify -> Change Parameters) to easily update key settings like the length of the rail.
If you create new components, please let me know and I will link them from here so others can find all the holders that work with this system.
Note: there is a component in the model named "Dovetail Attachment". I provided that s a jumping-off point for holders that you want to be removable, but not mount with magnets. It uses a dovetail mounting system that allows the holder to slide up and off the rail.
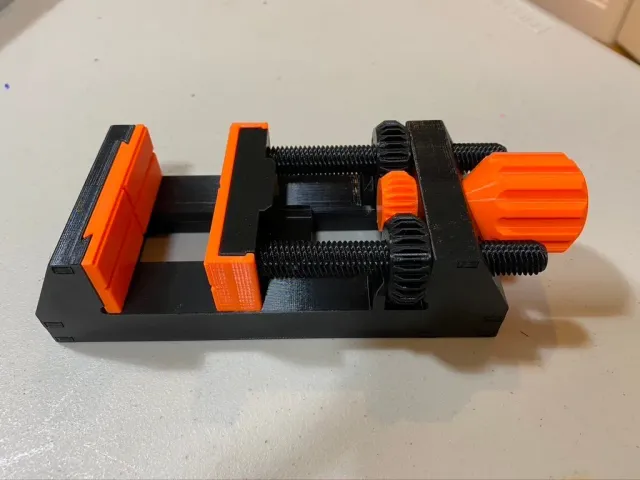
Related: If you are using this tool holder, you may be interested in this vise. The original design is really cool and I remixed it to open/close quickly using multi-start threads.
A big thank you to LAY3RWORKS for the design which was the inspiration for this model.
Print Settings
- Printer Brand: Prusa
- Printer: I3 MK3S
- Rafts: No
- Supports: No
- Resolution: 0.2mm
- Infill: 20%
- Filament: Generic PLA
Assembly
Print a rail of the desired length and the holders that you want to go with it. Note that if you want a longer rail than your print bed can accommodate, just print multiple smaller rails and abut them. Or, go back into the F360 model and adjust the RailLength parameter to get any rail size you'd like.
No supports are required for any of the components. They may need to be reoriented when you place them in your slicer to ensure the proper orientation.
If you are printing endcaps and plan to use the screw holes, you should mirror one copy of the endcap in your slicer so the screw holes are both on the top (or both on the bottom).
Once printed, mount the rail to a wall, cabinet or other surface using the provided screw holes or adhesive.
If you are using the endcaps, you can either hold them on using:
- A pressure fit
- Adhesive if you went them to be permanent.
- There is a 3mm screw hole on top. You can use an m3x4mm screw to cinch them into place, or put the cap on and using it as a guide to drill an m3 hole in the top of the rail. Then the screw will attach more affirmatively.
If you are using the tube clamp, you will most likely need to go back into the source model and adjust the relevant parameters to get the size you want:
- Diameter
- AroundDiameter
- Extension
Tags
Model origin
The author marked this model as their own original creation. Imported from Thingiverse.