Aqara Modified Sensors (external trigger, limitswitch) v1
Description
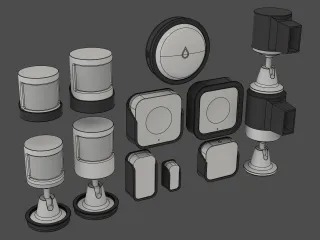
PDFThese are two custom bodies for the Aqara door sensor PCB (for home automation). One that enables the use of external triggers like limitswitches, buttons, wires, and anything that makes a connection really.
The other one has a built-in common limitswitch. Can be used similarly to the magnet, but with faster and more precise action. I use this on my fridge to notify me if the door is open too long. The magnet trigger distance is too sloppy to be reliable for small door gaps.
- All parts are printed solid. 0.2mm minimum.
- The default reed switch can remain in place to give dual use triggers.
- Wires are soldered on top of the reed switch leads, or it can be removed.
- The small notches in the side of the frame is for the wires.
- With the built-in limitswitch, wires should face away from the PCB (no space on top).
There is space for a 2-wire Dupont connector inside the frame that uses 26awg wires which goes to the same connection pads that the standard reed switch uses. This connector needs to be glued to the PCB. There are small unused test pads on the PCB that you can connect wires to that connects to the same reed pads, but they are very close together so they can short-circuit from moisture, which can give you false triggers. If you expect moisture I would put a conformal coating on both sides of the PCB to prevent the small pads from connecting. This was a problem on my mailbox for a while, which gave me a shit ton of false triggers. Fixed by using the reed switch pads.
- Instead of the Dupont connector, you could just use wires in the hole.
- It's possible to use one sensor to monitor many items by combining switches in parallel, like if you had a cabinet with many drawers, and you wanted to monitor that…
I use the Dupont one for my mailbox. Because it's metal the signal would be reduced if the standard sensor is placed inside, so I mounted this custom one under it instead and used long wires that goes to a limitswitch inside. When the lid is lifted, the switch triggers as if a door was opened. A limitswitch takes up much less room and is easier to hide (although you might want to talk to your local mail service before you stick wires and trigger-looking devices in your mailbox..)
The 2mm hole in the front of the frame is for the sensor's LED. You can take some clear filament and stick it through the hole and then cut it with some flush cutters. This will act as a light-pipe for the LED (works well). Can probably put some tape on the front and squeeze some superglue into the hole from the back too, which will harden into acrylic for the same purpose.
The two body halves needs to be glued together. To change the battery you can use some light glue so it's possible to pry apart when the time comes to change it (supposed to have a 2 year battery on them, so not often). The parts are also kept together by the wall mount, if you're fine with that.
Wall mount does not work with the standard Aqara sensor, as mine is less thick, but the mount does look similar to the one I made for the standard sensor.
The smallest file is the button presser that sits in the body so you can pair the sensor without opening it to push the PCB's button. Might need some scaling to avoid jamming. Prints with the small tip up.
Tags
Model origin
The author marked this model as their own original creation.


