PVC Pipe Shelf - brackets, feet, top caps, marking jig
Description
PDFPURPOSE
I wanted some small shelves, partly because of the space available on top of my utility table. I also wanted to go small in order to validate the concept before I got too far into it.
DESCRIPTION OF DESIGN
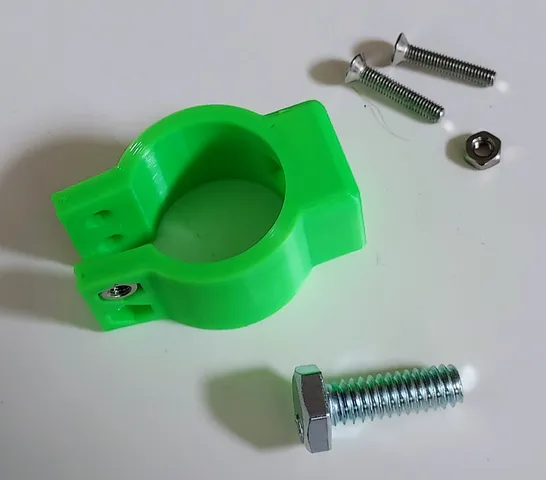
The main part designed is the bracket, which goes under the wood shelf (boards or plywood). There are small holes for mounting screws (#6 or #8), but these screws are only to keep the shelf from sliding around - the weight is carried by the bracket clamped firmly to the vertical PVC pipe. I used ¾ inch pipe, with an outside diameter of about 1 inch. It is secured with a ¼ inch bolt and nut (Q20 for short). There is a recess for a quarter-inch “captured nut” on the inside, and I chose to use regular hex bolts inserted from the outside. I did make a square recess on the outside, in case you prefer to use carriage bolts for a smoother look and feel. In that case, put a washer on the inside before placing the nut. In my experience, either of these arrangements will be plenty to stop the clamp from slipping down the pipe.
I know there are designs which have holes cut in the wood, so the pipes fit straight through the shelves. However, I just didn't think I could measure and cut the holes accurately enough, and wanted to design something I could actually build and use, even given my limited tools and skills. So I just cut off a small diagonal corner from the boards.
ALIGNING AND ATTACHING BRACKETS
All the boards were prepared, sanded, corners cut off, and the brackets attached, BEFORE attaching the PVC pipes (see photo of 3 boards with their brackets). So, the brackets kind of needed to be in the right place. If you're good at this kind of measuring, cool. Place the brackets, mark the spots for the #6 wood screws. For myself, I felt better with this marking jig. It has holes in the same exact place as the bracket, but with little “rails” which extend down so I could use the side edge of the wood as a guide to make sure I marked the holes consistently. This worked very well, for me.
PRINTING THE PARTS
All the parts fit on my Prusa Mini+. However, I printed them separately since I needed 12 brackets, 4 top caps, 4 feet, and 1 marking jig. I used PETG, but PLA should work fine. My 35% infill was probably overkill. Use 4 or 5 perimeters for strength.
Most of the parts print on an obvious big, flat side. (The marking jig may be upside down; not sure how to fix that in my upload, but I'll look into it.)
With this orientation, I printed everything without supports. The one oddity I found was for the feet caps. I have a very slight indentation on the bottom of the foot, where I hot glue a thin slice of natural cork. You have to slice the cork (and drink the wine, of course), but I find it works very well. Anyway, I tried printing the foot with support turned on, and turned off. Either way, it didn't matter. It looked the same. The little bit of strings that fall down looked just like the little support bits, and both take the same effort to clean up: not much. So it's your choice. Also, there are other PVC top caps, end caps, and feet on Printables, so consider those too, or design one from scratch.
Enjoy! Comments and questions appreciated.
Tags
Model origin
The author marked this model as their own original creation.