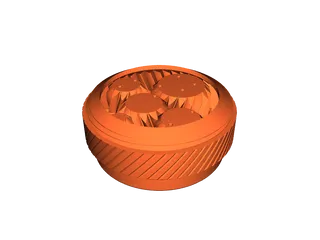
Umikot (58mm Version) - Planetary Gear Spirograph Espresso WDT Tool

Description
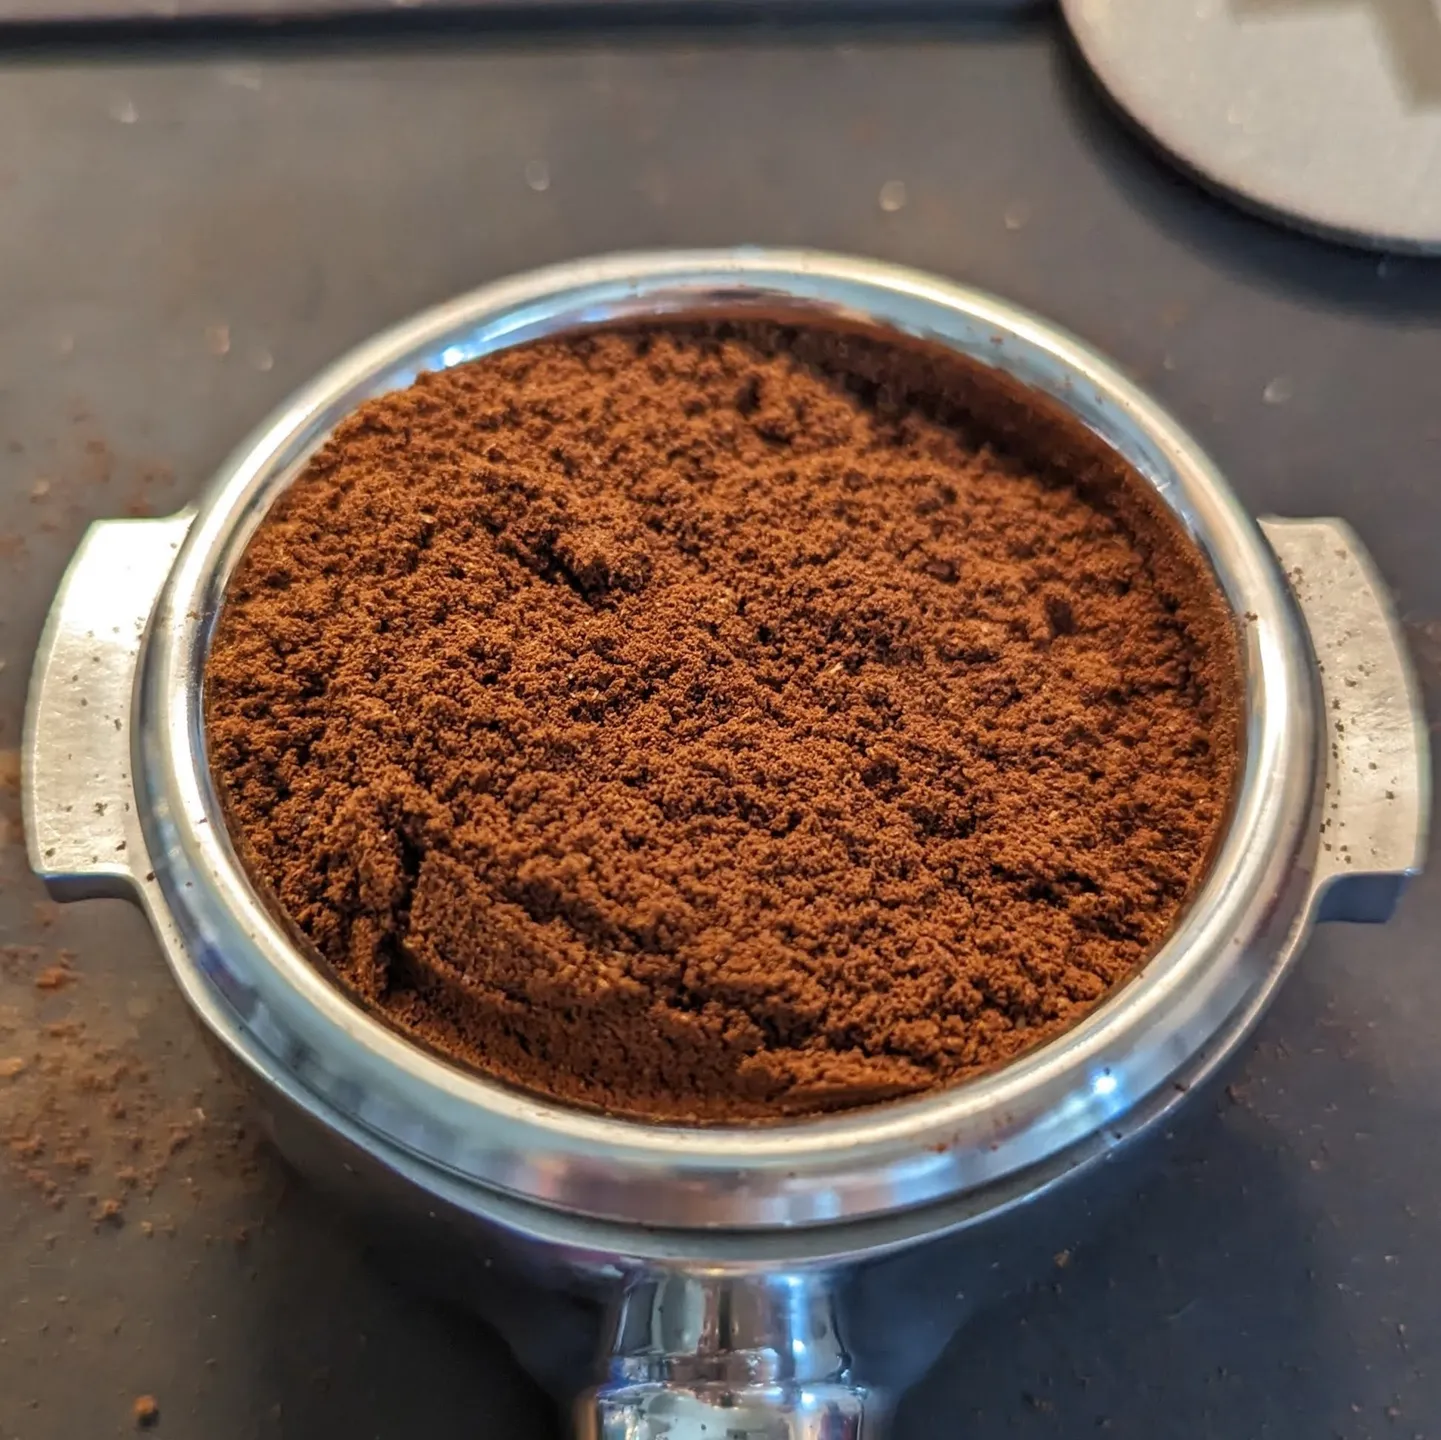
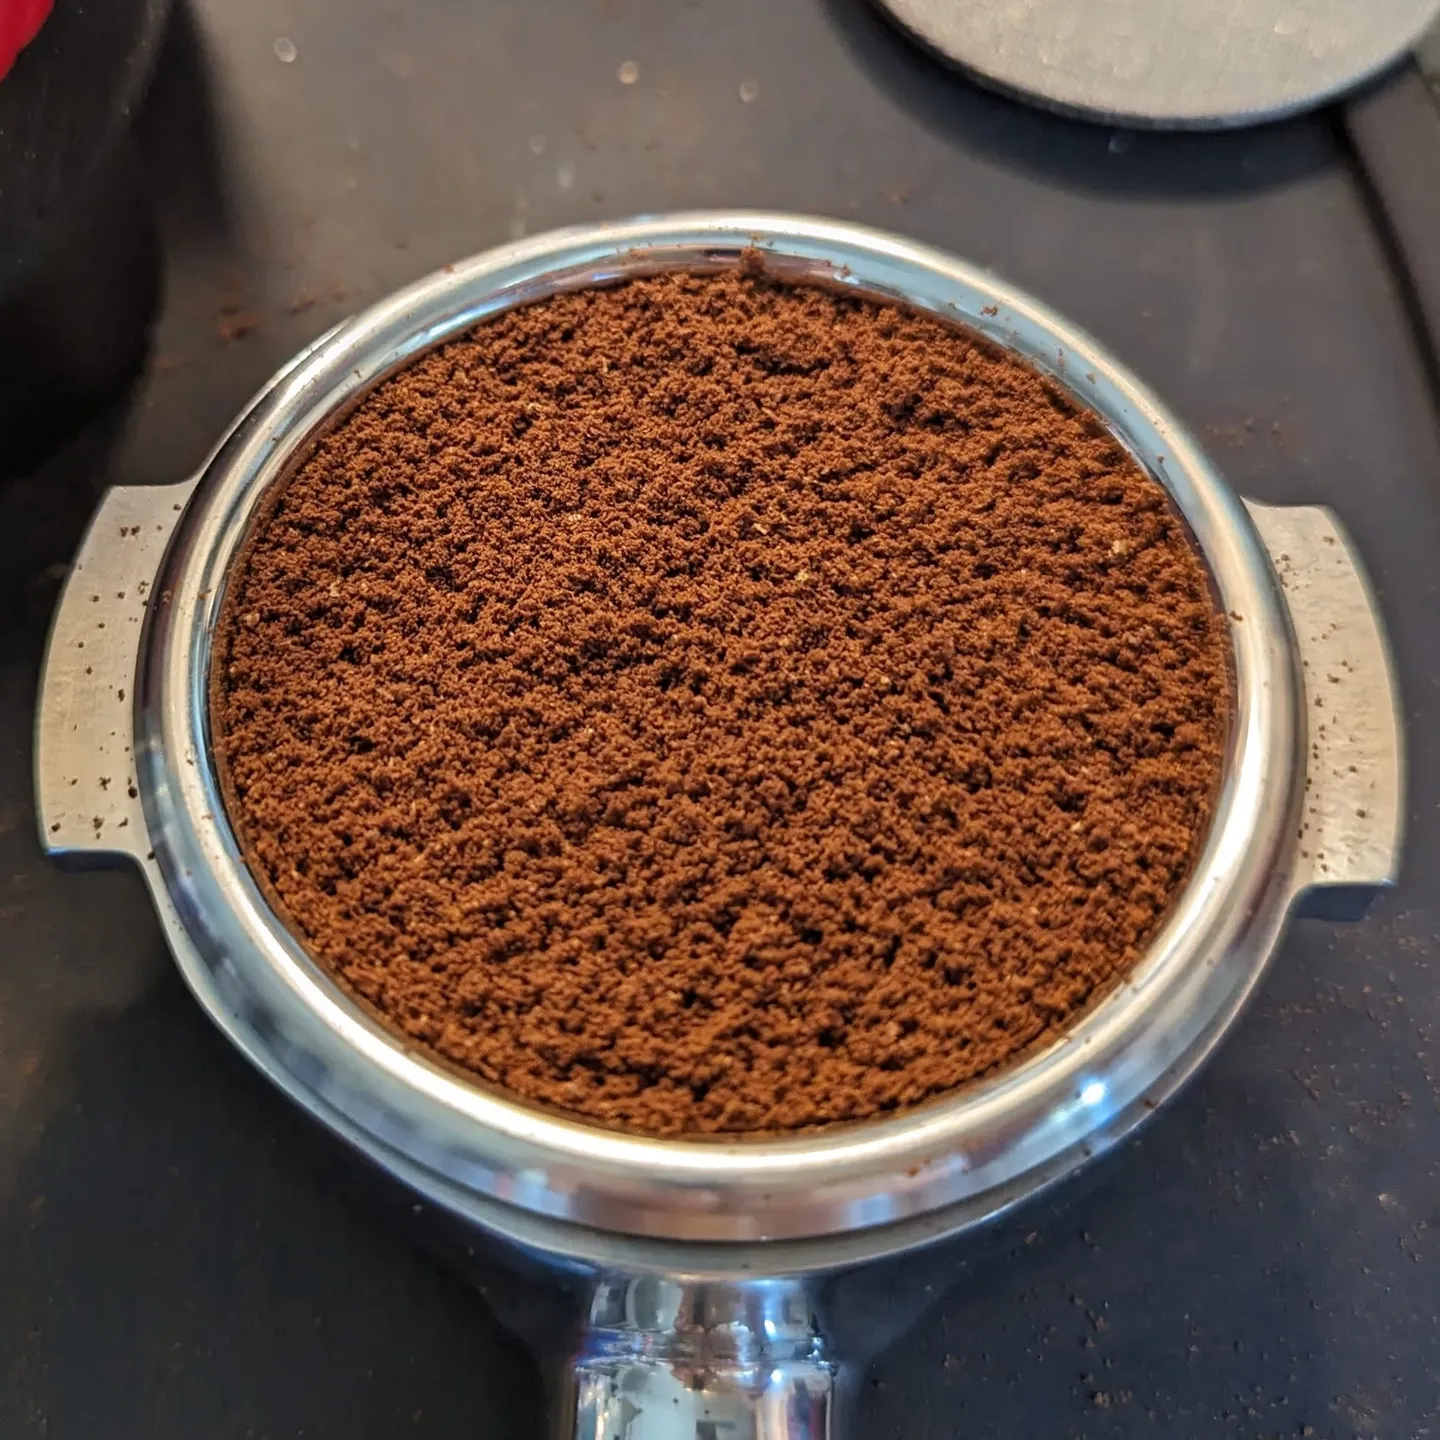
PDFWDT is an art. Its chaotic nature takes skill to master consistently.
Umikot is a Tagalog word which means: to spin; to turn around; to revolve; to rotate; to circle; to go around; to swirl; to gyrate.
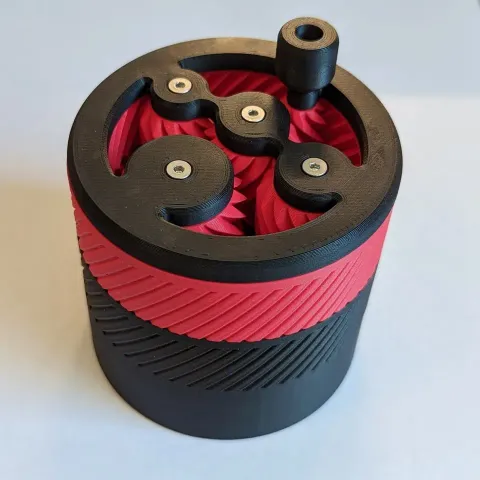
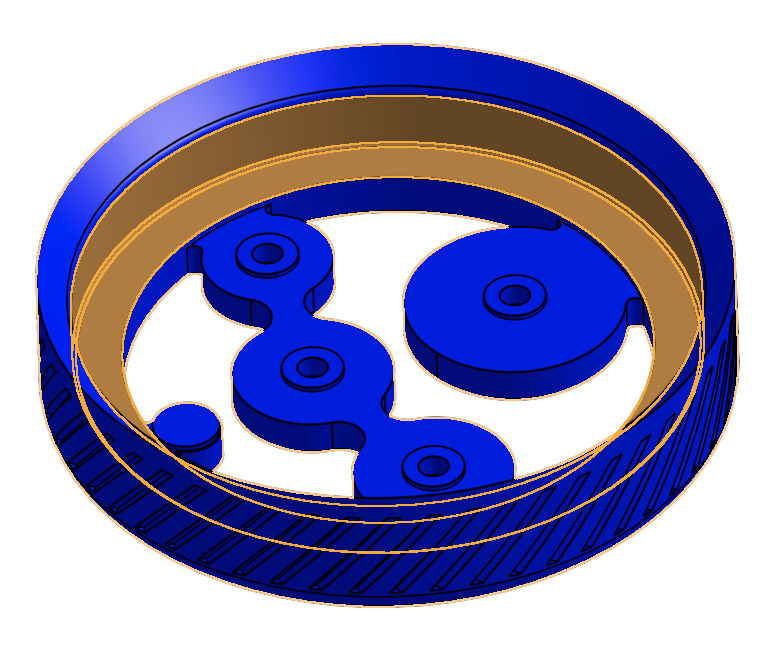
In that spirit, this 3D printable tool utilizes a print-in-place planetary gear mechanism to create spirographic needle motion. This is the 58mm version. Looking for the 54mm version? See here.
Like what I'm doing and want to share the love? Buy me a coffee – any donation is much appreciated (paypal.me/vjapolitzer) 😊
This design is provided to you for free under a Creative Commons CC-BY-NC-SA license. Make and enjoy, but do not sell.
Check out the latest and greatest version featured by Brian Quan:
OnShape Sources
Make it your own! Custom needle depth, tweak tolerances, or remix! Easily export STLs and STEPs. Check out the open source design on OnShape. (Note: when exporting STLs, make sure you select Units→Millimeter and Resolution→Fine.)
58mm workspace
58mm S (Short) workspace
Changelog
UPDATE February 3 2024:
- V2.1: Thicken the stationary needle post for easier printing
UPDATE September 2 2023:
- V2 release! New for V2:
- Maximum coverage for needle pattern (due to this change, V2 is all new and not backwards compatible with previous release candidates, nor V1.7)
- Stationary edge-needle - one needle has been repurposed to a perimeter sweeping role. This reduces hotspotting in the center and improves distribution at the edges
- Needles insert from below - easier replacement with less disassembly
LongTabversion - better needle protection and easy to use. Also,ShortTabandNoTabversions to support tamping stands. Magnets only available forNoTabversion, but if you really want magnets, that can be easily generated on OnShape.- Improved basket lip interface
- Shorter threaded portion on the base - faster to print and faster to swap
- Optional 58mm~S~ (short) upper parts for needles with shorter, 20mm handles. More compact design!
- STLs only on Printables - fewer files for me to manage for updates. Export STEPs from OnShape if you want them!
- All prior files and instructions placed into zip archive. The previous OnShape workspace can be found here
UPDATE July 15 2023:
- Added tip for random z-seam for Upper Mech to improve smoothness and reduce snagging
UPDATE July 5 2023:
- V2rc1 Upper Mech and Spin Ring - reduce lateral play and integrate spin grip
- Release candidate - needs more testing! Mine works great, but let's improve this together!
- Reduced radial forces on the gears help with binding issues
- The V2rc1 Spin Ring is bushing style. Lubricate with some paraffin wax for smooth action
- V2rc1 Spin Ring is NOT backwards compatible with previous versions of the Upper Mech
UPDATE May 29, 2023:
- V1.7 Upper Mech and Spin Ring - Improved mechanism smoothness.
- Reduced helix angle for more forgiving print.
- Outer lip on Spin Ring to better stabilize and hold the gears at their ideal vertical position. V1.7 Spin Ring is backwards compatible with V1.6 Upper Mech.
- See updated assembly instructions for achieving good alignment ("Attach the spin ring and handle" step)
UPDATE May 20, 2023:
- Compensate for material shrinkage, more forgiving basket fit (58mm)
UPDATE May 18, 2023:
- Initial release of 54mm version for Breville machines! The magnet versions have not been tested for fit of the magnets - please let me know if you can test this. The hole tolerances may need to be tweaked.
- V1.6 Upper Mech: Improved tolerance for both 58mm and 54mm. Calibration to achieve ~0.2mm XY tolerance is advised.
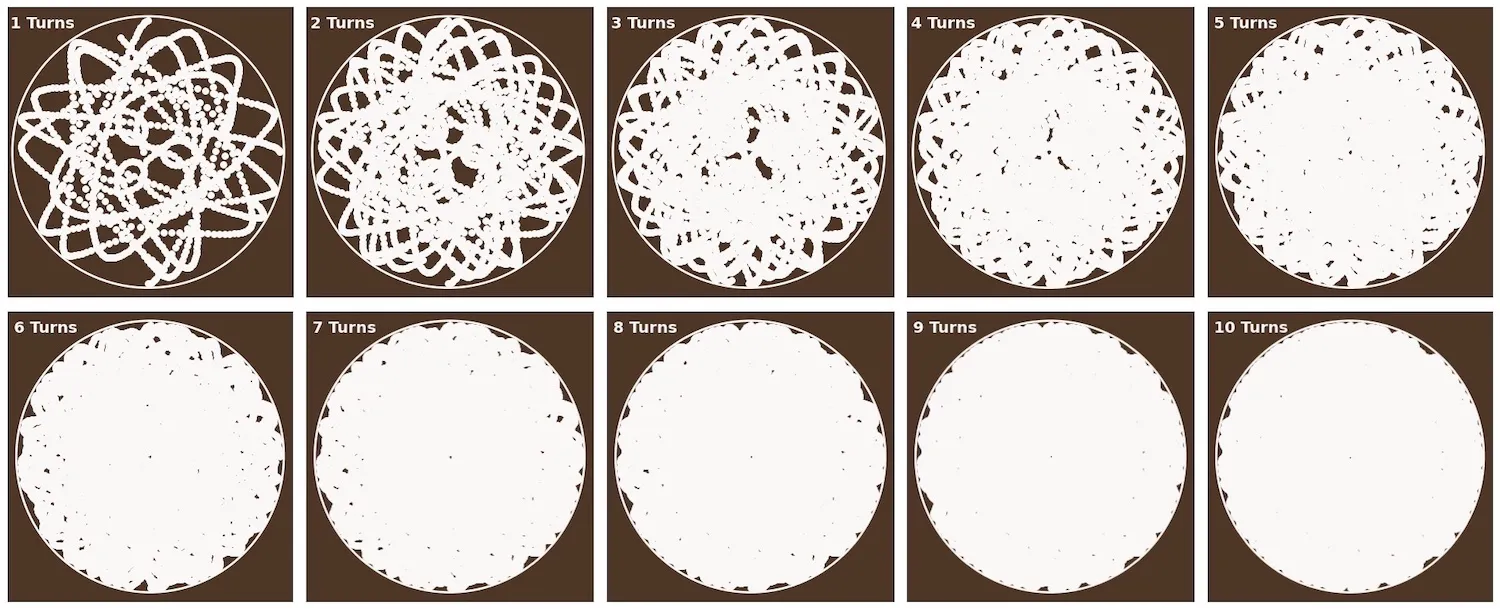
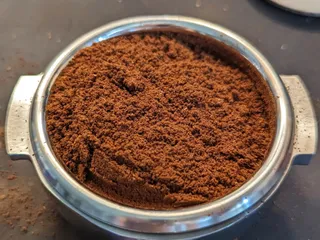
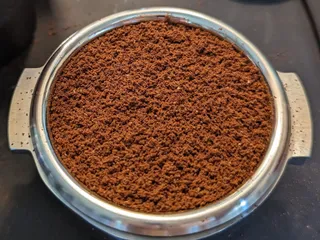
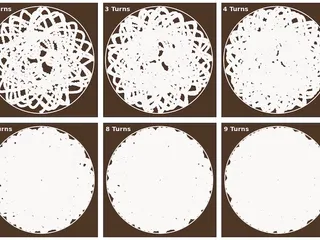
A common problem with many commercially available WDT tools is that they utilize concentric motion, which creates trenches in the coffee. The spirographic pattern avoids needles crossing the same path, with the goal of a more homogeneous particle distribution.
I have optimized the needle pattern for even coverage, and no more than 8 rotations of the handle should be necessary. Two different needle lengths provide deep and top of the bed distribution.

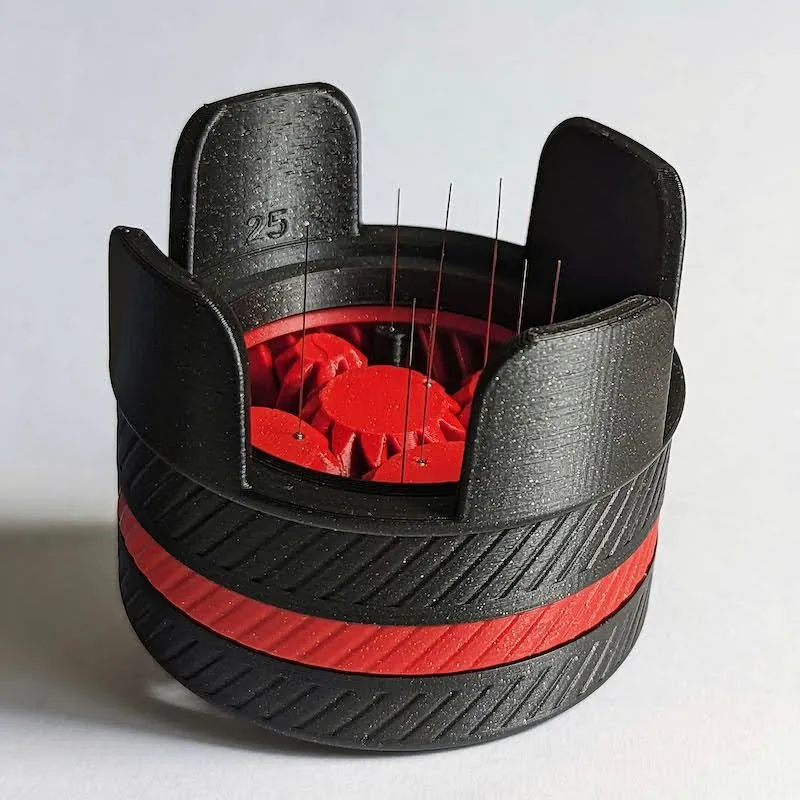
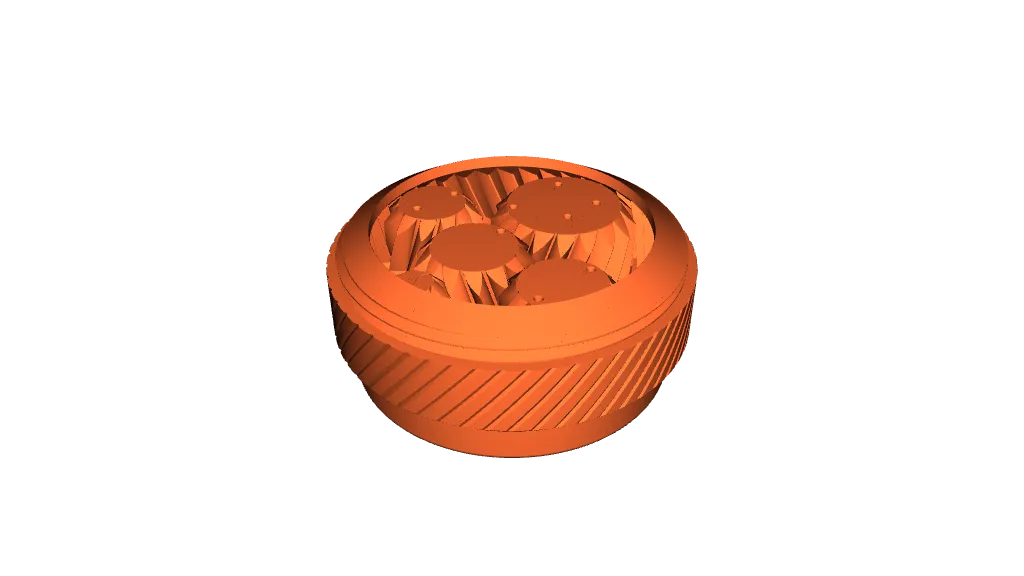
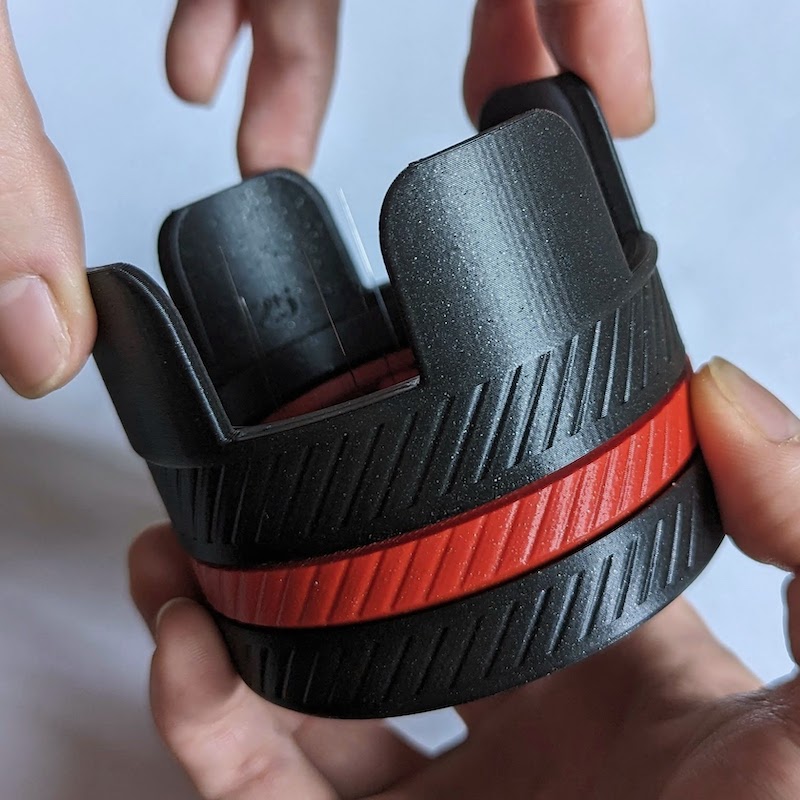
The needles are inserted from the top and are replaceable, and the base is swappable, allowing for configurable needle depth for different baskets, without needing to change out the needles. Optionally, you can print versions of the base that can house eight magnets and/or include a flange to interface with the portafilter lugs. A little de-bossed label to indicate a given base's depth is included for easier identification.
Instructions
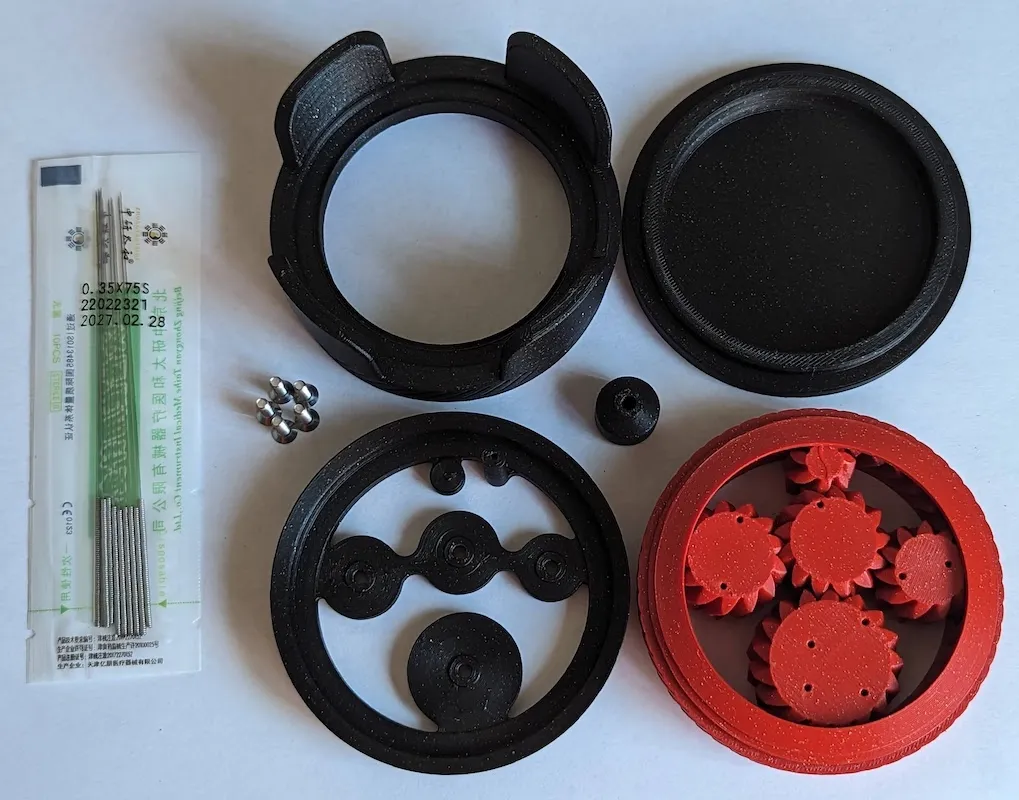
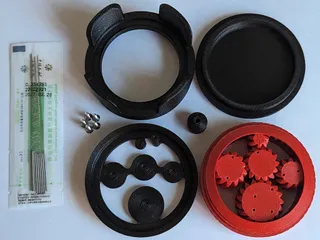
Gather your parts and materials.

For the non-printed things, you will need:
- 5x M3 x 12mm flathead/countersunk screws (if you have non-flathead/countersunk screws you would like to use, try the
noCountersunkfiles) - 10x 0.35mm acupuncture needles with a 30mm handle (Compatible with the same as the popular 9-prong tool, 0.35x75mm from aliexpress)
- OR! 10x acupuncture needles with a 20mm handle for the 58s (short) upper. 30mm handled needles can work with the 58s upper, but the handles will reach the basket lip with the 25mm depth base.
- [OPTIONAL] 8x 5x3mm magnets for the each base you wish to print
- Cheap flush-cutters you don't mind dedicating to needle cutting, or even better, a hardened cable cutter
- Screw-driver/Allen-key for the M3 screws
- A 3D printer
Print your parts!
I printed mine with PLA. You may want to print the Base part with PETG.
Personally, the contact time with the hot basket/portafilter has been short enough that I have not had issues with PLA - however, PETG, with its higher glass transition temperature, would certainly have reduced risk of softening.
Settings:
- 0.2mm layers
- 4 top/bottom layers
- 2 walls are sufficient
- 11% gyroid minimum (consider higher for more heft!)
- No supports
- Concentric top pattern for Spin Ring V2
- Concentric bottom pattern for Mech V2
- Random z-seam for Upper Mech can help with snagging and improve smoothness [Thanks to zumicroom in EAF]
The gears and needle holes require a good calibration (0.2mm XY print-in-place tolerance) and good quality filament!
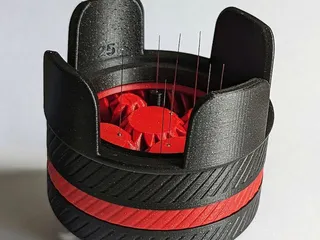
Printed Parts:
- 1x Mech (choose the short version for needles with 20mm handles)
- 1x Spin Ring
- 1x Handle (see Handle Options below)
- 1x Base (see Base Options below)
- 1x Stand (see Stand Options below)
Handle Options
The Handle is available in Small and Large. Which to use comes down to preference.
The pictured Umikot is fitted with a Small, which is good for small hands or those that want a delicate-operation feel (that is my personal preference, but go with what feels good for you!)
Base Options
The Base part is available in different versions for:
- Various needle depths
- With or without a flange that interfaces with the portafilter lugs/ears (
LongTab/ShortTab/NoTab)- The Long Tab version protects the needles, but is not compatible with many tamping stands.
- The Short Tab version provides the stability of the tabs, but loses the protection of the needles in favor of more tamping stand compatibility
- The No Tab version should be compatible with any tamping stand, and is available with holes for 5x3mm magnets (
5x3Mag)
Pick the needle depth that fits your 58mm basket. The filenames include the depth (i.e. Umikot58 - Base V2 25mm LongTab.stl). This is how deep the needles extend below the lip of the basket. See below for some common needle depths.
My favorite is the LongTab base.
Note that the default Lug files support PF lugs/ears <27mm wide. For a more tailored fit, or for wider lugs/ears like on some La Marzocco portafilters, check out the OnShape link to generate different widths.
I prefer versions without magnets, as it is easier to gently lift Umikot after distribution without disturbing the grounds. You may like the feeling of the magnets and the easier one-handed use they provide - pick what you like!
Common 58mm basket needle depths are:
- 15g basket
- 21mm
- 18g basket
- 23mm
- 20g basket
- 25mm
- 22g basket
- 27mm
- 25g basket
- 30mm
- Sworks 18-20g basket
- 23mm
- Weber Workshops 18-22g basket (old version)
- 24mm
- Pullman 19-20g basket, Weber Workshops 20g basket
- 25mm
Note: For the very best fit, measure the internal depth of your basket. The above are based on specifications and have not all been tested. Please let me know if these recommendations need adjustments!
Stand Options
Print the corresponding stand, LongTab, ShortTab, or NoTab, depending on the base you choose.
Cut the needles to size.
The designed needle depth for the various base files assumes the needle length to be cut precisely. If anything, favor slightly short. You only need to cut to the lengths described below. The base you choose is what adjusts the effective needle depth.
The needles are likely harder than the cutting edges of most cheap flush cutters, so be prepared to dedicate them to the cause. I used a very inexpensive one from a multi-pack I got off of Amazon. Even better, use a proper, hardened cable cutter.
Be very careful to safely dispose of the cut ends of these needles!
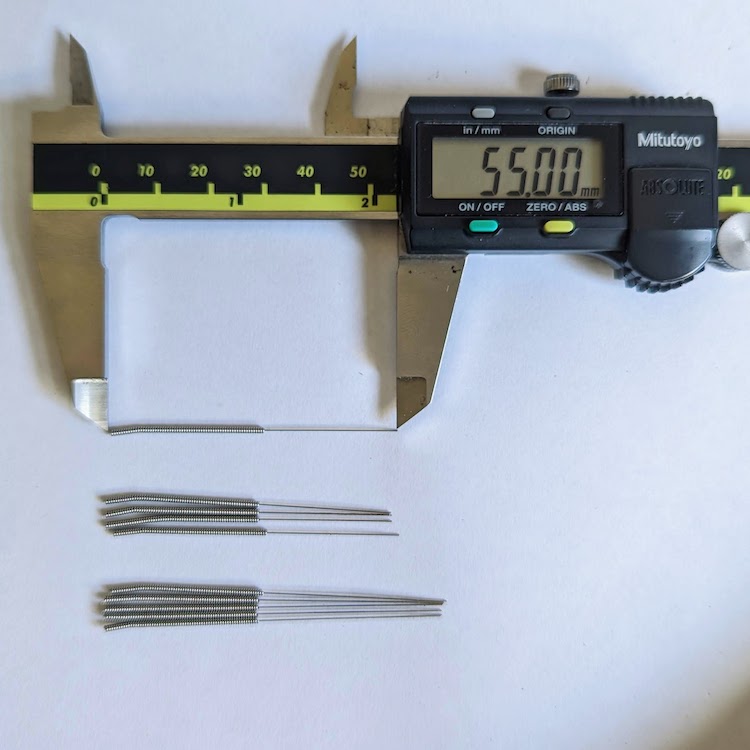
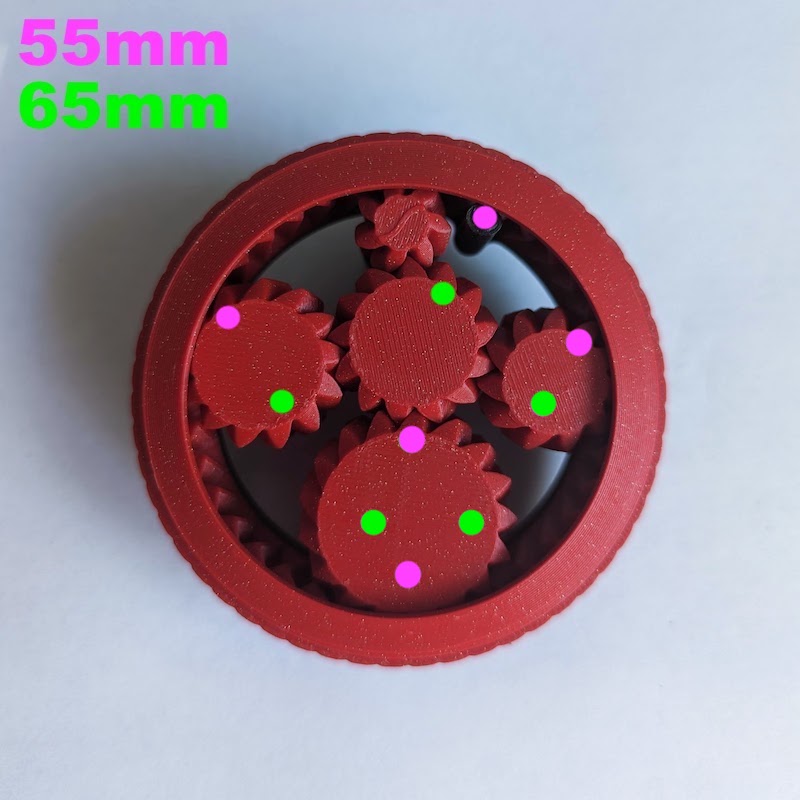
First, cut 5 of your 10 needles to a total length of 65mm (35mm needle + 30mm handle):
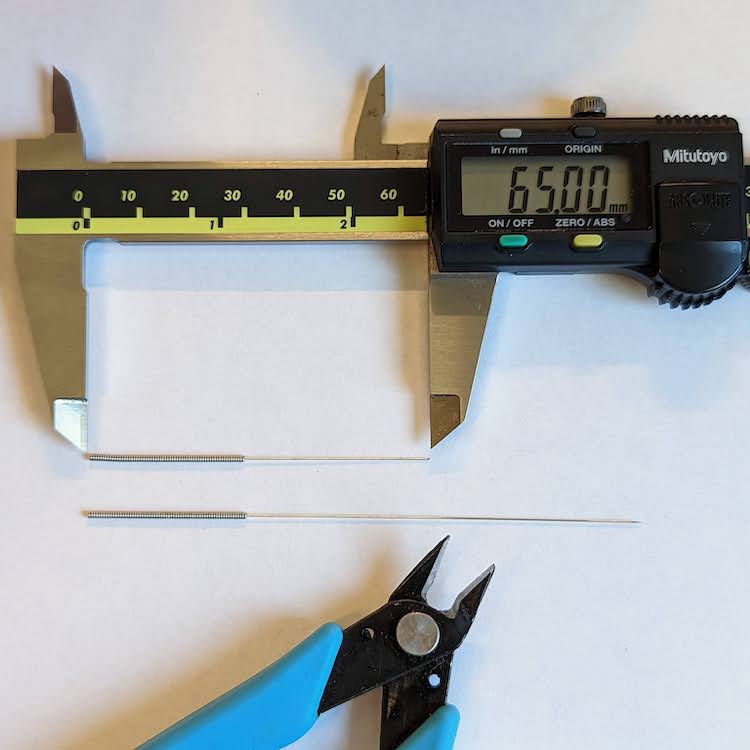
Cut the remaining 5 needles to a total length of 55mm (25mm needle + 30mm handle):
NOTE! For the Umikot58s SHORT version of the mechanism, cut all your 20mm handled needles 10mm shorter (55mm and 45mm).
Give the needle handles a slight bend
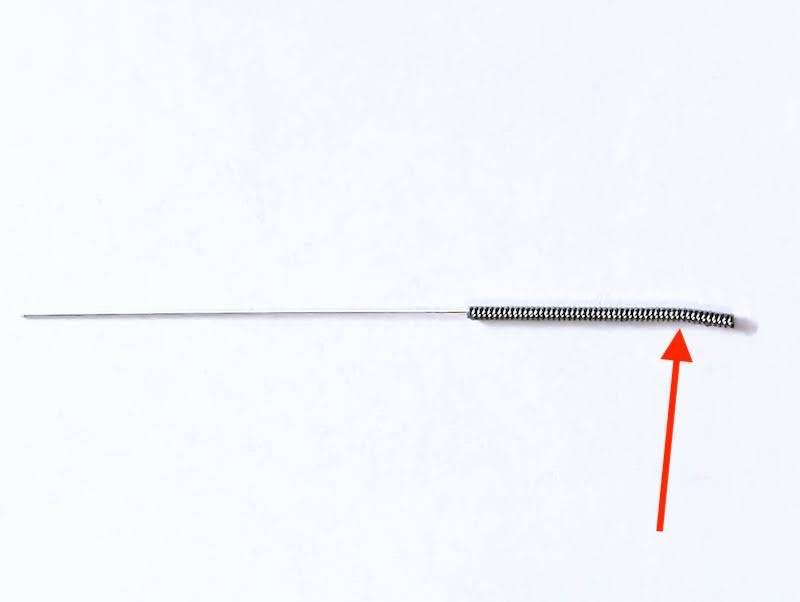
To secure the needles in their places in the gears, give them a little bend, like in the above photo. This way they won't rattle around, but can still be removed if they ever need to be replaced.
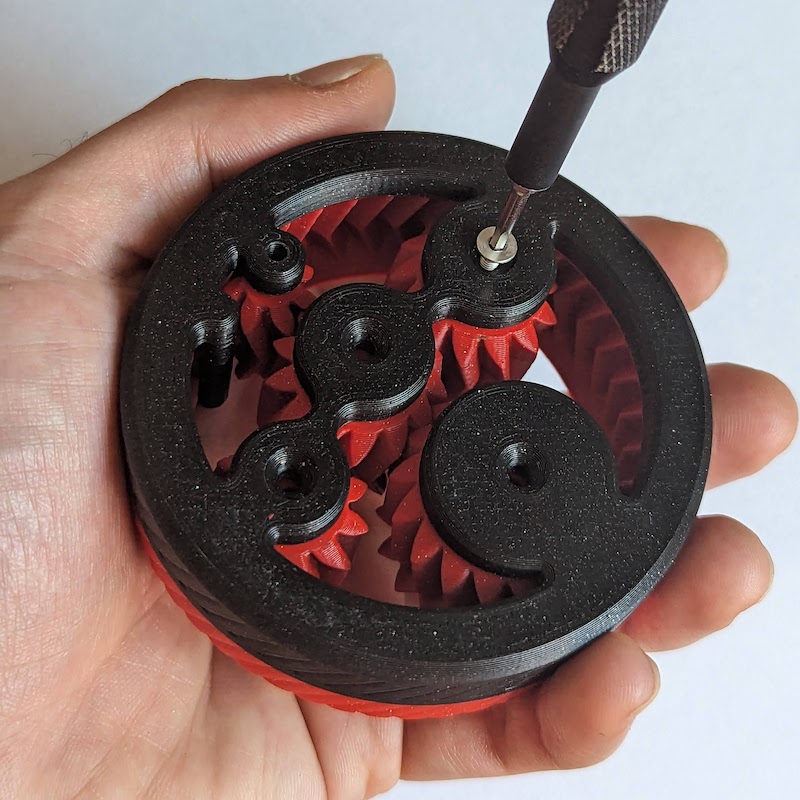
[Optional] “Tap” the gears' screw-holes
This step is optional, particularly if your screw holes are quite tight. To make our lives a bit easier later, “tap” the holes with one of your M3 screws. Carefully screw them into each of the gears' holes, stopping when you feel the resistance noticeably increase (you've hit the bottom) and then remove the screw. Repeat for each of the 4 larger gears. You will need to hold the gears carefully to keep them from rotating while you do this. Be careful you do not get pinched!
[Optional] Lubricate the Spin Ring
For the smoothest operation, the V2 mechanism can benefit from some lubrication. I recommend rubbing some paraffin wax (such as from a tealight candle) on the inner surfaces of the Spin Ring.
Attach the spin ring and handle
Gently screw in 4 of the M3 screws to attach the spin ring. Fully tighten until they stop (the mechanism should be locked). Then back out 1 turn, which will align the gears vertically to the outer ring gear.
Then, do the same for the handle, but only back out ~¼ turn:

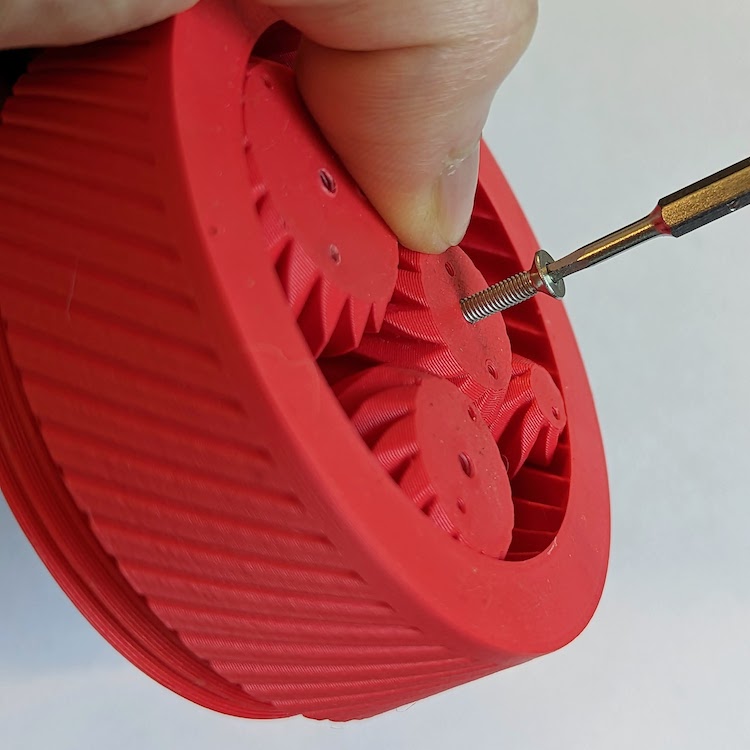
Insert the needles!
Be careful during this step - the trimmed needles are still thin and sharp! Gently insert each needle fully into the gears from the bottom. Do not force them! The slight bend in the handle will secure them. If a needle is too loose, make the bend a touch more.

(58mm Short version pictured)
See below for the needle pattern with respect to the different needle lengths:
Attach your base
[Optionally, press in the magnets if you went with the 5x3Mag version.]
Screw on your chosen base. You can change bases at any time, but be very careful when doing so, as the needles are pokey!
(58mm Short version pictured)
Distribute some coffee!
And that is it! If you chose the NoMagnet NoLug base or the Magnet NoLug base but your basket isn't very magnetic, you will need to hold Umikot down while turning the mechanism. Gently give it several rotations. At least 8 gives the pattern nearly full coverage, but I like to do as many as 12 - whatever gives you the best results!
The distribution must be done with the basket in a level position - otherwise, the grounds will tend towards whichever direction the basket is tilted.
Finally, remove Umikot, give the portafilter a tap to settle the grounds, tamp, pull, and enjoy your espresso!

Disclaimer: not all filaments, nor the 3D-printing process, are certified food safe. Use of this tool is at your own discretion.
Like what I'm doing and want to share the love? I always appreciate any support on Ko-Fi 😊
Tags
Model origin
The author marked this model as their own original creation.