Cooling tower for small details
Description
PDFI was looking for a small cooling test to tune in short layer time cooling, and decided to make my own, as i couldn't find anything simple for the task. Before using this I recommend calibrating your print temperature and flow rate. Personally I use this last or second to last before bridge cooling test. I like my test models small and simple, because I mostly print functional parts and thus some filaments are expensive. Using small and simple tests often give good balance on easily readable results with minimal waste. This tower has 20x20x5mm base if you want to check dimensional accuracy while printing these. I added it mostly for better bed adhesion, but decided to make it somewhat standard sized (XYZ cube) so it would add something more than just a base.
For temperature I use this model: https://www.printables.com/model/316034-temperature-tower
The given model is included in superslicer calibration files. You can also set temperature changes based on layer height on prusaslicer if that is your preferred slicer.
For filament flow I print a simple cube or Cylinder in vase mode and measure the layer width. I think this is the best method to use, since it requires the least amount of material. I included a simple cylinder, but you can also do these simple geometrical shapes easily with any 3d modeling software or even in some slicers with built in functions.
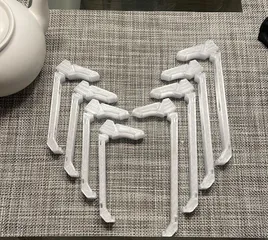
In included photos you can see how the smaller details get droopy due to insufficient cooling. I recommend printing maybe 2 or 3 prints, but of course results may wary. The filament used in photos is eSun ePA-CF.
I usually start with no cooling, if I need a baseline model and am unsure whether or not cooling is needed. (1st tower from the left)
Afterwards I increase fan speed (in this case 30%) and reduce the print time of which triggers the short layer time. You can check your layer times using the drop down selection in gcode preview in your slicer and look at layer time. Additionally you can make sure the given timelimit is reached by checking fans speed from the same selection.
After the second test I test layer adhesion by pushing the print sideways, forcing the layers to separate. (3rd from left) The print is small enough so this can be done with thumb, but be cautious not to cut yourself. If the print doesn't break with moderate force and the layers look as they should (no drooping etc) you have likely found a good level of cooling.*
*in my case the last spire is a bit wobbly, but for my use I rather lose some fine detail to achieve greater layer adhesion. I hardly ever print single wall tiny spikes anyway :D
I hope this helps someone dealing with high heat materials that benefit from just the right amount of cooling to get good results with good layer adhesion.
No gcode files included, since these tests need to be done specific to machine and speed. If you need to try larger i recommend scaling the model or creating your own with a 3d modeling software, since this is a really simple model that you can even use as a first model if you have no experience with 3d modeling. I recommend everyone that has a 3d-printer to try modeling, since it allows personal prints for specific needs. I printed mine with heavily modified ender3 that sits in a small closet to keep the heat in.
For any questions don't hesitate to ask. If I don't answer someone else might, I'm new to printables so I'm not yet familiar with all the features so might take a while to get fully acclimated. Nonetheless, happy calibrating :)
-Dog
Tags
Model origin
The author marked this model as their own original creation.


