Catan - base game 3D (high resolution MMU) - V2
Description
PDF----------------------------------------------------------------------------------------------------------------
Update Optional Storage Box
I uploaded all files needed to store all parts for 4 players within the original game box.
----------------------------------------------------------------------------------------------------------------
Update V2
The initial models included numerous overlapping volumes which did slice correctly in an older Prusaslicer version but not in recent versions. Therefore I reworked all files and removed all significant overlaps, and also repaired most meshing errors. All parts should print in the correct colours again (tested for Prusa Slicer V2.5.0). Additionally some minor inconsistencies were removed.
----------------------------------------------------------------------------------------------------------------
This is my take on a 3D Settlers of Catan (base game), which is compatible with and based on the hexagonal magnetic base plates designed by Dakanzla (https://www.thingiverse.com/thing:2525047; a remix of his base plate is here on prusaprinters: ttps://www.prusaprinters.org/prints/3471-magnetic-base-plate-for-settlers-20/files)
The set is specifically designed for printing with a 0.25 mm nozzle at 0.1 mm layer height and might not work out well with a regular 0.4 nozzle. While it is also designed for multicolour print with MMU2 (5-colours), it should be possible to print it in single colour too (simply change the setting to single material print in the Slicer).
Nowadays there are a couple of great Catan sets available here on Printables but when I started the work on this, the best design, in my opinion, was Dakanzla's on Thingiverse (https://www.thingiverse.com/thing:2525047). His work inspired me to try it myself to design my own little catan set. My first piece, the city, was inspired, ironically not by his city design but by his settlement design. I thought such a church belongs to the city and hence it started …
What I wanted to achieve with this design was to get an island that is as consistent in scale as possible (which still includes a number of compromises nonetheless of course) so that one can play the game on a somewhat believable gamified coherent island.
Addtionally I chose the colour set in a way that the island itself is a bit more muted in its pallette while the player figures feature strong vibrant colours to make it easier to see what is going on on the island.
This set is perfectly playable, I used it in real action already several times. It is not suitable for small children however as it contains peaky objects and while it is certainly durable enough for play, some elements will not withstand abuse. This is after all my private edition, so I don't have to make the compromises which official board game makers need to make. So I went for fine details. ;)
Printing advice
Printing with a 0.25mm nozzle and at a layer height of 0.1mm is tricky (clogging is your enemy) but perfectly possible. The MMU makes printing with them trickier as you are limited in the extend you can raise the nozzle temperature to prevent clogging. Therefore the choice of filament, which is less prone to clogging the nozzle during retractions, is important. One can also modify retraction parameters but that might in turn worsen stringing.
Many elements use double layer techniques for colour effect. You can see that in the slicer files when thin layers (0.1-0.2 mm) of one colour are on top of another colour. You should test with your materials if your combination gives a nice effect. The top colour should not be too opaque for that. You can use the “dual layer calibration” file to test the suitability of colour combinations.
Slicer seems to be rather buggy when opening existing projects. In order to see the project, open the file by using “open project” and immediately press “Slice” without doing anything else in between. The slicing can take considerable time for some objects but when its done you should be free to go back to the object mode. All the files are saved as 3mf sessions of Slicer as key modifications were done with Slicer options. Basically all files should be ready to print after slicing and exporting as gcode.
Print slow if things don't look good or fail
Adjust the printing speed at the printer directly according to needs. I generally set back the speed to 75%, sometimes 66%, once beyond the easy to print base section. The forest is especially tricky and might be better to print at 50% speed.
Coast frame tiles
The 3 different coast frame tiles are actually 7 colour prints with magnet insertion step. So they have 3 stops introduced via g-code (go to the Preview window and look at the height ruler, there you have to right lick on the + symbols and choose “edit g-code” to view the added g-code for the pause function). Change at the first pause from blue to green, at the 2nd stop from clear to brown. At the third stop comes the addition of magnets (same as in the hexagon bases: 3x6 mm). When you want to resume the print, press the knob one time. The display should show “heating” then. Do not press the knob more often than that as it might cancel the heating and lead to a mess when the printer resumes nonetheless.
In order to prevent inverse warping after removing the ocean tiles from the build plate these elements are printed at only 40°C bed temperature. Use a Kores stick or something equivalent to prevent adhesion problems.
Post processing
I smoothened the token surface on both sides with 1000P wet sanding paper. This creates wonderfully smooth surfaces that look really great in my opinion.
Crossings, settlements and cities are printed with a support ring. This needs to be broken off. The underside of the extensions might need to be cleaned by scalpel from excess material. If layers are too fused, one can lower the support rings by 0.1 mm in the 3mf file.
Desert? What desert?
My island is far too lush to have a desert. It has a big castle though! And those knights are nasty and collecting taxes across the island, almost as if they were robbers. Players might influence them though where to go next for the tax.
What else is needed?
Additionally to the elements included here, one needs only 19 copies of a magnetic base plate like this one here on prusaprinters or any equivalent design on thingiverse:
https://www.prusaprinters.org/prints/3471-magnetic-base-plate-for-settlers-20/files
To play the game you need a copy of the base game for the cards and dices.
Optional Storage Box
The files include figure boxes (for settlements, cities and ships) and road tile boxes (for roads and crossings) as well as a try for each where the boxes of four players can be easily stacked on top of each other. The frame parts A and B need to be glued together with superglue.
The regular frame parts are added according to numbering from left to right. Whereas on the right end the vertical frames are added (which are also assembled according to number from the upper to the lower side). All frame parts are to be glued together with super glue. On the top side there is sufficient space to store the figure box and road box stacks.
The castle/desert tile, the mountain tiles and the coast tiles need to be stored in there respective frame part. The remaining tiles fit in all the remaining tiles spaces interchangebly.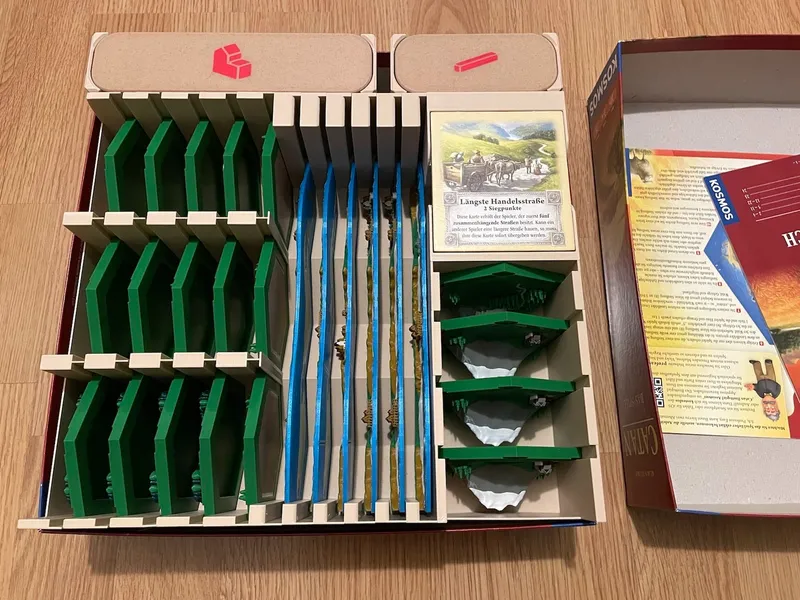
Optional short figure box
The stock figure box includes 6 slots for ships which are an optional cosmetic add-on (https://www.printables.com/model/63150-moored-sailing-ship-catan-high-resolution-mmu-cosm). If you want to have a figure box without those ship slots, there is a folder with a shorter figure box just for settlements and cities.
List of filaments I used (as a starting point, all of those should be available form 3djake.com and shop.prusa3d.com)
- Fillamentum PLA Extrafill Luminous Green
- Fillamentum PLA Extrafill Green Grass
- Fillamentum PLA Extrafill Orange
- Fillamentum PLA Extrafill Mukha
- Fillamentum PLA Extrafill Traffic White
- Fillamentum PLA Extrafill Light Ivory
- Fillamentum PLA Extrafill Electric Grey
- Fillamentum PLA Extrafill Concrete Grey
- Fillamentum PLA Extrafill Crystal Clear
- 3DJAKE rPLA Orange (actually a clay like brown)
- 3DJAKE ecoPLA – Brown
- 3DJAKE rPLA Blue
- 3DJAKE ecoPLA Satin Gold
- Prusament PLA Opal Green
- Prusament PLA Lipstick Red
- Prusament PLA Jet Black
- Prusament PLA Azure Blue
- Prusament PLA Pinapple Yellow
- Formfutura ReForm - rPLA Caramel
- Fiberlogy Easy PLA Beige
- Filament-PM PLA Silver
Disclaimer: This is a non-commercial unofficial fan design and I have no affiliation to the publisher Cosmos or the game designer Klaus Teuber. This design includes small and pointy objects and is not suitable for small children.
Tags
Model origin
The author marked this model as their own original creation.