Roller Door Box v2
Description
PDFThis is a remix of https://www.printables.com/model/157965-rolling-doors-box. While I took the original design concept, I completely created my own parametric design in Fusion 360. There are a lot of benefits of this design (IMHO), but there are also some cons. The biggest con is that with fewer pieces in this design you get fewer options for color pops, which the original design allowed for. The other big con is that while the new design does still have an overall hexagonal shape at the ends, there is no hex relief on the sides which is aesthetically appealing. The new design is fairly plain in comparison. As a note, the print times between this new design and the original design is pretty much the same. The new design uses ~20% more filament.
The design improvements:
- Parametric sizing: While there are some practical minimums, you can create whatever size box you want
- Simplified printing (fewer pieces): There are only three pieces to print (Sides (x 2) & Door). The box interior (floor) is included with the side itself.
- Better door length: I found the original design to have a door that's way too long and that caused issues when trying to open the box all the way (the door popped up on the far side). While I do not believe I have nailed this 100%, I believe that the door sizing now adjusts such that it is long enough to cover entirely, but short enough to not pop up on the far side when opening all the way. The rib count on the door also automatically adjusts based on it's length.
- Improved door flow: I believe that the geometry of the door pathway is better. I have printed several sizes of this new design and I feel like the door opens/closes smoother.
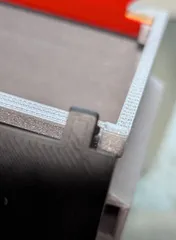
- Door stoppers: When the box is closed (or fully open) on the original design I found it hard to grip the door handle. I added stoppers to both sides so that it is kept far enough away from the box that you can easily get it to move.
- Auto-adjusting alignment tabs: Based on the size parameters, the alignment tabs adjust their position and size.
- Middle divider gone: While this may be a bad thing for some, I found the middle divider to be annoying. There was no slope built in to help get small parts out easily. I removed it entirely, although it could be added back fairly easily if you wanted to.
- More convenient ergonomics: The ends of the old design (the opening) had some lips that I found made it hard to use a finger to remove parts from the box. I redesigned the geometry of this to remove the lip and make a smooth/gradual face so that parts can easily be retrieved/fished out the end.
Suggested print settings:
Sides (x2):
- PLA
- Layer height 0.20mm - 0.25mm
- Infill: 15%
- Supports: N/A
Door (x1):
- PETG (important!)
- Layer height: 0.10mm
- Infill: 15%
- Supports: N/A
- Perimeters: 1
- First layer height: 0.10mm
- Note: I'm new to this in general but I found PETG to be much harder to get good prints when using such small layer heights. Ensure you have your printer dialed in and the nozzle height set appropriately. I had to tinker a bit until I found the sweet spot.
Assembly:
- Clean up the pieces and do a test fit
- Insert the door into the guide rail in a fully open position (such that it is in the bottom channel)
- Drop CA glue in the recessed alignment tabs of both side pieces. Don't overdo it, you don't want any squishing out and interfering w/ the door movement.
- Carefully align the sides and ensure the door guides into the guide rails
- Open the door fully so that any excess glue does not get onto it
- Gently clamp the pieces to dry
Tags
Model origin
The author remixed this model.


