External Flash Tripod Mount
Description
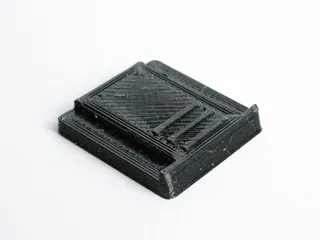
PDFAdapter for mounting external camera flashes with hot shoe connector on generic camera tripods.
Supports classic 1/4" screw connection but also Arca Swiss-like quick release systems, including Peak Design's Travel Tripod.
Also features a locking hole to secure the flash to the adapter, compatibility with Peak Design's Capture clip, as well as pass-through holes for Peak Design's anchors.
Print instructions
Settings
- 0.4mm nozzle
- 0.2mm layer height
- 2 perimeters (a higher count will likely mess with the hot shoe overhangs. If you want to strengthen the screw thread, you should do it with modifier geometry. The thread is 5.5mm deep.)
- 20%+ honeycomb infill (higher density recommended for non-PC material)
- Generate supports only on build plate (upper supports are baked into the model already)
- Detect bridging perimeters on
- Support overhang threshold angle 45°
- Infill bridging angle 180° (bridging should go the short way from the custom support wall towards the sides of the hot shoe, as pictured in the slicer screenshot)
Material
Printing with Polycarbonate is strongly recommended. I personally use PolyMax PC as it seems to be the strongest variant out there, costing not that much more money than Prusa's "PC Blend". To print this part, it was not necessary to use a glue stick on the smooth PEI sheet as the contact surface is so small. It easily came off without damage to the sheet after it cooled down. Beware though that removing the supports is an absolute PITA with this material due to the extreme layer adhesion - you have to apply a lot of force with the scalpel, so protect your fingers.
This can of course also be printed with PETG or PLA, but of course this comes with a strong penalty regarding durability. Flashes usually aren't so heavy, but I wouldn't want to trust my gear to a PETG print of this even though it usually is my preferred material for functional parts.
Support removal
Tools
- Pliers
- Scalpel (ideally with thin triangle-shaped blade)
Upper custom supports
Take scalpel, insert it between the outer wall of the slot and the support structure at the very top, just below the overhang, with blade directed inwards. Blade should touch the inner corner between support structure and overhang. Push scalpel in slowly to cut off support structure at the top. Move scalpel position to perform the cut all the way to the end. Then use pliers to tear support structure off the bottom of the hot shoe slot.
Lower auto-generated supports
Take pliers, grab the thin strip of support material protruding from under the part, slowly apply a rotating motion to peel it off the part from the corner inwards. Then use scalpel to shave the support structures off the underside of the part as cleanly as possible.
Tags
Model origin
The author hasn't provided the model origin yet.


