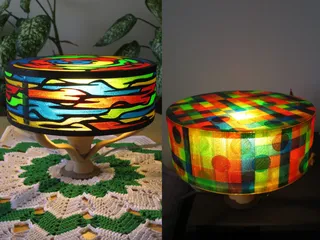
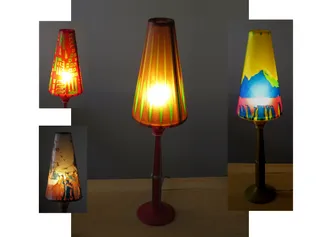
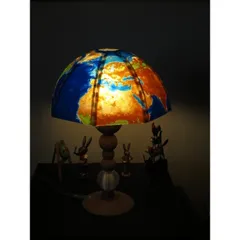
Tiffany Lamp nach Art des Frimmels
Description
PDFI have named this lamp "Tiffany Lamp nach Art des Frimmels" as the design idea was to use the idea of Tiffany glass art. The lamp was originally published by me on Thingieverse some time ago in order to cheer people up a bit during the early days of a virus. However as I suspect some prusa printer owners haven't yet found it, and there is a lamp contest going on, I publish it here as well. Moreover, I added a fifth lamp shade pattern I drew some time ago, never before published. The lamp measures around 40cm of height, and 24 cm by each side.
Basically, you need to print a lamp base (a 2-material .3mf, around 24 hours), some shade lock parts (three single-color .3mf, total of 2 hours), and the shade of your choice (4 prints using 4 or 5 materials, around 3 hours per side). Please note that some shades consists of four .3mf files, other shades have only a single .3mf that should be printed four times.
You might consider using my good old temperature correction script for the wipe tower, as found in: http://www.frimmel.se/print3D/ (the script patches the gcode to better filament change and wiping temperatures).
Please see the screen dumps of the setup and verify your setup looks alike (eg for some newer PrusaSlicers I have seen the wipe tower move around, just move it back into place if so). Please also note, I have added some "attachment supports" to the wipe tower and some parts in order to make them attach more firmly to the print bed (you don't want them to come loose after 24 hours of print).
This lamp was designed using blender, freecad-daily, gimp and inkscape. If you would like to see my other designs, just search for "frimmel" at https://www.thingiverse.com.
Please be aware that my designs are generally CC non-profit. Please respect this decision, as I drew all the bears, sea horses, lamp foot et.c. myself.
Before you print this lamp, be sure to actually read the printing instructions.
Print instructions
The various parts in brief
The lamp base is constructed in several parts in order to efficiently print it using the MMU. I have printed it in (PolyAlchemys) ELIXIR and PLA with quite stunning results. Also, I have printed it using woodfills to get a more adult finish. I slice it using layer height 0.3mm in order to save time - with e.g. wood fills sometimes it is even hard to notice the difference from 0.15mm.
For the lamp shade, you should use transparent PETG or equivalent AND you should use the "powder coated" plate if you own one, as this will render a "pearl" look to the transparent surface. Most lamps, I printed using Filament-PMs range of PETG, which I think really looks nice. With Filamentums CPE-HG100 some shades will look just beautiful! the good thing is, there are only a few material shifts so the shades are printed much faster than you might expect. The lamp shade should be sliced with layer 1=0.2mm and all other layers 0.3mm.
Consider using matching colors for shade lock parts and the lamp base. Also consider to swap some colors for two of the sides to get some additional variation (not the least useful if you print one of the single-pattern shades).
I have printed the lamp using various material. With eg woodfill the threads might become almost too tight. However, for me it was still quite easy in the end: I just screw the part on for a few degrees at a time (until it gets almost stuck), then unscrew a bit. By repeating this simple pattern, I could fully attach the threaded parts without using too much force even for woodfills. Then again, another solution to the tightness would be to scale one of the parts by 1-3% in X and Y direction (you can easily do this in the slicer). If you still have problems with this, then please visit the original thingieverse publication (https://www.thingiverse.com/thing:4267782) where I have added some custom parts for such rare cases)
Please adjust temperatures and material parameters for your print- e.g. the temperatures I have setup in the .3mf might be wrong for you.
Parts to print
Lamp base (2 materials, print time 24h)
lampfot_komplett_KjellCo_xy0.4mm_z0.3mm_ELIXIR_PLA.3mf
Top part connecting the lamp base and the shade, and parts to lock the shade parts together (each part 1 material, print time 24min + 1h + 46min)
pelarkopplingsbit_PLA.3mf
skärmfästet_4hörn_ELIXIR.3mf
skärmlåsbit_topplås_ELIXIR.3mf
Theme 1: cartoon animals (5 materials, print time 3h per side)
skärmsida_djur_Brunbjörn_xy0.4mm_z0.3mm_PET_PET_PET_PET_PET.3mf
skärmsida_djur_Mickelräv_xy0.4mm_z0.3mm_PET_PET_PET_PET_PET.3mf
skärmsida_djur_Orlando_xy0.4mm_z0.3mm_PET_PET_PET_PET_PET.3mf
skärmsida_djur_Primus_xy0.4mm_z0.3mm_PET_PET_PET_PET_PET.3mf
Theme 2: leafs (5 materials, print time 3h per side)
skärmsida_Göllersdorf_xy0.4mm_z0.3mm_PET_PET_PET_PET_PET.3mf
Theme 3: petals flowers (5 materials, print time 3h per side)
skärmsida_petals_xy0.4mm_z0.3mm_PET_PET_PET_PET_PET.3mf
Theme 4: vine (5 materials, print time 3h per side)
skärmsida_rankorA_PET_PET_PET_PET_PET.3mf
skärmsida_rankorB_PET_PET_PET_PET_PET.3mf
skärmsida_rankorC_PET_PET_PET_PET_PET.3mf
skärmsida_rankorD_PET_PET_PET_PET_PET.3mf
Theme 5: sea horses (4 materials, print time 3h per side)
skärmsida_sjöhästA_xy0.4mm_z0.3mm_PET_PET_PET_PET_PET.3mf
skärmsida_sjöhästB_xy0.4mm_z0.3mm_PET_PET_PET_PET_PET.3mf
skärmsida_sjöhästC_xy0.4mm_z0.3mm_PET_PET_PET_PET_PET.3mf
skärmsida_sjöhästD_xy0.4mm_z0.3mm_PET_PET_PET_PET_PET.3mf
About electricity
The lamp is set up for an E14 lamp socket found for example at the "Kjell & Co" shops in Sweden (https://www.kjell.com/se/produkter/hem-kontor-fritid/belysning/lamptillbehor/hallare/lamphallare-ojordad-e14-p39361) but available world wide, e.g. search ebay for "socket e14 lamp". Obviously, you will also need to buy an electric cable including a connector (I bought mine at "Clas Ohlson" in Sweden).
You must ENSURE not to overheat the printed parts so take good care of which lamps to use. Personally, I use LED lamps of no more than 3W in my constructions.
Assembly
Please have a look at the attached images before mounting the lamp, it is much easier than just reading this text. Especially, the lamp shade parts can be "zip locked" together easily, then locked into place by the square lock piece which has small indentations for this purpose (have a close look at the piece before mounting the). For the lamp base, ensure to do the electrical wiring properly (NEVER do this yourself if you do not precisely know what you are doing - ask a friend for help). Start by pushing the electric cable through the foot part, then the middle part, and finally the part that will contain the bought lamp holder. Attach the cable and the lamp holder (the electric part). Screw the lamp holder container onto the lamp holder, the lamp shade holder onte to tlamp holder, and the little lamp holder top cover. Be aware, that when finally screwing the lamp foot together, simultaneously counteract the twisting of the electric cable inside (un-twist the cable through the exit hole in the lamp foot)
How the lamp shade modifiers are set up
As an example, this is a list of all parts and modifiers in "skärmsida_djur_Brunbjörn_xy0.4mm_z0.3mm_PET_PET_PET_PET_PET.3mf":
skärmsida.stl color 1, main skirt object
skärmsida_26g_Brunbjörn_4färger_A_MODIFIER.stl color 2, modifier
skärmsida_26g_Brunbjörn_4färger_B_MODIFIER.stl color 3, modifier
skärmsida_26g_Brunbjörn_4färger_C_MODIFIER.stl color 4, modifier
skärmsida_26g_Brunbjörn_4färger_D_MODIFIER.stl color 5, modifier (the background color)
skärmsida_26g_svartkant_MODIFIER.stl color 5, modifier (the frame)
Tags
Model origin
The author hasn't provided the model origin yet.


